Custom Grad Portrait and a Commemorative Wreath
I'm sharing two fabulous grad projects with you that are budget friendly and will honor your graduate during their special party.
Affiliate links provided for your convenience. View my full disclosure policy here.
If you're looking for affordable projects to celebrate your graduate, you're going to love these ideas! Today I'm sharing how to make a graduation wreath highlighting your child, as well as an extra large print. Keep reading and I'll show you how to make each one.
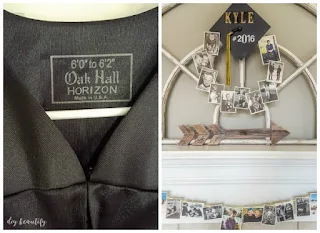
Nothing shows the growth of your child quite like a Commemorative Grad Wreath. I was inspired to make this after seeing the Grad Wreath on Joyful Scribblings. I made several changes to mine, making it unique and even more budget-friendly!
This graduation memory wreath is one of my top-pinned projects. It's been featured at Joann, Better Homes and Gardens, Parenting Magazine and more!
Graduation DIY projects that won't break the bank
How to make a graduation memory wreath
Supplies
-
wreath form - straw or Styrofoam will work best (or if you're
cheapthrifty like me, make a wreath form by attaching the ends of a pool noodle with duct tape and wrap with strips of canvas drop cloth (see image below) or fabric in the color of your graduate's school - metal fasteners
- black button
- heavy black card stock (I used Bazzill Basics; it's the perfect weight)
- hot glue and glue gun
- 8-12 pictures of your child (wallet size will be too small for this wreath; just print favorite pictures and then crop them all to roughly the same size)
- E-6000 glue (or another strong, quick-set glue)
- large alphabet stickers (I like white because it shows up so well on the black, but other light colors would probably work as well if you want to coordinate with your child's school colors)
Large white stickers on the mortarboard spell out his name and graduation year.
Adding the pictures of your child
- I collected favorite pictures of my son from birth through present and glued them to black card stock to give them structure, leaving a small outline. My paper trimmer saved me so much time on getting the cuts perfect.
- I used a dab of hot glue on each mounted picture to attach them to the wreath form, overlapping them slightly.
And that is it! Easiest and most memorable wreath ever! It makes a huge impact, is totally personal, and fun to see how my son has changed over the years.
This memory wreath could be used for any graduation...kindergarten, 8th grade, college, nursing school, etc! Use your imagination and make it your own!
I'll admit that I did shed a few tears as I reminisced at the little boy who seemed to grow into a young man overnight. I will treasure this wreath for many years (and I'm sure his future wife will too).
Update: Don't miss the black and white version of this wreath!
How to make large custom graduate portraits
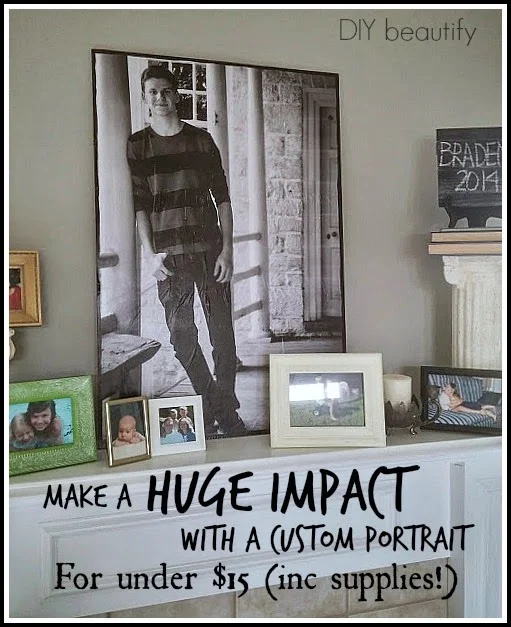
This budget project satisfied my desire for something bold (and inexpensive) at my son's graduation party. I made 2 of these large prints and they definitely made a statement!This extra large project involved taking my flash drive of grad pics to Staples and requesting Architects or Engineers prints (if you have a copyright on your pictures from the photographer, please don't ignore it...my pictures were all taken by a friend who gave me creative license to do what I wanted with them).
Engineering prints are usually about $3.50 but they were having a sale and they were $3! The prints are 2' x 3'...very large...perfect for making a statement. They are printed onto regular copy-type paper and they are only available in black and white.
Note: since making this project, I'm not sure if you can still order the prints as I stated above. Another option is to have them printed at Walgreens as a "poster print". It won't be quite as large, but still makes a big statement! Be sure to wait until they have a 50% off sale!
I was initially going to decoupage my pictures onto two canvases, but the price for that size of canvas was well over $30....so I sent Mr DIY to Home Depot to look for some thin, lightweight wood that we could use instead.
He came home with this weird wood that I'd never seen before called triply underlayment, with the pieces already cut to size. It's a nice thin wood. One 4' x 4' piece was enough for 2 canvases, and cost only $10, making each canvas only $5 each! And there's a nice strip leftover for another project like a sign.
Supply List for Custom Canvas:
- engineering print
- canvas or wood, cut to size
- ModPodge
- foam brush
- black acrylic paint
Total Cost for 2 canvases was about $26 including all the supplies
I would highly recommend before you begin adhering your print to your surface with Mod Podge to go online and do a search on Mod Podge Tips. There are YouTube videos and other tutorials that will walk you through how to properly apply it so that you don't get wrinkles. I didn't know this and didn't do it, so my artwork is quite badly wrinkled. Thankfully my darling graduate likes the rather 'grunge' look of it and told me not to worry about it when I was fretting over all the unsightly wrinkles.
So I'll tell you what I did and then I'll show you a mess of pictures 🌝
I brushed a layer of Mod Podge onto the wood and laid my print on top and smoothed it out as best as I could and then left it alone to dry.
When I make another one, I'll roll my print up from top to bottom and apply it a little at a time, unrolling as I go and pressing to get the bubbles out. Aren't you happy you can learn from my rookie mistakes?!
Once that dried I flipped it over and using a craft knife I cut off the excess paper that was hanging over the edges of my wood. The wood acted as a guide for cutting. Simple enough.
Then I turned it back over, front up, and brushed a layer of Mod Podge on top of the print. I was going for some texture and decided to try a technique for creating texture on canvas I read about online by pressing a small canvas directly down onto the wet Mod Podge. This did give it a unique look as it dried. The wrinkles interfered a little though.
After that was dry, I brushed black craft paint around the edges of the wood and up onto the print. When I had it printed at Staples, three edges had a white border so I wanted to cover that up. I gave the whole portrait a hand-painted border of black. I wasn't going for perfection....remember the wrinkles?
Okay, here's some pictures of the process I just described:
You can see the texture that was created by pressing the canvas onto the wet Mod Podge in the picture in the top right hand corner.
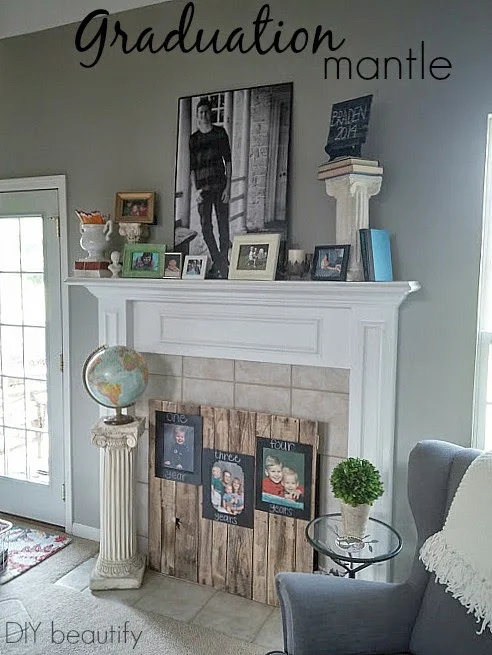
This one looks great as the centerpiece of my Graduation Mantle...I mounted the other portrait on a tall display easel just inside the front door.
and a couple more...
If I've inspired you today, please consider subscribing to my blog so that you never miss a post!
bringing beauty to the ordinary,


Both are great. I especially love the large photo! thanks for sharing with SYC.
ReplyDeletehugs,
Jann
Thank you; they were sort of last-minute projects but were fast and easy to do!
DeleteLove the wreath....think I may try this with my first born's grad party this year!!
ReplyDeleteLoved the ideas! Did not get the great price break for engineer print. Was told photo uses much more ink, therefore I had to pay $20. Still loved the out come. Thanks for sharing!
ReplyDeleteThanks so much for letting me know your project turned out! I can't believe how much you had to pay for the engineer print! I wonder if they've raised the price because so many home decor enthusiasts figured it out?!
DeleteWhat size was the grad cap, I’m thinking 12x12? TIA!
ReplyDeleteSorry for not including this info, I just updated the post. It was a 7-1/2" square; it will really depend on the size of your wreath; make it the size that looks best.
DeleteThanks for this tutorial. What did you use for a hanger on the back?
ReplyDeleteI tied a ribbon around the wreath before attaching the mortarboard, and hung it from the tied ribbon!
DeleteReally adorable wreath! What size letter/number stickers did you use and what size are the mats for each picture?
ReplyDeleteThanks so much,
Ria
Thank you Ria! The stickers are 1-2 inches tall. My pictures are about 3x4s and so the black mats are just slightly bigger.
DeleteMy graduate had a combined open house so as part of the prep, I gathered the wreath supplies; the grads were assigned to chose and print their favorite photos from school years; and an evening was dedicated to the grads assembling the wreaths together. They had so much fun and it generated so many memories! The wreaths were a wonderful (inexpensive) addition to a wonderful celebration! Thank you for sharing!😊
ReplyDeleteThat is a wonderful idea Elaine! Thank you for sharing!
DeleteThanks for the great ideas! I was wanting to know how you can make 2 wreaths from 1 large pool noodle? It is harder to locate the pool noodles in the winter time so I need to stretch them as much as possible. Thanks so much for the info!
ReplyDeleteGina
Indiana
Thank you for this great post. You inspired me to make a graduation wreath for my son. Instead of a pool noodle, I used a metal wreath I found at a dollar store. It is sturdy and worked very well. I used graduation themed paper napkins to cover the metal wreath. I could not find black card stock paper, so bought a black poster board which I then cut up to make the cap and background paper for the pictures. The dollar store also had graduation theme gift bags with 2020 tag which I cut up and pasted on the cap for embellishment. It all came together very well. All under $5.00.
ReplyDeleteYour wreath sounds amazing Arpita! Thanks for letting me know! I love that you made it for only $5!!!!! I'm sure your son will enjoy it 😉
DeleteLove this! I am in the process of making this for my son. QQ do you have to wrap the pool noodle in fabric? I purchased pool noodle in the colour of my sons school theme wonder if I still need to cover in fabric
ReplyDeleteThanks so much for this! I absolutely love the wreath! Think I'm going to give it a try for my son's graduation this year!
ReplyDelete