Knock-Off Ballard Inspired Curtains
I have had a bit of a love affair with a jumbo damask stencil that I recently purchased! I've used it all over my home, most recently in my master bathroom.
These curtain panels, inspired by Ballard Designs, were created with a stencil that you might recognize. A very hardworking stencil! If you're new here, and you haven't seen the stenciled wall I painted in my master bedroom, you need to go check it out.
It took an entire day to paint and stencil a wall in my master bedroom. It was a lot of work but worth the effort; we absolutely love it! Affiliate links are included for convenience; you can find my full disclosure policy here.
My master bathroom was painted in Sherwin William's Gris. It's a lovely blue-grey color, very soothing. It's also the color I used for the stencil in my bedroom - tying these two rooms together.
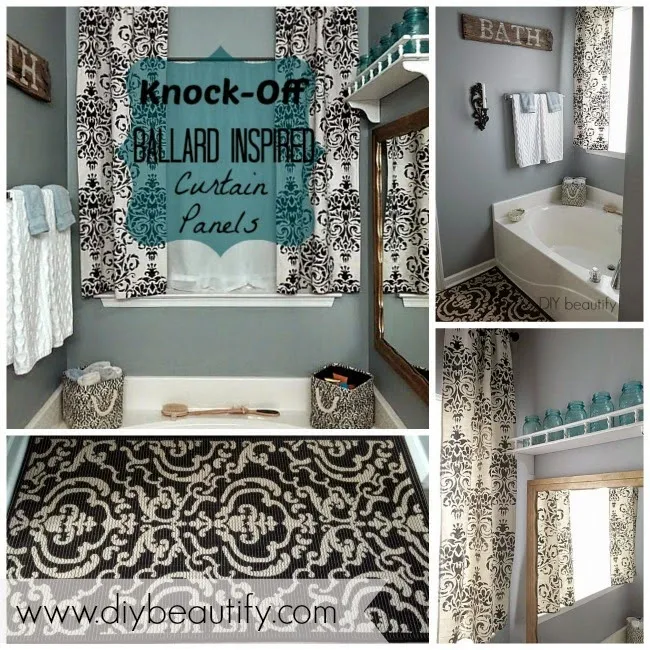
My ensuite bath is a smaller space and I wanted to go bolder and more dramatic yet have it be a cohesive look with my bedroom. I decided to create curtain panels using drop cloth and my damask stencil, inspired by these curtains in Ballard's catalog...the Concorde Panel.
The panels start at $55 each. Wowzers! I knew I could recreate them at a mere fraction of the cost!
Here's a little play by play...
Unlike my stenciled wall, where the stencil is more spread out, I chose to paint these as close as possible for a more saturated look. You can find more instructions about painting with a stencil over here.
This project took one small sample size jar of black paint from Home Depot.
It adds a dramatic look to my bathroom, especially combined with the damask rug and baskets. It's a little more edgy than my bedroom, but still flows seamlessly. The repeated stencil pattern, the repeated wall color all help with that as well as the continued use of vintage elements (sign, mason jars, mirror, etc)
The price breakdown for my panels...
- Painters canvas drop cloth from Lowes (9ft x 6ft) = $11.00 (I used about half of it) divided by 2 = $5.50
- Sample size jar of black paint from Home Depot = $3.00
- (I already had the high density foam roller and the well-used damask stencil)
Total cost = $8.50 for two panels!!
Enjoying the fruits of my labor = PRICELESS!
Ahh, nothing like a good soak after a hard day of work :)
You too can make beautiful panels like these for your home at a fraction of the cost of the pricier Ballard ones! Customize them to be any color you want! Switch up the design to be more spaced out or tighter together. It's totally up to you...you get to be the designer!
It's amazing how one stencil can achieve so many different looks, depending on what you use it on, what paint you use (flat or glossy), how much pressure you apply, etc.
I have gotten a LOT of mileage out of this one stencil! If you haven't seen my stenciled table, you've got to check it out!
 |
| Stenciled Table |
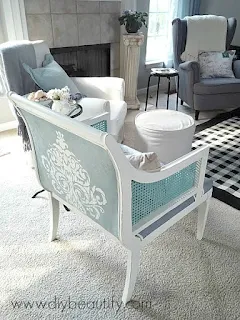
I've also used this damask stencil on the back of a chair that I painted. Go here for that tutorial!
 |
| Chalk Painted Chair with Stenciled Back |
Don't be afraid to try stenciling...it's a fun and easy project!
If you're looking for a damask or brocade looking stencil, Amazon has a large variety of them.
You can't go wrong with any of these stencils. I hope you'll give it a try!
DIY beautify will be cutting back slightly and posting 2x/week, on Tuesday and Friday,
instead of my M,W,F routine, except for the bonus posts I have three kids (and a hubs) who I want to spend more time with; by cutting down just a wee bit I hope that
I will be able to better balance my time. Let me assure you that you will not see a change in the quality of my posts or the projects that I share with you!
Become a DIY insider!
You'll never miss a post, and you'll get all my FREE tutorials
and more...delivered straight to your inbox!
and more...delivered straight to your inbox!
Let's be Social! Follow along on Pinterest, FB, Twitter, Instagram
This blog's content is for entertainment purposes only and is not professional advice. By reading this blog and attempting to recreate any content shared on it, you assume all responsibility for any injuries or damages incurred. Read my full disclaimer here.


These are gorgeous, Cindy!! I want them somewhere in my house now too! You knocked of Ballards and now I'll knock you off ha ha. My favorite pick is you in the tub. :)
ReplyDeleteHaha, thanks Christy...you go girl...knock me off :)
DeleteLOL! Stopping back by to let you know I chose your beautiful curtain panels as one of my feature picks! Thanks for sharing at our knock off themed party!! XO
DeleteWoohoo - thanks Christy ;) Have a great weekend!
DeleteSeriously awesome curtains! Love the contrast of the black and white! Well done!
ReplyDelete~ Ashley
Pinning!
Wow, these are gorgeous!! I love how you used stencils, and I'm a huge sucker for black & white damask. (If you want to, I’d love for you to link this project up to Motivational Monday: http://thediymommy.com/motivational-monday-2/)
ReplyDeleteThanks so much Christina :) So glad you stopped by!
DeleteCindy! Holy smokes! Popped over from homework and was amazed instantly. You've inspired me!
ReplyDeleteAw..Ellen, you are too sweet! I'm always happy to inspire! Can you believe the money I saved??
DeleteI love these Cindy! I made dropcloth curtains for my living room and love them too. Your stencil sure is paying for itself. Thank you for sharing at What We Accomplished Wednesdays. Have a great weekend!
ReplyDeleteBlessings, Deborah
Yup, getting my money's worth, lol! Isn't dropcloth amazing?
DeleteThank you so much for sharing your creativity on The Inspiration Board at homework. I so appreciate it!
ReplyDeleteYou were featured in the spotlight!
Have a wonderful weekend.
carolyn ~ homework
Thank you! That's wonderful.
DeleteAbsolutely beautiful! Your curtains really add a layer of sophistication to your bathroom. And they were thrifty too!
ReplyDeleteThank you; I'm loving the luxurious atmosphere they've helped invoke - at mere dollars :)
DeleteYep, you've inspired me to make some of these for my dining room! They look great! Great job. I'd love it if you shared this on Worthwhile Wednesday http://thecraftiestallie.blogspot.com/2014/06/worthwhile-wednesdays-23.html
ReplyDelete~Allie
Thanks so much Allie, I love inspiring others! Have fun making them for your dining room :)
DeleteI've actually been eyeing those Ballard panels for ages - you did such a great job with your knock-off and I can't believe how little you spent! They look fantastics in your bathroom! Thanks for linking up Best of the Nest!
ReplyDeleteThanks Kris... they were definitely a thriftier version :) I think a longer pair of panels would look even better in a room... You should give it a go!
DeleteHi! I just found you through Green Willow Pond. I think you did an amazing job on these. They are so pretty. I have two questions if that's okay. On the dropcloths, did you sew them somehow? I am NOT a sewer. LOL And I am going to stencil our entryway floor. I have stencil brushes and started one section (before our puppy ran right through it and I'll have to start all over). They say to wipe off the brush onto a roll of paper towels, which I started but felt it was a waste. Have you used that method or just the roller brush? The roller brush seems easier and I might try it on the second go round.
ReplyDeleteHi April, I'm so glad you found DIY beautify and I am happy to answer your questions. The dropcloths come with a hem already so I try to take advantage of that. I did sew a hem on one side of each and the rod pocket at the top (just folded down enough so my curtain rod would fit and added about 1/2" extra). However, there are special glues that you can use too - FabriTac is perfect for fabric that will get washed. You might even try hot glue if you won't be moving them around a lot or needing to wash them. As far as stenciling goes...I have never done a floor, so not sure about that exactly. I do know that the stencil brushes are probably not what you want to be using. They are intended for 'pouncing' and you won't get a great look with that method. I would stick with the small foam roller...it will make your job much faster. And YES, you do want to roll off a lot of the paint onto paper towels first or you will get seepage under your stencil edges instead of a nice, crisp edge. There are some great tutorials on Pinterest that deal with painting on floors, you could try searching there for extra tips! Hope that helps.
DeleteI absolutely love these curtains. You did great! I'd love it if you'd link up to my Look for Less Design Challenge! By linking up, you're entered to win a $60 Target Giftcard too! http://homecomingmn.blogspot.com/2014/07/diy-x-leg-ottoman.html
ReplyDeleteYour curtains look beautiful. I have been day dreaming about stenciling curtains for months now. Great inspiration :) Thank you :)
ReplyDeleteRoopini,
Let's Make It Lovely
Thank you Roopini! You should try them, they are fairly simple to make ☺
Delete