30 Minutes or Less DIY Pumpkin
5 Steps to a Thrifty Burlap Pumpkin (in 30 minutes or less!)
A trip to the pumpkin patch has been a family tradition ever since our kids were tiny.
My boys would always pick out the biggest pumpkin they could find...my daughter would choose the tiniest, cutest little one!
We still look forward to home roasted pumpkin seeds, an evening spent as a family carving our pumpkins and...and putting our 'Jack O-Lanterns' outside to spookily light the way on Oct.31.
Our carved pumpkins are amazing...the kids love them...but they don't last.
Every year we have to toss them out.
I love pumpkins and have created several DIY varieties that don't turn gnarly and gross. They can be brought out each fall and enjoyed...and then carefully packed away at the end of the season.
What makes this pumpkin extra special is that it is super thrifty! It is created from a cube of green florists foam and wrapped with burlap.
Want to make your own?? Here's how...
This post contains affiliate links, which are always items I personally recommend. You can read my full disclosure policy here.Supplies Needed for Burlap Pumpkin
- - a cube of florist foam
- - a 20-inch square of burlap
- - a 20-inch square of drop cloth (or any other light-colored fabric)
- - rubber band
- - pins
- - jute
Optional
- - a large button and pin with a large head
- - scraps of burlap
Instructions:
Step 1: Leave your foam in the plastic wrapping and lay it in the center of your fabric (the reason I'm lining my burlap is because burlap has holes...and the foam is green... I don't want it to show through. The drop cloth provides the lining, and well as extra padding). You can use anything for the lining (an old sheet or pillowcase torn, or other scrap fabric)Step 2: Pull up the fabric at the corners of the foam and pin in place
It should look like this:
Step 3: Gather your corners of fabric and tie securely with a rubber band (this will become our stem).
Step 4: Spread the 'stem' apart to reveal the inner drop cloth and trim those pieces off...this reduces the thickness of it.
Step 5: Take some jute and tie it around the rubber band. Then tightly wrap the jute up and around the fabric, overlapping where necessary so the burlap is covered. Pull tight! Trim off any excess and either hot glue the end of the jute to the stem or tuck it under one of the coils.
That's it! 5 Steps to an adorable DIY pumpkin.
Wanna take it further and add some embellishments??
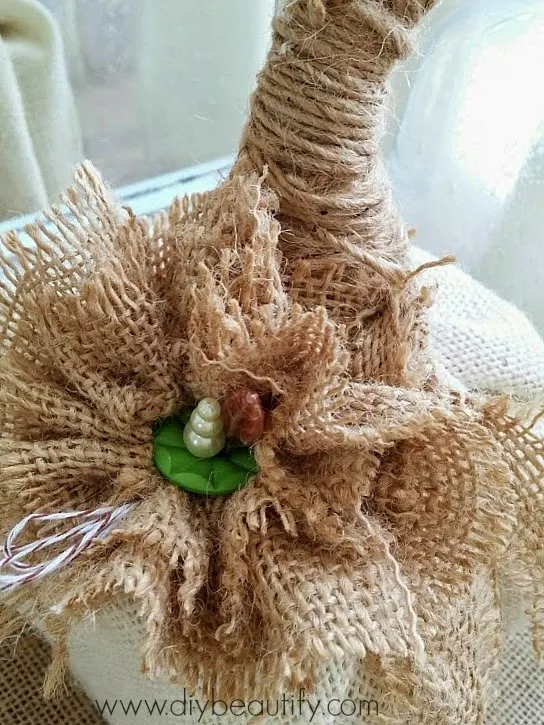
Use a narrow strip of burlap and tie it around the base of the stem. Use another strip of burlap (roughly 12" long and 2-3" wide) to create a burlap flower. You can follow these instructions to create an easy gathered burlap flower.
Layer the flower with the button in the center and attach to the base of the stem using pins, poking them through the button holes and into the pumpkin to secure. If you don't have decorative pins or pins with large heads, you could easily glue the flower and button in place.
Enjoy your handiwork...and with all the money you saved...you deserve to celebrate with a pumpkin spice latte at Starbucks, lol!
Featured at:
Design Dining and Diapers
Sharing with:
Design Dining and Diapers
Sharing with:
Cupcakes and Crinoline Project Inspired, The Dedicated House Make it Pretty Monday, Cedar Hill Farmhouse The Scoop, Upcycled Treasures The Makers Link, The NY Melrose Family Whimsy Wednesday, Crafty Allie Worthwhile Wednesdays, Ella Claire The Inspiration Exchange, Glitter Glue and Paint Project Pin It, From My Front Porch to Yours, Autumn Abounds Link Up at DIY Show Off, Design Dining and Diapers Inspiration Gallery, Tatertots and Jello Link Party Palooza, PinkWhen DIY Sunday Showcase, Its Overflowing Share Your Creativity, Link it or Lump it, DIY Show Off, The Hankful House Get Your DIY On, Elizabeth and Co Be Inspired, Maison de Pax M&MJ, The Happy Housie Work it Wednesday , Fine Craft Guild, Little Miss Celebration Best of the Weekend The Style Sisters, Less Than Perfect Life of Bliss Pretty Preppy, Confessions of a Serial DIYer Best of DIY,


Cutest and easiest pumpkin I've seen! Thank you......
ReplyDeleteThanks Di...and you're welcome!! I hope you try one - or a few ;)
DeleteTotally cute! These just might make it to my Thanksgiving table this year! I've been looking for something different. This could be a good project for grand kids to do with me. Thanks!
ReplyDeleteYou're welcome Val! It would be a fun project for you and your grandkids to do together!
DeleteI was just saying to some of my friends last night that I need to start using my yards and yards of burlap! You have inspired me! I am going to make these!
ReplyDeleteSo happy to inspire you Shambray :) Have fun making your pumpkins!
DeleteStinkin adorable! So trying this. I came over from The Blissful Bee.
ReplyDeleteShannon - bohemianjunktion.com
Thanks so much Shannon, happy you like :)
DeleteStopping by from the link up. These are so cute and look so easy! I will definitely be making these this year! -Jess @ Sweet Little Ones
ReplyDeleteThanks so much Jess! They're so easy to make, I hope you enjoy the process! So glad to have you visit :)
DeleteOh my! I love burlap and I love this!! Pinned!
ReplyDeleteThanks Elizabeth, I'm a burlap Junkie too!
Delete