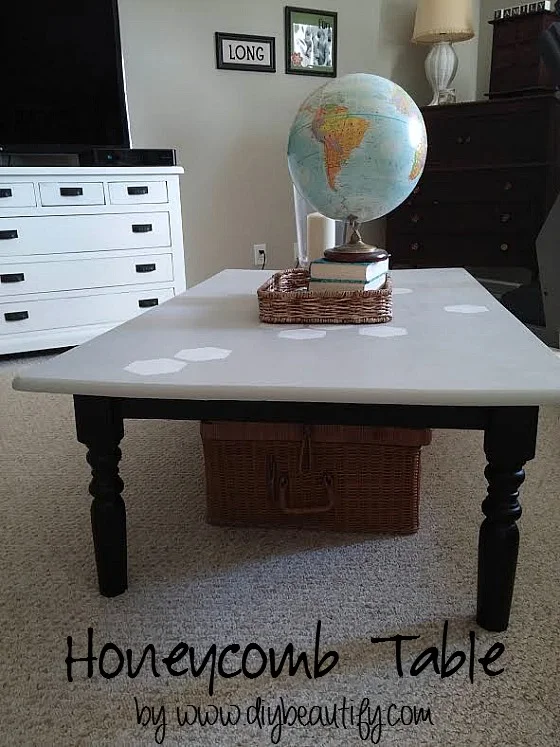
Honeycomb Pattern Table Makeover
Not every project goes according to plan.
Even talented DIYers have a few flops and fails under their belts.
It's just part of life.
This project was supposed to be so simple!
It started with a table...
This table....my first foray into the world of 'DIY dumpster-diving' ...has been in our living room for the past 9 years.
It's a kitchen-table-turned-coffee-table.
And yes, I found it in someone's trash!
Back in 2005 it received quite the overhaul. Legs cut down. Massive sanding to remove the ick. Painting. Poly.
It's a kitchen-table-turned-coffee-table.
And yes, I found it in someone's trash!
Back in 2005 it received quite the overhaul. Legs cut down. Massive sanding to remove the ick. Painting. Poly.
Fast forward to present time.
In a home with 3 kids....well, you don't need the details. Suffice it to say that the table needed a makeover.
And I had great plans. Oh the plans I had!
My desire for a honeycomb shape on the table was confirmed when I found these vinyl octagon shapes at Target. You see, my little hardworking Cricut machine died on me awhile ago (boo), and I needed vinyl octagons. Thank.You.Target!
So I bought two packages and reveled in how e.a.s.y. this project was going to be!
After cleaning the table, I laid out my vinyl shapes. Not really in any pattern, just random.
Next I painted over the whole thing with my favorite gray paint, Sherwin Williams's Mindful Gray. Three coats.
And here is where my project failed me...after the paint dried, I used a tweezer to peel up my vinyl shapes....and this is what I found...
Can you see it? Look reeeeally closely...
The vinyl honeycomb shapes were soo sticky that they lifted off some of the black I painted...9 years ago!
It looked awful!
What was I to do?
Well, I did what probably anyone else would do and I painted over it. Again. Three coats. Again.
And let it sit....for about 3 weeks....
Finally, I knew I had to do something because the kids were using it to rest their feet and their snacks...and I hadn't waxed it yet.
I really wanted the honeycomb look...but I realized that I didn't care for the number of honeycombs I'd used on the original redo. I wanted it to be simpler.
So I put some of the shapes back on the table (Yes, I saved them. And before using them again I stuck them on my denim-clad leg a few times so they wouldn't be as sticky).
I just used the ones that are like a frame with an open middle.
And I carefully painted some creamy off-white paint into the center.
And when I pulled the shapes up, this time I got crisp edges with no mess!
Whew!
I like it a whole lot better! It's subtle but still has that great honeycomb pattern that I was after. You might recognize my painted dresser that became a tv console in the background. The white I used on the honeycomb shapes is the same creamy white that I painted that dresser.
I waxed it, buffed it and it's ready for another decade!
I was thinking of outlining the octagons with a gold or copper paint pen. What do you think? Should I leave it as is or add a touch of metallic?
I was thinking of outlining the octagons with a gold or copper paint pen. What do you think? Should I leave it as is or add a touch of metallic?
And just to keep it real, this room rarely looks this neat! I had to do a bit of staging before taking these pics. Here's a reality shot of the corners you can't see in the above pics...
Scary, right?
I'm just glad there was a happy ending to my table makeover.
bringing beauty to the ordinary,
Featured at:
Sharing with
Less Than Perfect Life of Bliss PPP, the Pin Junkie, Design Dining Diapers Inspiration Gallery, From My Front Porch to Yours, Miss Mustard Seed Furniture Feature Friday, PinkWhen DIY Sunday Showcase, Cupcakes and Crinoline Project Inspired, Coastal Charm Show and Share, Tiny Sidekick The Makers Link, Confessions of a Plate Addict The Scoop, View From The Fridge Cook Craft Share, Green Willow Pond, Maison de Pax M&MJ, Crafty Allie Worthwhile Wednesdays, The Blissful Bee Work it Wednesday, Designer Trapped Think and Make Thursday, French Country Cottage, 3 Little Greenwoods Show Me Saturday, Tatertots and Jello Link Party Palooza,
Less Than Perfect Life of Bliss PPP, the Pin Junkie, Design Dining Diapers Inspiration Gallery, From My Front Porch to Yours, Miss Mustard Seed Furniture Feature Friday, PinkWhen DIY Sunday Showcase, Cupcakes and Crinoline Project Inspired, Coastal Charm Show and Share, Tiny Sidekick The Makers Link, Confessions of a Plate Addict The Scoop, View From The Fridge Cook Craft Share, Green Willow Pond, Maison de Pax M&MJ, Crafty Allie Worthwhile Wednesdays, The Blissful Bee Work it Wednesday, Designer Trapped Think and Make Thursday, French Country Cottage, 3 Little Greenwoods Show Me Saturday, Tatertots and Jello Link Party Palooza,


This is so cool! Thanks for sharing! Also wanted to remind you about the “Found & Foraged” linky party tomorrow (Saturday) at 8pm. Can’t wait to party with you at http://www.houseofhipsters.com
ReplyDeleteI definitely know what it feels like when projects don't go as planned, but your table turned out cute!
ReplyDeleteLove it! I'm featuring your project tomorrow as one of the Pretty Preppy Party Features this month! Thanks for linking up! xx, b
ReplyDeleteWhat a transformation! It looks really good, thanks for sharing!
ReplyDelete