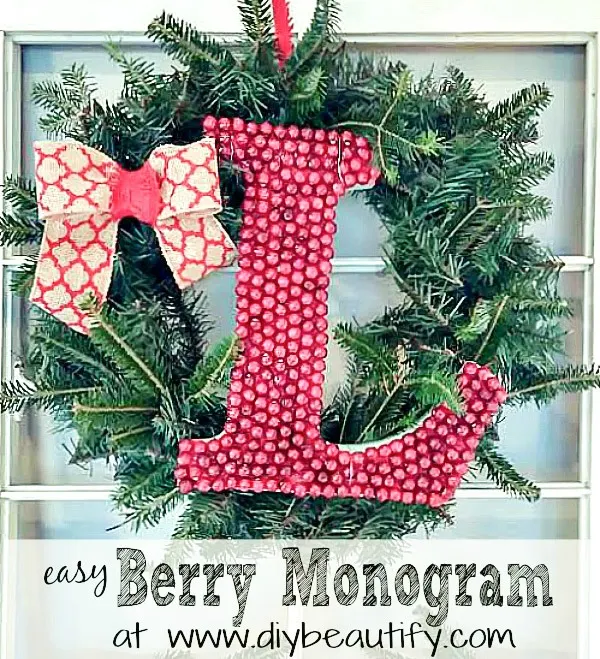
How to Make a Berry Monogram Wreath
How to make a Christmas berry monogram wreath
Affiliate links are provided for your convenience.
You can find my full disclosure policy here.
I fell in love with a monogram I spotted on
Atkinson Drive blog. However real cranberries were used, so the longevity of the monogram was uncertain.
I put my thinking cap on and figured out a way to create a permanent/temporary monogram of my own using items I already had on hand. What's permanent and what's temporary you ask?
I already had this wood letter 'L'. I decided to create a
temporary and removable front for the letter using
wood cranberry beads and foam core.
SUPPLIES NEEDED:
- a flat wood monogram letter of your choice
- white foam board
- glue gun
- double-sided tape
- red wooden bead garland separated into loose beads or loose red beads
- craft knife
- red spray paint
- artificial green Christmas wreath
- greenery picks or branches from a real tree
- craft ribbon of your choice
- craft wire
HOW TO MAKE A BERRY MONOGRAM WREATH
STEP 1
Trace wood letter onto white foam core and cut out carefully, using a craft blade.
STEP 2
Lightly spray your 'new' monogram with red spray paint (this ensures that no white will show through after you glue on the beads).
Lightly spray your 'new' monogram with red spray paint (this ensures that no white will show through after you glue on the beads).
STEP 3
Apply double stick tape to the back of the foam core and firmly press it to the front of your wooden letter.
Apply double stick tape to the back of the foam core and firmly press it to the front of your wooden letter.
I decided to attach the berry monogram to a plain green Christmas wreath and hang it from the window on my mantle.
I used craft wire to attach the monogram to the wreath, twisting it around the beaded letter in three places (indicated by the arrows below).
I made a quick burlap bow and tied the wreath to my window frame using a red strip of burlap.
For the finishing touch, I tucked in a few stems from my pine tree (when Mr DIY cut off the lower branches, I stuck them into a bucket of water in my garage, knowing I'd want to use some of them to decorate).
How's your decorating coming along? I think I'm finally done...now I need to get to shopping and wrapping and baking and cleaning!
Coming up later this week...a favorite Christmas cookie recipe!
Update: I'm pleased to let you know that my DIY berry monogram peeled right off my wooden letter. I've packed the berry monogram away until next year and put my original blue monogram back up!
bringing beauty to the ordinary,
Become a DIY insider!
You'll never miss a post, and you'll get all my FREE tutorials
and more...delivered straight to your inbox!
and more...delivered straight to your inbox!
Let's be Social! Follow along on Pinterest, FB, G+, Twitter, Instagram
Popular Posts You Might Have Missed
This blog's content is for entertainment purposes only and is not professional advice. By reading this blog and attempting to recreate any content shared on it, you assume all responsibility for any injuries or damages incurred. Read my full disclaimer here.
Sharing with
Elizabeth and Co.,
Crafty Allie,
The Happy Housie,
Weekend Craft Creative Spark,
Designer Trapped,
Blesser House,
Maison de Pax,
French Country Cottage,
The Pin Junkie,
Living Well Spending Less,
Design Dining and Diapers,
Tatertots and Jello,
3 Little Greenwoods,
PinkWhen,
Cedar Hill Farmhouse,
Coastal Charm,
Green Willow Pond,
Less Than Perfect Life of Bliss Pretty Preppy,
Shabby Art Boutique,
Thrifty Decor Chick,


Oh Cindy, that is just so cute! It's not a decoration that has to be put away after Christmas either, so it's a good one to make. This would work on large and small letters, with dried or fake berries too. I agree the added greenery made all the difference and it looks fab on your mantle. Using beads was a good idea. Nice job!
ReplyDeleteYou're right Val, you could totally customize this look and use different size letters!
DeleteOh my goodness! I've got red berry wooden garland that would be perfect for this project. Thanks so much for the inspiration!
ReplyDeletePinning and sharing everywhere!
~ Ashley
Thanks Ashley, I was just thinking...you may not even need to separated the beads, just glue the strand down around your letter?! Less work!
DeleteWow, your mantle is so beautiful! I love how you paired the wreath/monogram with the old window. What a great job! I'll be pinning this for sure. Stopping by from the Sunday Showcase link up! -Jess
ReplyDeletewww.sweetlittleonesblog.com / sweetlittleonesblog@gmail.com
Ooohh! Love the look of this and it looks so easy to do. Your entire mantel looks beautiful with the assorted candles, the window, and the shutters. Thanks so much for linking up with us at Your Turn to Shine!
ReplyDeleteThank you Jamie! The shutters kick-started it all, and it just progressed from there. Love hanging out at your party!
DeleteLooks great! I totally need to resort to foam core more often. I love the projects with it. Thanks for linking up to Show Me Saturday.
ReplyDeleteThanks Ginger, you're right...foam core is inexpensive and very versatile!
DeleteLove this! I have several strands of those "cranberry" beads that I didn't use this year. What a great way to use them. Thank you for sharing it and your yummy gingersnap cookies and pretty hot cocoa bar at What We Accomplished Wednesdays. Have a merry Christmas season!
ReplyDeleteBlessings, Deborah
I love it! And it looks like the real thing!!
ReplyDeleteThanks Julie, I'm really enjoying the bright color and texture.
Delete