How to Make a Modern Rustic Sign
Well hi there. I'm so happy you are choosing to spend a few minutes of your day with me!
In a world of mass-produced home decor items, handmade is so refreshing, isn't it?! I'm going to show you how to paint a sign that you won't find in a store! You can customize it to say whatever you like.
I have to be honest...painting signs ranks up there as one of my very favorite things to create!
I find it fascinating to turn a plain piece of wood into something beautiful! Something that is personal, unique and definitely not off-the-shelf!
I was contacted recently by a friend who needed a special sign for a new baby boy and wondered if I could help her out...um, YES please!
We brainstormed a little and decided on three main objectives for this particular project:
I didn't measure because math and I don't get along...I work best by eye-balling things! I like the random-sized stripes...it keeps it from looking too perfect.
I wasn't crazy about painting the name over the stripes because it would have looked too busy. There needed to be a break between the two. I had another board remnant that I decided to layer on top of the stripes. I painted the smaller board white and then I added the name on top.
To add a name to my sign, I created a stencil on my Silhouette machine (made to measure), cut it out and painted the name on using a foam roller.
Once everything was dry, I lightly sanded both boards to distress, wiped them free of dust and added a coat of wax for protection. The distressing adds a rustic touch, while the modern stripes and classic colors keep it looking trendy.
The last step was gluing the smaller board onto the larger one. E-6000 is perfect for this. I set a heavy can of paint on top to stabilize it as it dried.
And the results...
...this awesome sign that is perfectly classic and will grow with this little boy.
I've gotta say that I really like the dimension that extra board added! The name really pops out at you.
These types of signs aren't difficult, but there are a lot of steps involved. If you have any questions about the process, please don't hesitate to contact me or leave me a comment.
bringing beauty to the ordinary,
In a world of mass-produced home decor items, handmade is so refreshing, isn't it?! I'm going to show you how to paint a sign that you won't find in a store! You can customize it to say whatever you like.
I have to be honest...painting signs ranks up there as one of my very favorite things to create!
I find it fascinating to turn a plain piece of wood into something beautiful! Something that is personal, unique and definitely not off-the-shelf!
I was contacted recently by a friend who needed a special sign for a new baby boy and wondered if I could help her out...um, YES please!
We brainstormed a little and decided on three main objectives for this particular project:
- it had to have his name...Mason
- it needed to be the colors of his nursery (grey, navy, white)
- it needed to be modern and classic to grow with him and his room - after some thinking, we decided on stripes
This post contains some affiliate links, which are always products I personally recommend! My full disclosure policy is available here.
If you want to make a similar sign, here are the Materials You'll Need:
- board (I used a pine remnant from my stash, but it originally came from Lowes)
- electric sander (you need to be able to smooth the edges, and this also will help with distressing later on) - MUCH easier and faster than using sandpaper only!
- frog tape
- chalk paint (get my diy chalk paint recipe)
- brushes and sponge roller (I love, love, love my short 2" Purdy brush! It's seen a lot of projects and has never let me down!
- alpha stencils or make your own with a Silhouette or Cricut machine
- clear furniture wax
- E-6000 glue
(If you're interested in complete details for how I make DIY chalk paint in sample paint jars, you can get it right here!)
Steps to Make a Sign:
Decide what size you want your sign to be and and either cut your board down, or have the helpful folks at Lowes do it for you!
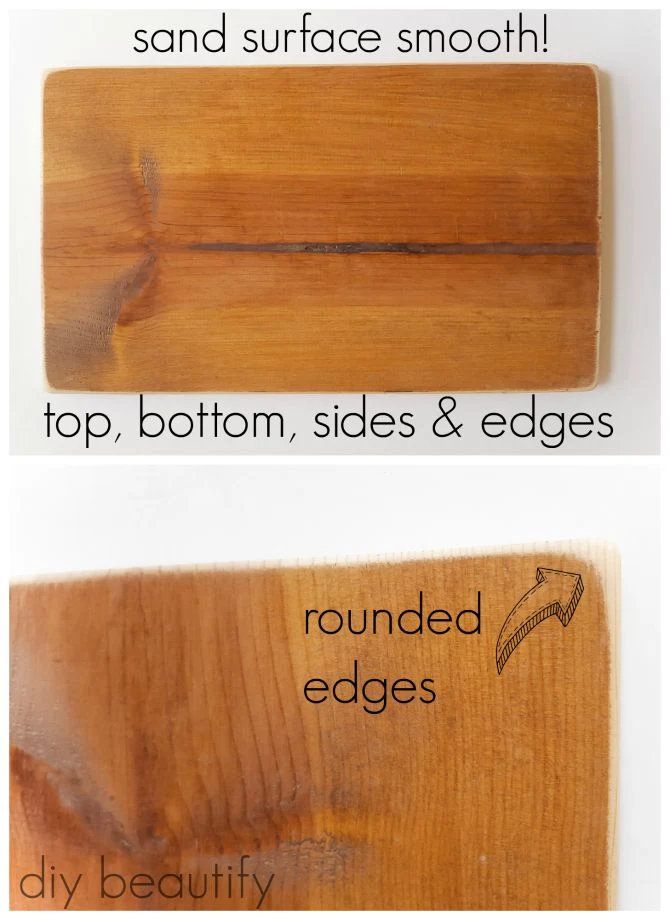
Sand the entire board, paying special attention to the edges. I like to slightly round my edges. Bottom line: you don't want anyone to get a splinter...we're going for a smooth surface! The electric sander makes this job so easy, and it goes fast!
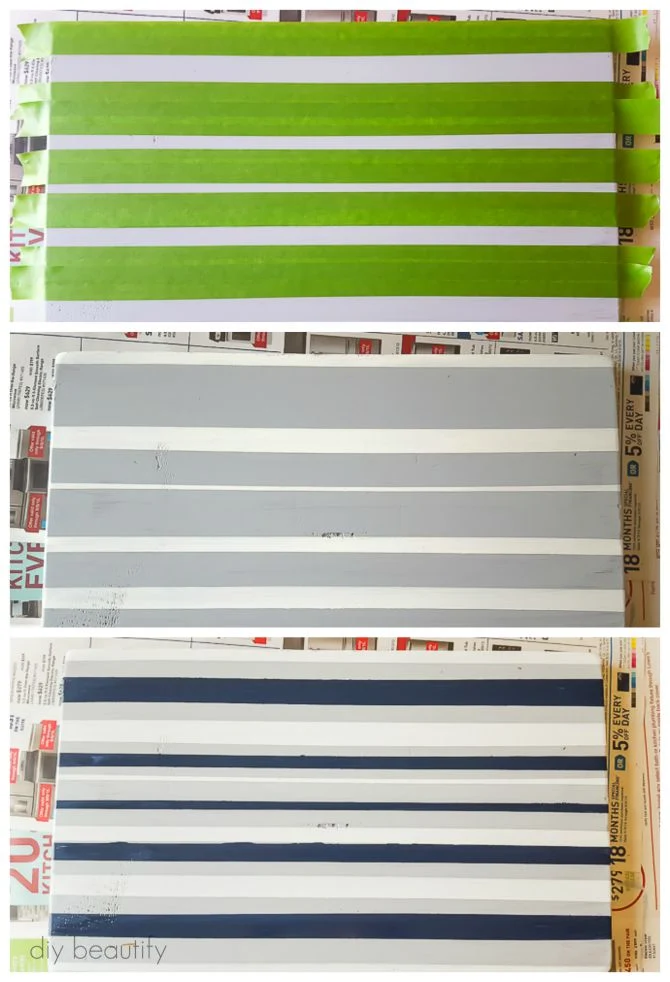
I decided to use gray as the background, so I mixed up some home made chalk paint using samples from Lowes.
Once that dried, I free-handed some stripes (meaning no measuring was involved!). Frog tape is perfect for this type of application; when you run your nail along the edge to burnish it, it will prevent paint from seeping under so you get clear, crisp lines.
You can see from the above picture how I accomplished two different colors of stripes. I taped off and painted the white stripes, then once that dried I taped off and painted my navy stripes.Once that dried, I free-handed some stripes (meaning no measuring was involved!). Frog tape is perfect for this type of application; when you run your nail along the edge to burnish it, it will prevent paint from seeping under so you get clear, crisp lines.
I didn't measure because math and I don't get along...I work best by eye-balling things! I like the random-sized stripes...it keeps it from looking too perfect.
I wasn't crazy about painting the name over the stripes because it would have looked too busy. There needed to be a break between the two. I had another board remnant that I decided to layer on top of the stripes. I painted the smaller board white and then I added the name on top.
To add a name to my sign, I created a stencil on my Silhouette machine (made to measure), cut it out and painted the name on using a foam roller.
Once everything was dry, I lightly sanded both boards to distress, wiped them free of dust and added a coat of wax for protection. The distressing adds a rustic touch, while the modern stripes and classic colors keep it looking trendy.
The last step was gluing the smaller board onto the larger one. E-6000 is perfect for this. I set a heavy can of paint on top to stabilize it as it dried.
And the results...
...this awesome sign that is perfectly classic and will grow with this little boy.
I've gotta say that I really like the dimension that extra board added! The name really pops out at you.
These types of signs aren't difficult, but there are a lot of steps involved. If you have any questions about the process, please don't hesitate to contact me or leave me a comment.
bringing beauty to the ordinary,

Follow me here! Pinterest, FB, Twitter, Instagram
Don't miss these Popular Posts!
Sharing with: Designer Trapped, Blesser House, Design Dining and Diapers, French Country Cottage, Tatertots and Jello, Place of My Taste, The Pin Junkie, Southern State Of Mind, House by Hoff, The Happy Housie,


This is really cute. You have so many great ideas, I have to stop blogging so I can go and make some of them.
ReplyDeleteOh Mary, Mary...if you only saw the state of my disorganized home! I tell you, blogging and coming up with creative ideas is a full time job on its own! Staying on top of things is such a struggle!
DeleteIt is a full time job and more. I spend my days on link parties, and not doing what I love which is the actual projects. We have to try and find a balance.
ReplyDeleteI hear you, link parties are so important to get your ideas out there, and attract new followers, but so time consuming! Finding balance is difficult!
DeleteA cute and simple sign will make a big difference in the home.
ReplyDeleteYes, it certainly will! Thanks for visiting!
DeleteGreat tutorial - thanks for sharing with us. I've simply got to try it. Thanks for sharing at the Pretty Preppy Party. xx, b
ReplyDeleteThank you Bianca!
DeleteThis is so cute, love the stripes and the colors you chose!
ReplyDeleteThank you Christy, I'm really pleased with the way the sign turned out. Thanks for taking time to comment 😊
DeleteThank you Christy, I'm really pleased with the way the sign turned out. Thanks for taking time to comment 😊
Delete