Mini Budget Bathroom Makeover
The decision to switch out a bathroom light fixture snowballed into an entire mini budget bathroom makeover! Come see how we did it for under $100!
Affiliate links may be included for your convenience; my full disclosure policy can be found here. If you click through and make a purchase I'll receive a small commission at no extra cost to you!
The fact that this project happened during the week of our son's high school graduation and subsequent grad party (at our home) just added to the
Nevertheless, we finished this project (before the party), thanks to my hardworking hubby, Mr DIY.
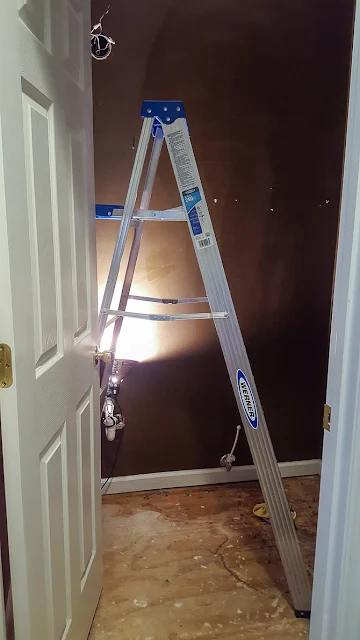
You really need to see the before pictures to fully appreciate this mini budget bathroom makeover!
See what I mean?! Yuck! There's a reason why I haven't shared pictures of this room up to now!
I have no idea why I ever thought chocolate brown was a good color for the walls in this tiny space. It made it even darker and more cave-like. And did you notice the carpet on the floor? In a house full of guys, it's a bad idea all the way around!
You can probably understand why we were so eager to give this small half bath a makeover!
Mr DIY started by removing the light fixture (you can see that project here). He also removed the sink and toilet and pulled up the carpet and padding.
We were left with a big mess. Our son helped by pulling out the numerous staples from the flooring, and I gave the room a good dusting.
New wall paint was the first item on the to-do list. Did you know that Lowes now sells Sherwin Williams paint? I was ecstatic because I wanted to match the paint to the majority of the downstairs, which is painted in SW Mindful Gray. I ended up going a shade lighter on the swatch and chose Repose Gray.
Here are a few in-process pics. It always gets worse before it gets better, right?
Imagine this...a tiny, windowless room with no light fixture, and I'm painting inside with the door closed! A happy ending doesn't seem to be possible, but I'm happy to report that no paint was spilled, and the walls were successfully given two coats of paint. A work light was the perfect solution. You can see below that I have it clamped to the sink pipe!
Two coats later, the improvement was remarkable! It was already so much lighter and brighter!
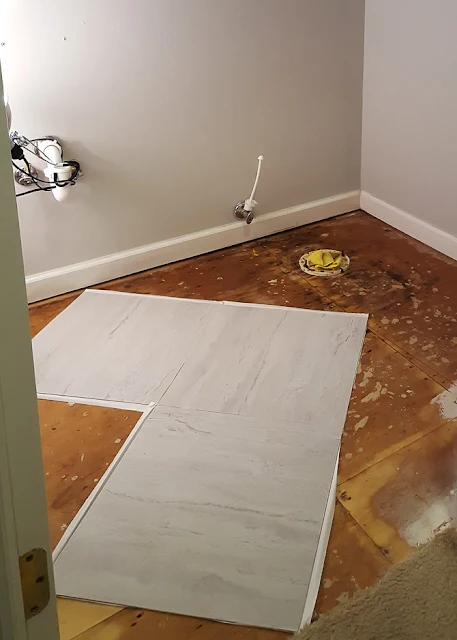
The next project we tackled was the floors. We selected 18" peel and stick tile and laid it on the diagonal, like we did in our laundry room makeover. Before the tile went down, I rolled on a layer of floor primer directly on to the sub floor. This product is recommended for peel and stick tiles; it self-levels and prepares the floor for the tile.
Adding the tiles was much simpler with the sink and toilet removed! In hindsight, I wish we would have gone with black and white tiles like we did in the laundry room because it's more dramatic, but it's still a huge improvement for very little money!
Once the floor was done, we added quarter round molding around the baseboards to close off the gap that was left from removing the carpet. Mr DIY also added a transition strip to cover the area where the new tile met the old carpet.
Once the sink and toilet were re-installed, it was my turn to take the reins of this bathroom makeover and add some personality.
I chose minimal decor, with a focus on natural and rustic. All the hardware in the space was spray painted with Rustoleum oil-rubbed bronze (including the light fixture, metal shelf, toilet paper holder and floor vent). I still need to spray paint the door handles.

This mini bathroom makeover was accomplished in just a few days, and we only spent about $100! It's quite a dramatic change, and I couldn't be happier!
My pictures don't quite do it justice because the room doesn't get any natural light, but trust me when I say it feels so much lighter!
You really don't need to break the bank to add a fresh new look to a room! I hope this mini budget bathroom makeover inspires you to get started on a project you've been putting off!
Source List:
- mirror - Homegoods
- faucet - Delta
- olive bucket - Walmart
- monogram - Hobby Lobby
- metal heart picture - Cracker Barrel
- glass jar votive holder - Marshalls
- glass jar wall hanging - Marshalls
- burlap roses - Hobby Lobby
Are you planning a bathroom makeover?
Do you need guidance choosing a great faucet for your space? I recently participated in a featured interview with Wayfair.com about just this subject! You can find out what I love best about the faucet I used in this bathroom makeover, as well as the other bloggers featured...maybe this interview will help you make the best decision! Click here to read the interview!bringing beauty to the ordinary,
Become a DIY insider!
You'll never miss a post, and you'll get all my FREE tutorials
and more...delivered straight to your inbox!
and more...delivered straight to your inbox!
Let's be Social! Follow along on Pinterest, FB, G+, Twitter, Instagram
Popular Posts You Might Have Missed
This blog's content is for entertainment purposes only and is not professional advice. By reading this blog and attempting to recreate any content shared on it, you assume all responsibility for any injuries or damages incurred. Read my full disclaimer here.


Way to go! the bathroom looks great now and it is so much lighter and brighter.
ReplyDeleteWe had carpet in our master bath at our first house. Yuck!!
Thank you SO much for your sweet comments Stacey! I can't believe that any builder would put carpet in a bathroom. I'm so glad it's gone now!
DeleteI really like the wall color. Big difference just with the paint.
ReplyDeleteThank you Carol... don't think I'll ever go with chocolate brown paint again... what was I thinking? 🤤
DeleteIt looks great! We just finished a bathroom makeover on a budget too. They can be tricky, but so worth it in the end. The peel and stick tiles were a good solution for your floor. Love the accessories. Thanks for sharing!
ReplyDeleteKatie
button-jar.com/blog
Thank you Katie!
DeleteI want to thank you very much! I have small bathroom and was looking for total makeover at an affordable budget. Your tips help me a lot. Now I have bathroom where I can take a deep breath! Oh, and yes, the new makeover matches with my bathtub as well :)
ReplyDeleteI'm so glad these ideas helped you with your own budget bathroom makeover!
DeleteTerrific Job!I love everything! What color/brand of paint did you use on the walls?
ReplyDeleteThank you! Its Repose Gray by Sherwin Williams.
Delete