Painted Buffalo Plaid Mason Jars
This tutorial will walk you through the steps to create a painted buffalo check pattern on mason jars! So fun and trendy!
Affiliate links are included for your convenience; my full disclosure policy can be found here.
Patterns are popular in home decor and everyone has their favorite, whether it's stripes, polka dots, chevron or herringbone.
When I was young, it was hearts. I had heart necklaces, notebooks, pillows, and always signed my name with a heart. ♡♡♡
I actually still dot my 'i' with a heart, but my taste for patterns has changed.
Plaid, gingham, checks...I love it all but I've recently been drawn to the classic black and white buffalo plaid and have been adding it to my home decor in bits and pieces.
When I saw a tutorial at A Thoughtful Place for buffalo check pumpkins, it got my creative wheels turning and I thought I'd try my hand (literally!) at adding this fun pattern to mason jars!
I'm working on less perfection in my life so I decided just to get right to it and see how my idea turned out!
Today's post is in collaboration with my friends from the Thrifty Style Team. Together we bring our thrifty style to the group each month, in the form of projects or decor. At the bottom of this post there will be a link to the rest of the posts for this month. It's a talented group of gals and I know you'll be inspired!
SUPPLIES NEEDED TO PAINT BUFFALO PLAID MASON JARS
- mason jars
- white spray paint (this is the product I used)
- gray and white chalk paint
- black acrylic paint
- craft brushes with a flat head
- sanding sponge
- clear wax
- jute twine
- fairy lights (optional)
HOW TO PAINT BUFFALO PLAID MASON JARS
You'll be able to see these steps in picture format below.
STEP ONE:
First, give your mason jars a couple of coats of white spray paint. Turn them upside down while painting.
You want to avoid glossy paint, but any white spray/primer should work.
Let paint dry.
STEP TWO:
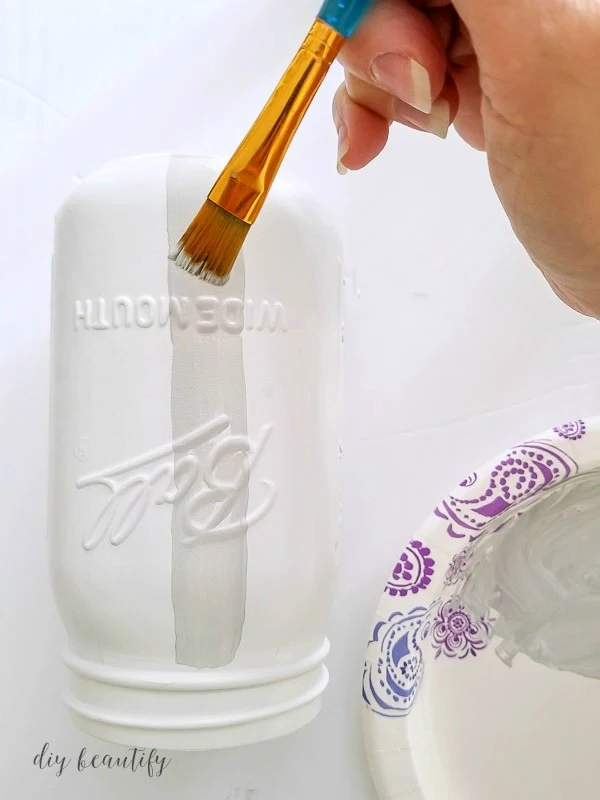
Next, grab a paper plate and mix up some light gray chalk paint (I used some darker gray I had, mixed with white to achieve a pale gray). You can see the two colors I used before I mixed them in the image above.
STEP THREE:
Paint vertical stripes onto the mason jar. I found it was easiest to stick my left hand into the jar to hold it steady. I started painting just below the lip at the top. As I drew my brush down, I pressed it onto the jar, opening up the bristles. This method allowed me to paint mostly even stripes.Mason jars have rounded edges, so this part can be a little tricky.
Try to space the stripes out according to the width of your brush strokes.
STEP FOUR:
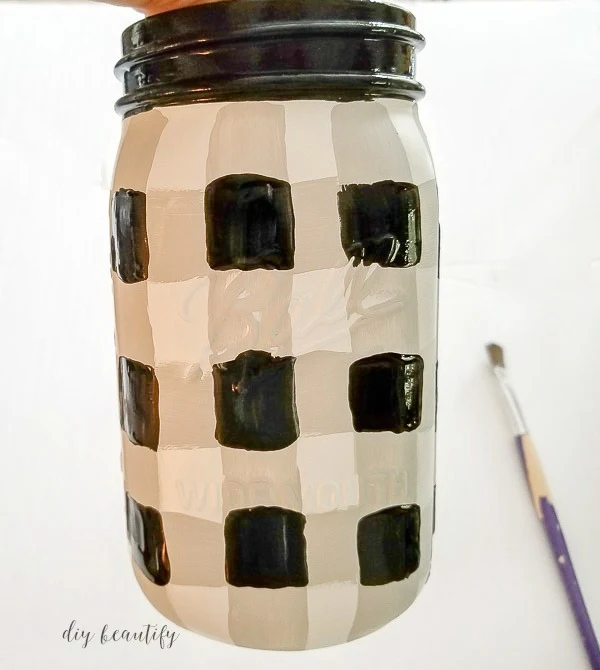
Paint horizontal stripes. You don't need to actually paint over the vertical stripes you just made, just paint a horizontal stripe that will connect all the way around the jar.
Let the paint dry.
STEP FIVE:
Now we are going to fill in the areas where the gray lines intersect with black paint. In the image below, I've circled the areas that should be painted in with black.
STEP SIX:
Paint the lip of the jar black. This my friends, is what will literally save your hand painted jar and make that buffalo plaid really pop! It somehow magically makes the whole thing look better, even if your lines are wonky and your squares are really just blobs!
Go ahead, blow up this image and take a really good look at my painted lines. See the wiggles and wobbles and how nothing really lines up perfectly? This black painted rim will somehow help to disguise the imperfection of what's going on below...trust me on this!
STEP SEVEN:
Once the black paint dries, lightly sand edges to distress. This is totally optional, but I like how it adds to the whole "vintage-y" feel of the jars! Be careful not to drag the sanding sponge through the black areas or you can make the rest of the jar look murky. This is only if you're trying to complete this project in the same day.
If you're patient and have time to wait a day or two to really let the paint dry, it shouldn't be an issue; three guesses as to how patient I was 😉
The last step is to smear it with some clear wax and buff it a little to make it look all sheeny and happy. Then tie it with some twine or raffia, and stick a bundle of fairy lights inside!
I love the glow of these painted mason jars!
But they're cute even without the lights!
I'm loving my reclaimed wood wall as a backdrop! You can find out more about our walls and the installation process here. I'll be sharing the full reveal of this pretty sunroom space soon.
I'm loving my reclaimed wood wall as a backdrop! You can find out more about our walls and the installation process here. I'll be sharing the full reveal of this pretty sunroom space soon.
I hope you love this buffalo plaid project! It's easy to turn the lowly mason jar into a thing of beauty! If black buffalo plaid isn't your thing, paint the jars the color you love! Wouldn't red look great for Christmas?
As always, I'm honored when you choose to like, comment and pin my posts! Please PIN THIS IMAGE if you enjoyed this project!
Become a DIY insider!
You'll never miss a post, and you'll get all my FREE tutorials
and more...delivered straight to your inbox!
and more...delivered straight to your inbox!
Let's be Social! Follow along on Pinterest, FB, G+, Twitter, Instagram
Popular Posts You Might Have Missed
This blog's content is for entertainment purposes only and is not professional advice. By reading this blog and attempting to recreate any content shared on it, you assume all responsibility for any injuries or damages incurred. Read my full disclaimer here.


These jars are absolutely adorable! We love buffalo checks and your Mason jars are just perfection!
ReplyDeleteVicki and Jenn
2 Bees in a Pod
Thanks Vicki and Jenn!
DeleteAren't those just the cutest little jars. I've got a plaid and check stencil, I better get to creating some.
ReplyDeleteThanks Bliss! It will probably go much quicker with a stencil, you'll have to let me know!
DeleteAwesome project! For some reason I have the hardest time figuring out how to make the buffalo pattern, but now I have your guide!!!
ReplyDeleteThanks Pam, hope the tutorial is helpful!
DeleteThese are gorgeous, Cindy! I love buffalo plaid! I need to give this a try. These would make cute jars to store stuff in my office. Thanks for the idea!
ReplyDeleteThanks Michele, I hope you try this project...I plan on moving these jars around my home!!
DeleteCould I love these more? I don't think so. I have some mason jars that need to be painted STAT
ReplyDeleteAww, thanks Deborah! I was really pleased with how they turned out. Let me know how it goes!
DeleteSo cute and such a great idea! Love buffalo check, especially in the fall. I definitely want to give it a try.
ReplyDeleteThank you, it's such a classic pattern!
DeleteI love your buffalo plaid mason jars, Cindy! I love buffalo plaid to begin with but I never thought of doing this. You have inspired me. I'm thinking of making some to match a winter throw I have.
ReplyDeleteI love them too!!! Buffalo check is my favorite. It just looks good with every style. I can't wait to try it.
DeleteI LOVE them, but I especially love them lit up!!! I'll take 6! ;)
ReplyDeleteYou had me at buffalo check! These are so adorable!
ReplyDeletesuper cute idea. can't go wrong with buffalo check.
ReplyDeleteThank you for a great explanation. I was looking online for a similar idea and really appreciate it
ReplyDeleteYou are so welcome! Have fun making your buffalo check jars 😉
DeleteThese are so cute! I'working on a blog post about buffalo check fall crafts. Could I feature you?
ReplyDeleteAs long as you link back to my post, that is fine.
Delete