DIY Family Tree Blessings Art
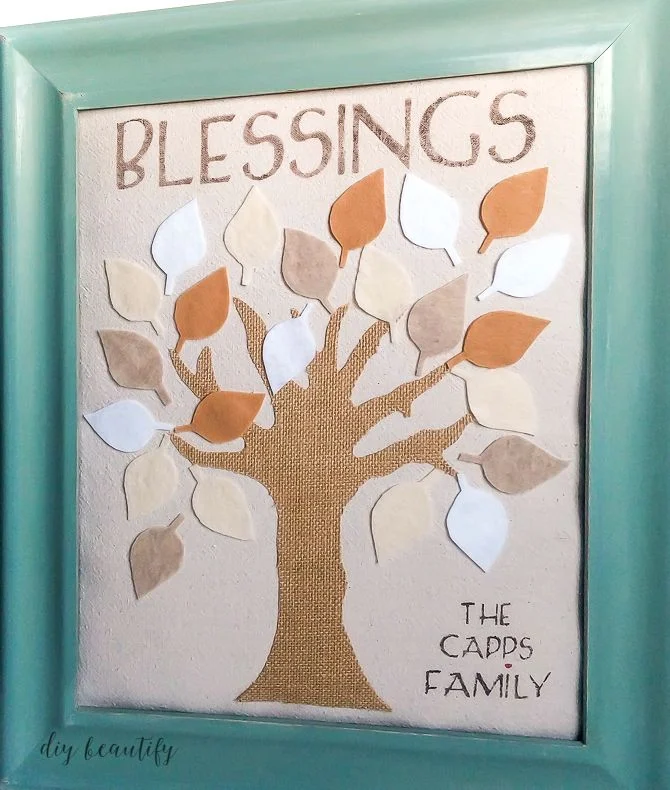
This family blessings artwork was inspired by my Thankful Tree Project that I showed you around Thanksgiving last year. The idea is the same...the colors are different. This blessings artwork is intended to be a permanent piece of art, so I wanted to use colors that could fit in a home year-round.
My sweet friend and I exchanged business services for one another, which is a really great thing to do with like-minded friends. She is a very grateful person and is always talking about blessings with her two girls. We agreed that this would be the perfect piece for me to make for their home, although she has no idea what it looks like (she gave me creative license to do what I wanted!!).
It's two-fold in that each member of the family gets to be a part of this family tree by virtue of belong to this family and by recording their blessings on the leaves!
Because our town is right on a lake I thought these soft colors would be perfect. Plus, who doesn't love Duck Egg Blue...and burlap...and drop cloth - ALL together in one project?! Be still my heart!!
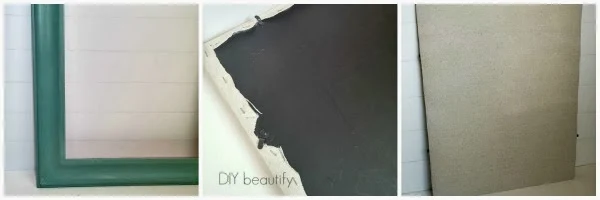
I started off by painting the frame with chalk paint, distressing it slightly and then waxing with furniture paste. I popped out the glass, the mat and the backing. I saved the backing and padded it by laying quilt batting on it and then wrapping a piece of drop cloth (washed so it's nice and soft) around the back. Using my trusty staple gun, I stapled it to the mat, pulling nice and tight. I remembered to take pictures as I went along, so here ya go :)
After I had the drop cloth stapled on, I pushed it back into the frame and then cut a piece of heavy cardboard to fit and stapled it to the frame around the edges (just to make sure it was going to stay in there good and snug). This way it looks nice and neat at the back.
I really, really wanted to use burlap on this project in some way...so imagine my delight when I found a roll of laminated burlap! Have you guys seen this stuff? It comes on a roll or in sheets, can be found at Michael's. The back only is laminated, which makes it very easy to cut out intricate shapes...like the tree in this project.
I used the tree template that I saved from when I made the Thankful Tree project with my kids at church. It is a simplified version of a tree so it would be much easier for the kids to cut out. You can see that I modified it as I was cutting to make it look more 'real'.
The tree was glued onto my drop cloth mat using Fabri Tac, a wonderful, super-sticky glue for adhering fabrics together. They call it 'the glue gun in a bottle'. It adheres immediately! (I have not been compensated for saying that, I just love the stuff!)
Now it was time to prepare my word stencil for across the top. I use my Cricut die cut machine all the time for projects like this. I just have the basic machine, I think I paid $70 for it about 10 years ago...and it has paid for itself many times over when I think of all the money I've saved on stencils that I haven't had to buy!!
Update: my Cricut stopped working recently, and I upgraded to a Silhouette machine because it can do so much more than my little Cricut.
After cutting my word out onto vinyl, rather than removing the back of the vinyl (think of a sticker) I simply taped the whole thing in place. My reasoning is that it's very difficult to not mess up a long, 12" 'sticker' and have it bend and fold and become ruined.
So I left the backing on. I was planning to use very, very little paint and I knew it would be just fine. Let me show you the pictures so you can see what I mean.
Like I said, I used a tiny bit of paint, and I dabbed most of it off before I started pouncing it onto my stencil. I used the fingers of my opposite hand to help hold down the stencil as I was working so those parts that are bubbling up would lie flat. As you can see, I had absolutely no bleed through! Yay for me :) You may notice that the top of the tree looks a little loose in the middle two pictures...I ran out of glue after gluing the bottom and had to send my trusty Mr. Diy out to get me some more. Aren't supportive hubbies the bomb?!
For my leaves, I cut out several card stock leaves in different papers, once again using my trusty Cricut. I used one as a pattern to cut out a bunch of felt leaves in various neutral shades, cutting the felt leaves slightly larger.
I glued all the felt leaves down onto the tree. They are the permanent leaves.
Are you wondering what the card stock leaves are for??
They are for my friend and her sweet little family to write their blessings on and layer them onto the felt leaves! I found if you rub the card stock leaves a little on the felt, they stick all by themselves without glue!!!
Isn't that the coolest thing ever?? I didn't write on any of them, obviously! I just stuck them up them to show you how they'll look. Just imagine them covered in blessings....won't that be special for this family?
This was such a fun project to do and I love how it turned out. The leaves got their own special little envelope so they'll stay safe and not get crumpled!
I can't wait to drop this off at their home and see their faces :)
Thanks for letting me share this project. I hope you're inspired to make your own Family Tree Blessings Art!
Have a wonderful day!
bringing beauty to the ordinary,
I Party With:


How very pretty! I'm pinning! Linda
ReplyDeleteThank you so much Linda :)
DeleteDuck egg blue, burlap, and drop cloth. Yup, love them all! Very cute way to count your blessings. Thanks for sharing with SYC.
ReplyDeletehugs,
Jann
I love when I can incorporate lots of my faves into one project, lol! Thanks Jann :)
Delete