Shabby Wreath for Spring
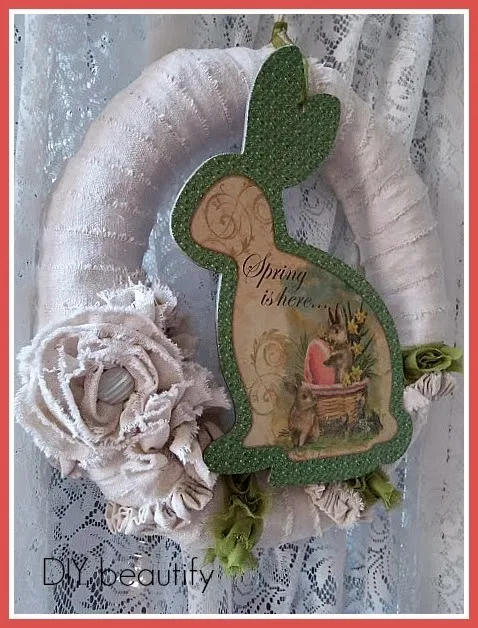
A Shabby Wreath for Spring and Easter Using Drop Cloth Strips!
Good Morning Peeps :) I trust temperatures are rising, the sun is shining and you are seeing some bulbs push their way through the earth. Spring might just be my favorite season of the year! I love all the newness that it brings and the promises that are just around the corner (flowers, lazy summer days, vacation).
Today I want to share this sweet and shabby wreath with you. It was sooo easy to make.
I made this wreath a couple years ago so I don't have a tutorial or pictures of the process {so sorry}.
The base of the wreath is a straw wreath form (you know the kind that is wrapped in plastic) but I'm sure a Styrofoam base would work just as well. You want something that you can push stickpins into.
The beautiful fabric that I have wrapped around my base is simply drop cloth that I've torn into strips. What makes it extra shabby is the torn, frayed edges. For all you sewing-phobes out there: There is NO machine sewing involved in this wreath - and only minimal hand stitching on the embellishments!!
Start by pinning the end of your fabric strip into the back of the wreath and then just start wrapping the drop cloth strip around the wreath form. Remember to overlap each strip slightly so you completely cover the straw wreath and wrap nice and tight. Pin again where your strip ends. If you need more than one strip, that's okay; just try to line them up evenly.
My green roses are just a length of trim from the fabric store. I again just wrapped it around in a pleasing way and pinned in place.
Then I made three drop cloth flowers and a drop cloth ruffle (totally optional). The ruffle was pinned on but I hot glued the flowers into place to make them more secure. If you don't want to sew a ruffle, you could add a strip of gathered lace from the store or eyelet, or whatever catches your eye!
I made the drop cloth flowers using this method that I used to make my gathered flowers. There is a bit of hand stitching but it's very very basic (just stitching up one side of a strip of fabric) and then you pull both ends of the thread and your fabric ruffles together. SO "sew" easy, get it :) I hot glued big buttons in the middle of my flowers. I found three flowers to be the perfect number for this wreath.
A strip of drop cloth looped around the top makes the perfect hanger.
When I was at Dollar Tree this week I spotted these darling bunny cardboard cutouts. They are well made, vintage looking, with just the right amount of sparkle. This green bunny is the perfect 'centerpiece' to my shabby wreath. I just untied his ribbon and retied it around the hanging loop of my wreath.
It's perfect for Easter but easy to remove when I want to.
So there you have it...an easy and charming shabby wreath - to help speed Spring on its way :)
bringing beauty to the ordinary,
Proud to be Featured at:
I Party With:


You got the bunny at The Dollar Store?! Get Out!
ReplyDeleteIt looks perfect on your wreath. Love the ruffles!
Thanks Ashley :) It was really easy to do and when I saw that bunny (yes at Dollar Tree) I knew it would be the perfect finishing touch :)
DeleteVery cute! I just bought that very same bunny sign from my local dollar store too! They had butterflies as well.
ReplyDeleteTania
I loved the butterfly too Tania, but I'm a bunny girl :) Love their sweet faces! Thanks for stopping by!
DeleteI saw that bunny at The Dollar Store! Your wreath is beautiful!
ReplyDeleteI couldn't believe it was only a buck! It's very good quality. Thank you :)
DeleteI love this so much that I hope you don't mind if I make one for me!
ReplyDeleteOf course not Terry! That is the biggest compliment you can pay a crafty gal...would love if you sent me a pic of your completed wreath! You might enjoy this Shabby Fall Wreath I made in much the same way, but instead of flowers, I made pumpkins from thrift store sweaters..I have a tutorial for the pumpkins too :)
Deletehttp://bit.ly/1smKaO8
Happy Spring :)