How to Make Tiered Plate Stands for Under $5
DIY Tiered Plate Stand with Thrifted Plates
This post contains affiliate links and I will be compensated if you make a purchase after clicking on my links.
I've made tiered dessert stands in the past and I love them!! I currently have two, and they're big - great for cookies and brownies and even a cake! They get used a lot.
When I was
She used vintage sherbet cups and clear dishes (a light and airy look that I love) and I hunted on Ebay for sherbet cups for awhile but the price was going to be too high (that darn shipping).
Goodwill wasn't yielding much in the way of colored sherbet cups. I found clear dishes and some purple colored stemware that would have worked nicely...but I'm not really into purple. I wanted to make something I would love and use. I was about to admit defeat when I spotted one piece of the tiniest little cut crystal stemware. I don't know if it's for brandy or what but it made me think...hmmm...because a couple of years ago, I bought another crystal piece a bit larger and it's been sitting unused in my china cabinet at home.
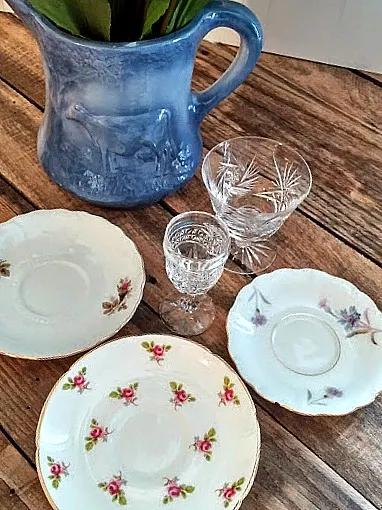
So I went back through the aisle of dishes once more (with a new eye this time), and of course you can see what I found...
Three mismatched and darling saucers...all with florals, all with gold trim.
I decided to make a tiny tiered dessert stand. Total cost: $4!
Here's how I did it.
E-6000 is the glue you want to use for attaching glass and/or china together. It stinks but it really holds well (I already had some so I'm not including it in the cost of the project. It's cheap though and you can find it at Walmart).
I attached a bead of glue around the bottom of the stemware and carefully set them into the middle of the plates (figuring out the proper order beforehand of course - wink). Then I let the glue set for several hours...if you don't, it will shift and move around on you.
Then I glued my tower together, this time the glue went around the rims of the stemware. Again, I left it alone for a couple of hours...it was hard because I wanted to see how cute it looked!
Finally, it was okay to flip it over...How sweet is this? Funny thing though...in all my pictures, the saucers look the same size...but they are graduated (although the bottom two are very similar).
Perfect for holding jewelry...
Or even some sweets! I wish I had some petit fours to photograph, but sadly they are not something I keep in my pantry on a daily basis, lol!
The great thing about this stand is that because they are saucers, they have a slight bowl shape to them, so the contents are more apt to stay put.
I could even see this used in a girl's shabby chic bathroom with hair accessories or makeup! The crystal stemware gives it a bit of bling and the floral dishes make it so dainty!! Definitely a very feminine piece!
This project would be a perfect last-minute Mother's Day gift if you are still looking for something to make! A beautiful, homemade gift is always thoughtful and appreciated.
Of course, you can use full-size plates with sherbet cups or even stemware in between too...I'll show you my large stands another time.
I hope you're inspired to make a pretty stand for yourself or someone you love!!
*****************************************************************************
And speaking of Moms, just in time for Mother's Day, zulily is hosting a #MyMomIs celebration of moms everywhere! Is your mom a hero, a great cook, an inspiration, your best friend... or something else equally as special? Every mom is one of a kind and zulily wants to hear about yours. This Mother's Day, zulily is celebrating moms by asking kids (big and small) to share photos answering the prompt “My Mom Is _____.” The photos will be displayed in a gallery for the world to view at http://www.zulily.com/mymomis.
To participate, visit the zulily #MyMomIs webpage, download zulily’s sign or create your own, snap a picture with the sign and share the photo via social media by tagging #MyMomIs or uploading the photo directly to the gallery.
To learn more about zulily and shop for the hottest trends for moms of all ages and their kids go to http://www.zulily.com.
bringing beauty to the ordinary,
Proud to be Featured at:
Sharing with:


These are sweet Cindy! And so thrifty too. They would make great gifts!
ReplyDeleteThat's exactly what I was thinking, Sharon! I'm going to keep my eyes out for more cute plates at Goodwill. Thanks for stopping by to comment :)
DeleteHi Cindy! Great minds. I made one similar to this. Mine was made with Dollar Tree items :) Gonna be hitting up the thrift store soon tho!
ReplyDeleteThanks for sharing.
Hey Bobbie, I love finding items from the Dollar Tree for crafting too! Good luck on your thrift store run :) Thanks so much for stopping by and taking the time to leave a sweet comment!!
DeleteThese are so fun! I have one and use it a lot. I love the items that you used! Thanks for sharing it with SYC.
ReplyDeletehugs,
Jann
I love the usefulness of these stands! Have pretty ones (and thrifty ones) makes them even better!! Thanks for stopping by!
DeleteI think your tiered stands are adorable Cindy. Thanks for sharing them at Shabbilicious Friday. I'm delighted to be featuring them at tomorrow's party.
ReplyDeleteThese would be so cute for tea parties! Thank you for sharing!
ReplyDeleteStarla, thank you so much for your sweet comment and I agree that they'd be perfect for tea parties. They are nice and dainty! I appreciate you taking the time to stop by and comment! Have a great day :)
Delete