How to Make a Thrifted Bird Feeder
I love birds and I wanted to attract them to my yard with something pretty.
Something that didn't cost $50! Anyone with me on that?
So when I saw a bird feed made from a vintage snack set on Pinterest, I was inspired to make something similar.
Affiliate links included for your convenience. Find my full disclosure policy here.
I wanted something that I could hang from a branch, rather than stick into the ground. After scouring Goodwill for a couple weeks I found a crystal snack plate with open handles and a
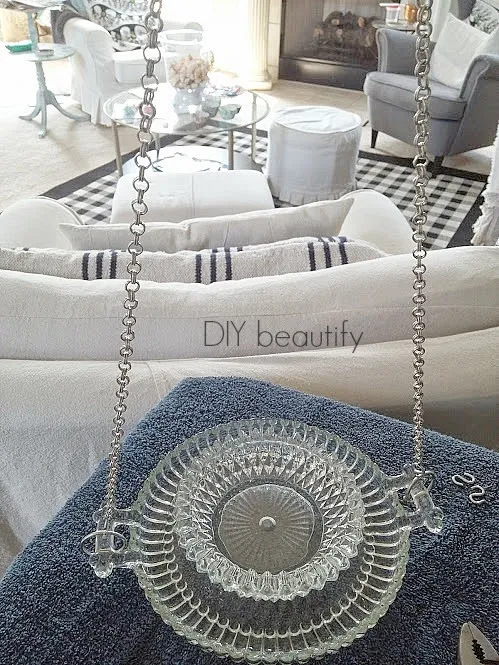
Um...you know you might be a DIYer if the only available workspace you could find
was your ironing board!
The other items I used were S-hooks, clip rings and my trusty E-6000 glue (perfect for gluing glass and ceramics). I used E-6000 when I made my tiered plate stand and it has held up well. I only had to purchase the S-hooks.
The first step was gluing my pieces together. I just ran a bead of glue along the bottom of the candy dish and set it in place. It needed a couple hours to set.
While the glue was working, I separated my vintage necklace into 4 strands using pliers. My plan was to attach the two heavier strands to the clip rings attached to the handles (as shown above) and join the chain at the top with S-hooks.
However....as plans often go awry...
When I held my bird feeder up by the chain, it was very wobbly and let's just say I might have had to vacuum up a bunch of bird seed!
So I'm not the engineering genius of the family!!
Okay, onto Plan B...
(sshhh...there really wasn't a Plan B...but there were two extra chains...so a Plan B was quickly hatched!)
Obviously I had nowhere to clip the extra chains to at the bottom but I was hopeful that if I attached the two chains into one long chain, ran them under the plate and brought their ends up to meet the other chains...that the weight of the plates and the little scallops along the edge would keep them in place (that was a very wordy sentence that I truly hope you understood!)
Thankfully, it worked like a charm (big sigh of relief!)
A small S-hook was fed through the chains at the top (sorry, this pic only shows the 2 chains but trust me, all 4 fit!) and then I used my pliers to close the ends of the S-hook so they wouldn't slide off. I then attached a large S-hook so I could simply hook my thrifted bird feeder over a tree branch.
Here you can see all 4 chains in action. It's hanging straight and looks great!
I like the fact that because the plates are clear crystal, I can easily see if they need to be refilled without lifting the bird feeder down. It looks just charming hanging from my Bradford Pear tree in the backyard...just off the kitchen.
I haven't noticed a bunch of new birds yet...but I'm hopeful that if I feed them...they will come :)
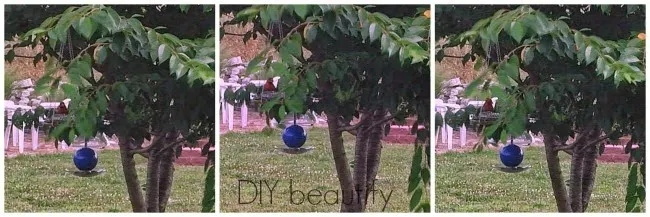
So just for fun I bought Mr. Diy a plastic bird feeder for Father's Day (it wasn't $50!!). It's hanging on the other side of the tree. We're having a healthy little competition to see who's feeder is more popular with the birds :) So far they don't seem too interested in either one.
Update: while at first it looked like the big blue ball was getting a lot of attention from
the birds (much to the chagrin of my thrifty-lovin heart)...lately they have been flocking to my little homemade feeder :)
I think it just took them awhile to find it!
It was fun to watch this cardinal land and jump on board!
Thanks for sticking with me and reading today's post. It was wordy and maybe completely incomprehensible...that's why I take lots of pictures!! This was a very easy DIY that could be easily modified depending on the type of plates you find (for instance, a large round dinner plate as the base with three cups glued in the center, handles out. The handles would be the perfect 'holes' for chain to attach to). Just use your imagination as you're browsing the thrift store!
Have fun and have a great day friends!
bringing beauty to the ordinary,
Proudly Featured at:


That is one pretty little bird feeder - love it!
ReplyDeleteThanks Sharon..it was fun to make :)
DeleteLove it Cindy - so pretty! I love that you are inspired, dive right in, and figure it out as you go...a girl after my own heart :)
ReplyDeleteMarie@The Interior Frugalista
Aw, that is just the best comment Marie! And up, pretty much sums me up...if I waited until I knew it all, nothing would get done ;) Thanks so much for stopping by :)
DeleteVERY pretty -- I love the clear glassware as well and the way it sparkles. I think that would also attract more birds. Great job!
ReplyDeleteThanks Lauren, that's what I thought too...elevates a regular item and makes it a little classier! Thanks for stopping by :)
DeleteI love seeing how you "worked through" this project. I've got the perfect tree for a bird feeder just like this!
ReplyDeletePlease stop by to link up with my Show-Licious Craft & Recipe Party. We go live Saturday morning at 8:00 EST.
~ Ashley
Haha, I was bound and determined to make it work!! The birds have been enjoying it too :) You need to make one.
DeleteSuper cute Cindy! You did a great job. Thanks for sharing with SYC.
ReplyDeletehugs,
Jann
Thanks Jann, it was trial and error all the way...but I'm happy to say I triumphed ;) and the birds are lovin it!
DeleteHappy to feature you at our garden party this morning! Thanks for sharing! Hope to see you again soon!
ReplyDeleteThanks Sharon, that's wonderful!
DeleteI love that you made such a lovely birdfeeder---they don't usually look this good! Your project would also be a great way to store jewelry or other accessories in a room.
ReplyDeleteOh that's a great idea too!! Love it :) I always find so many pretty treasures at Goodwill and love to think up fun ways to create with them. Thanks for stopping by to comment :)
DeleteCindy....your bird feeder is so sweet and pretty.
ReplyDeleteThanks for sharing your tutorial with us at Project Inspire{d}!
P.S. Next time...tie a little yellow or red ribbon to the feeder or chain and the birds will find your sooner. ;)
Thanks for that great tip Diane! I'll have to do that :)
DeleteAwesome!!! I totally love it!!! How does it do in the wind? My daughter is moving to her first house in July and this would make an awesome housewarming gift, but in Hawaii it is windy pretty much all the time! I would hate to have such a pretty thing break, but it is nice to know that I could easily make another one!!!
ReplyDelete