Paper Crafting and Vintage Memories
Preserving the Past - Paper Crafting
Disclosure: this post contains affiliate links. If you make a purchase after clicking on the link, I make a small commission (at no extra cost to you). I will only promote products that I love. Thank you for helping to support my blog.
Do you remember when Polaroid cameras were all the rage? I remember my dad taking pictures and the picture popping out of the camera a few seconds later! He would wave it around a little so it could dry before he would let us touch it. We were always so excited to see the instant image that was captured.
As neat as Polaroids were, the prints they produced were small. One size only.
I inherited a lot of pictures when my parents passed away. I wanted a way to preserve them and make them look as special as the memories feel..and to preserve them all together in a vintage album.
I realize I haven't really shown you any of my scrapbook pages, so I'm going to remedy that today! In my scrapbooking heyday a few years ago, I completed over {cough} 18 albums!
I realize I haven't really shown you any of my scrapbook pages, so I'm going to remedy that today! In my scrapbooking heyday a few years ago, I completed over {cough} 18 albums!
Here are some tips for paper crafting with Polaroid pictures:
 |
| My dad with his parents |
* Using papers and embellishments that have a vintage feel helps to stay true to the time period.
* Use the actual prints. They're much safer in a acid-and-lignin-free album than in a dusty box in the attic!!
* Placing all my pictures and embellishments close together makes them appear larger and gives them more impact than if they were spread out around the page.
* Use the actual prints. They're much safer in a acid-and-lignin-free album than in a dusty box in the attic!!
* Placing all my pictures and embellishments close together makes them appear larger and gives them more impact than if they were spread out around the page.
 | |
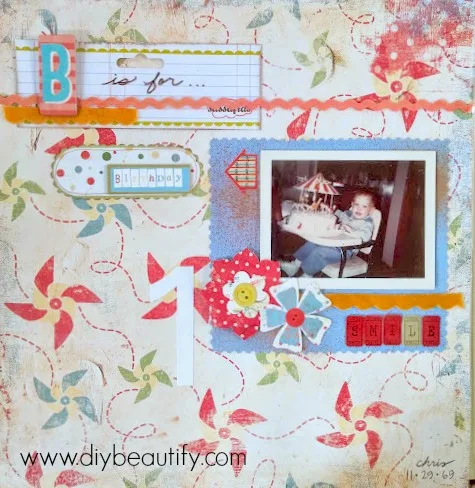
| Mr DIY's First Birthday |
This is the only picture that I have of Mr DIY on his first birthday to commemorate the
'auspicious occasion'!
* Mount a single picture on a larger, solid background and add embellishments to it to give the picture more prominence.
* Embellishments are colorful and playful, in keeping with the occasion (notice they're not 'baby-themed' yet they still suit the picture).
 |
| Me, about 16 months old |
* Include both the original as well as a larger photocopy. The original picture in the upper left shows the true colors (and my favorite purple velvet drapes and large stuffed animals - that I still remember!) I scanned and printed the picture out onto card stock in sepia in a bigger size. Including them both on the page is a fun way to place extra emphasis on the picture. The purple background supports the theme and the flowers add a girly feel to the page.
* Use a contrasting color (in this case turquoise) to make the page pop and add interest.
 |
| My mom with my brother and I |
* Choose paper that supports the era. I was a kid in the 70's and this paper is a true reflection of that time!
* Add a small journaling block to tell the 'story'
* Use minimal embellishments with a busy paper and keep the number of pictures to a minimum.
* When using a strong patterned background, mount pictures onto solid card stock to give a little 'breathing room' between the picture and the busy paper.
 |
| Mr DIY and family |
* Let the title tell the story. It's another fun and easy way to 'beef up' a single picture on a page. Oh those Long children, lol!
 |
| Me and my momma |
* One precious picture can be emphasized by a big title used directly beside the picture to give emphasis to the single print.
* Fill empty space with trim, ribbon, or strips of paper.
 |
| My Grandparents, circa 80's |
I have fond memories of my Papa's shiny suits and Nana's organza dresses, lol! Papa always had candy for us...and he loved to nibble on our ears (funny)! This picture could have easily been lost in a dusty shoe box. It's dated and again, solitary.
* Mounting a solitary picture onto complimentary card stock and rounding the corners helps it to 'jump off' the page!
* Use a single, large embellishment.
* Mounting the picture, title and embellishment close together gives it more impact
I hope you've found these tips for paper crafting with vintage pictures helpful!
You probably have a ton of pictures just like this slowly deteriorating in your attic! I encourage you to pull them out, pic your faves and make an album...or two!
Craft stores are great places to get all the supplies you need. And don't forget Amazon (affiliate link)...their prices are oftentimes better and their selection is superb!
I sourced a few selections from Amazon, to help you create the same look I've achieved -
bringing beauty to the ordinary,
Sharing with:
Cupcakes and Crinoline Project Inspired, Confessions of a Plate Addict The Scoop, Elizabeth & Co Be Inspired, Place of My Taste Work it Wednesday, Migonis Home Enchanting Inspiration, Fabulously Creative Friday, French Country Cottage, Design Dining and Diapers Inspiration Gallery, The Pin Junkie, I Heart Naptime Link Party Palooza, Shabby Art Boutique, That DIY Party, Its Overflowing,


Comments
Post a Comment
Your comments are like sunshine and chocolate! Thanks for taking the time to leave a nice one ;) I read all comments and love to respond if you leave your name and email! Otherwise, please look for my response under the post where you left it!