How to Create a Monogram Canvas
How to make a sweet and simple monogram canvas. This project makes a perfect personalized gift!
Affiliate links may be included for your convenience; my full disclosure policy can be found here. If you click through and make a purchase I'll receive a small commission at no extra cost to you!
Monogram Canvas Tutorial
Supplies Needed:
- canvas (I used a large, 16" x 20" canvas)
- chevron patterned frog tape
- small high density roller
- sample pot of paint from Lowes or Home Depot
- Silhouette or other die cut machine
- paper plates and paper towel
Paint Chevron Stripes onto Canvas
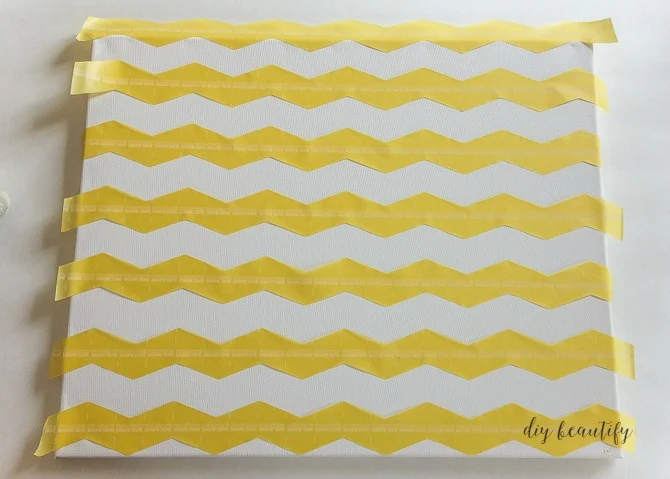
If you've never worked with 'shape tape' before, you are going to love how easy it is to get perfect chevron stripes!Place the tape across the canvas at even intervals. Leave a little hanging off the edges. Use a credit card or hard edge to burnish the tape onto the canvas (difficult to do because the tape doesn't really want to stick well. Trying flipping the canvas over and burnishing it from the bottom).
Pour a little bit of paint onto a paper plate. Have another paper plate with a folded paper towel on it nearby.
Run your paint roller through the paint to saturate it, then roll it a couple times on the paper towel to remove the excess. Here's the reason: if we took a wet roller to the canvas, that excess paint will find a way to seep under the tape and our edges won't be crisp.
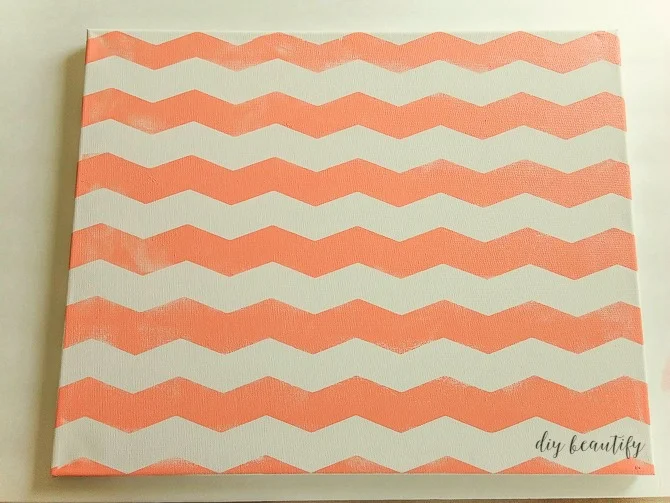
Carefully peel up the tape and discard. Admire your pretty stripes.
Notice that the color isn't evenly distributed; I have areas where it's lighter. Normally, if I'm painting onto wood, I would lightly distress with a sanding sponge after the paint dried to remove some of the hard edges and make it look aged. However, because this is canvas, I can't do that. So I created a distressed look during the paint application by keeping it from being too perfect.
If you don't want this look, you'll want to add a little more paint in the step above.
Create the Monogram
Now this step doesn't need to be hard, especially if you have access to a computer and you own a die cut machine like a Silhouette. The reason I love my Silhouette is that I can create my artwork in PicMonkey and then upload it right into my Silhouette machine and cut it out.PicMonkey is awesome because they allow you to use fonts that you already have on your computer. When you click on the large 'T' in the left hand menu, it will bring up the option to use 'Ours' or 'Yours'. All of the fonts in your computer will be, you guessed it, in the 'Yours' tab. The font I used for this application is Monogram KK. It's a free download from dafont.com. This font is perfect for monograms and you can adjust the size as well as merge all the letters together so that it's one cut. Click here to download Monogram KK.
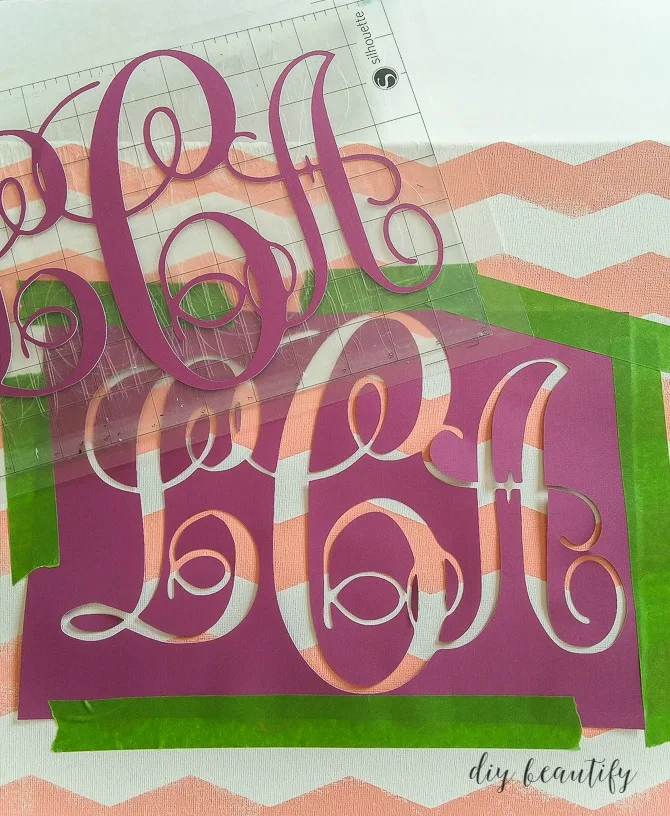
After I enlarged and cut my monogram out of craft vinyl, I carefully placed the negative in the middle of my painted and dried canvas and taped it down with regular green frog tape. (Note: I did NOT peel away the backing from my vinyl. Although it would have made it sticky, I was out of transfer paper at the time and knew it would be very difficult to get the stencil exactly where I wanted it without ruining it).
Next I painted in the monogram with black acrylic paint, being very careful not to get too much paint on my brush. I find a stencil brush applied in a pouncing motion (up and down) is the best way to keep the paint where you want it
After peeling up the stencil, I added a swirly accent in turquoise to the corners of the canvas as well as painted the edges .
This DIY project is a great way to take a plain canvas and personalize it. You have the ability to make it whatever color you like to match a bedroom or other area of your home. This canvas was created for a very special teen that I know, who was getting a bedroom makeover and was in need of some artwork to hang in her 'new' room.
bringing beauty to the ordinary,
Become a DIY insider!
You'll never miss a post, and you'll get all my FREE tutorials
and more...delivered straight to your inbox!
and more...delivered straight to your inbox!
Let's be Social! Follow along on Pinterest, FB, G+, Twitter, Instagram
Popular Posts You Might Have Missed
This blog's content is for entertainment purposes only and is not professional advice. By reading this blog and attempting to recreate any content shared on it, you assume all responsibility for any injuries or damages incurred. Read my full disclaimer here.


I'm off from school today and plan to open my Silhouette for the first time. I enjoyed your project and just may do one of my own.
ReplyDeleteGood luck with getting your health under control. Making lifestyle changes is never easy.
Thank you Paula, I hope you enjoy your day off and I'm so happy you're thinking of trying this project! Thank you for your encouragement also!
DeleteGood luck with your lifestyle changes. Its hard, but if you keep "how important being healthy is" in the back of your mind all the time it will be easier. Take all junk food out of the house. If its not there you can't eat it.
ReplyDeleteI have been dealing with a brain injury the past year, trying to get back to the old me, its one foot in front of the other every day and not beating yourself up when you slip.
Good luck
Thank you for your sweet words and encouragement! One step at a time is right. I know so many others are in the same boat and it helps to know I'm not alone. I hope you experience healing this year too my friend!
Delete