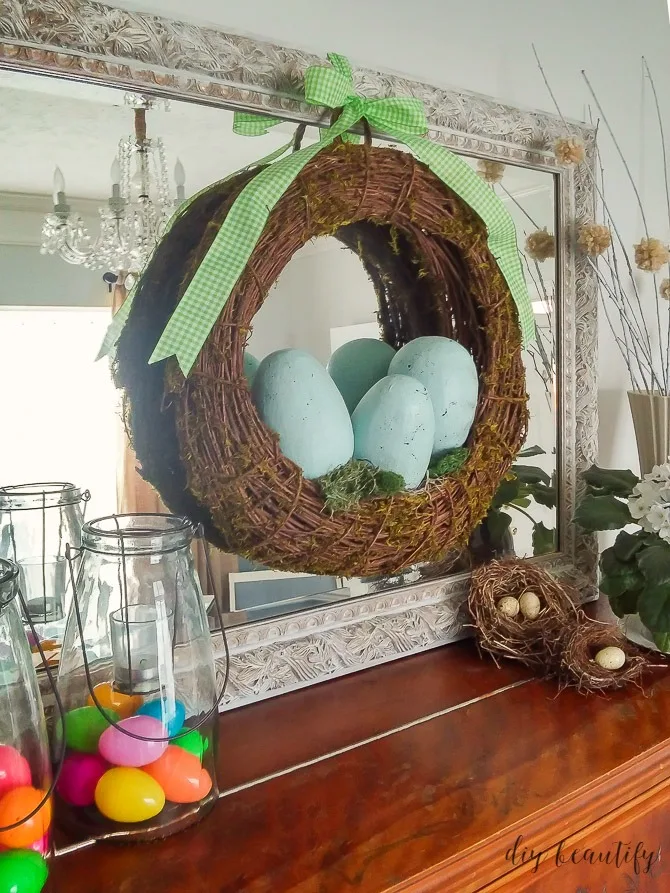
How to DIY Easy Robin's Eggs
A fresh Spring wreath for the front door is always a must. Create speckled robin's eggs that you can add to a wreath for a fun punch of Spring color.
Updated 2/2024
Affiliate links may be included for your convenience; my full disclosure policy can be found here. If you click through and make a purchase I'll receive a small
commission at no extra cost to you!
While I love wreaths, I'm not crazy about the high price tag, so I'm always determined to make my own unique ones. And when I spotted these large paper mache eggs at Hobby Lobby, I knew they would look great in the grapevine wreath I'd bought at Target. Of course, you could use small craft eggs and create an Easter Egg Wreath like this one.
How to paint robin's eggs for crafting
The craft eggs are plain, but with a few light coats of spray paint they come
alive. The color I used is a very soft bluey-green, La Fonda Mirage by
Valspar, but it seems to be discontinued.
This soft blue green
is a great alternative, another option is
this blue chalk paint spray.
I've since painted lots of eggs, and really prefer to use chalk paint because
it dries so quickly and less coats are needed.
Here is a great robin's egg blue color if you want to brush it on.
Painting the eggs
It takes several light coats to completely cover these eggs if you're spraying
them, because they obviously don't have a flat surface and tend to roll around
on you. My tip is to keep them together, as you see above. Spray paint all the
eggs as one surface, then once dry, roll them all and prop them against one
another again and repeat until all sides are coated.
If you're painting the eggs by hand, paint one side (top or bottom) and use
the tray that the eggs came in to hold them while they're drying before
flipping and painting the other end.
Once you have covered the eggs to your satisfaction, and the paint is dry it's
time to create the spots that are common in robin's eggs.
How to create robin's egg speckles
I used an old toothbrush and some
brown acrylic paint and flicked my thumb along the toothbrush to spray the paint onto the eggs.
You'll want to do this part outside or protect your work surface as it can get
a little messy.
You'll get dots, blobs and splotches...we're not after perfection here! The
odd large mark will only add dimension and character. Once dry, apply
clear wax and buff to give the eggs a soft sheen or you can simply leave them as
is.
Pin this image for easy reference!
The large grapevine wreath I found at Target has the perfect little
nesting spot for the eggs. I added some
craft moss to fill in the holes under and between the eggs. If you can't find a similar
grapevine wreath (this one is by Smith and Hawken), you may need to hot glue
your eggs to the
grapevine wreath form.
These DIY robin's eggs add a fun punch to my Easter decor. Watch this short
video if you want to see how I hung this wreath from my mirror.


The robin eggs are really pretty!
ReplyDeleteThank you Melissa, have a great week!
DeleteThese robin eggs are so happening in my house this Easter! Thanks for the tutorial - love the wreath.
ReplyDeleteThank you so much Marie, these are a fun project and I hope you enjoy the craft!
DeleteSuch a cute wreath for Spring and Easter! Thanks so much for sharing your creativity at the The DIY Collective this week! Please come back next week to show off your latest project!
ReplyDeleteHave an awesome weekend!
~ Ashley
Thank you for joining in and sharing your amazing DIY Robin’s Eggs with us and linking up to Friday Favorites. I’ll be featuring your post on my blog this week. We hope you’ll swing by and link up again this Friday! Have a wonderful Easter!
ReplyDeleteDefinitely my favourite shade of blue Cindy. I've included this project in my Shabbilicious Easter Egg round up for the Shabbilicious Friday Link Party tomorrow.
ReplyDeleteHappy Easter ~ Kerryanne