Cute to Classy Lamp Makeover
Do you ever have a crafty idea that is really amazing in your head...
...but the real-life version is rather disappointing?
It's that time of month when the Thrifty Style Team ladies have teemed up to share our easy, budget-friendly decorating tips and ideas with you!
Back to my 'craft disappointment'. When I bought this lamp to sit on top of my freshly painted driftwood nightstand in my brand new guest room, the shade looked a little boring.
It was either that or the fact that I was currently DIYing all.the.things and just couldn't leave well enough alone!
So I thought I'd jazz up the lampshade with some burlap flowers and trim. The results were ehh, okay but I was never really in love with it.
As with most fabric and hot-glue projects, they're pretty permanent so I just left the lamp alone.
Because I'm super-cheap, the little lamp-that-I-did-not-love came along with us on our move from Tennessee to Texas last year.
I was staring at it recently and realized that I really hated it!
It took a little trial and error until I was satisfied, but it's a completely different lamp now!
Affiliate links are included for your convenience; my full disclosure policy is here.
It's time to see what thrifty projects my team members are sharing this month. Check out their DIY projects and decor by clicking on the links below!SUPPLIES USED
- iron
- chalk paint
- paint brush (this is my favorite brush)
- ribbon/trim
- hot glue
HOW TO GIVE A LAMP A FRESH MAKEOVER
I started by removing the shade from the lamp and attempting to remove all the burlap and trim from the lampshade. I don't have pictures of this step because I was really skeptical about the success of it! You could also start with a new lampshade and just ignore this first part!
I had read online that a hot iron could be used to help remove hot glue from fabric. Set-in, hot glue that was long cold.
I figured I had nothing to lose, so after ripping off hunks of the burlap and the trim and flowers, I used the hot iron on the inside of my lampshade to loosen the glue.
I used a piece of cotton between the shade and the iron to protect the shade from burns. Then I picked off the glue from the front of the shade.
I was able to get all but a little of the hot glue off the lampshade!
I wasn't worried about it being pristine because I was planning to cover it anyway with some loose-weave ribbon that I had purchased for a serious discount after Christmas. I think I paid about $1 per roll!
I wrapped 5 strips of ribbon around the lampshade and hot glued the ends at the back, hiding the worst of the old hot glue.
Then I moved on to the base.
I originally thought a dark gray would look good, but I wasn't loving it with the shade. So I painted it with a second coat in a light gray with some of the dark peeking through. In the end, I didn't love that either and painted over it with white chalky paint. I used Wise Owl Chalk Synthesis Paints, which I love. I gave the finished, dry base a coat of their all-natural wax stick in Sweet Orange...and buffed it to a light sheen. This stuff smells sooo good, it's tempting to use it on your dry hands!!
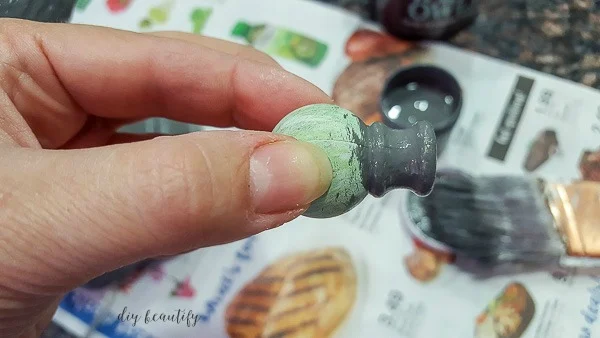
Here's a tip for painting the finial...
Hold it in your hand and paint the bottom edge, then lightly screw it onto the lamp and you can paint the top without waiting for the bottom to dry! This is great when you're impatient like I am...or when you're painting multiple coats (ahem...like I did)!
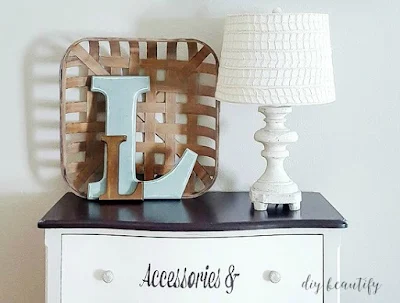
The lamp base and the shade came together beautifully!
The lamp went from looking 'cutesy' to classy!
It's all grown up now! The neutral color matches everything, so I can imagine this little lamp will travel from room to room as I change out my decor!
This lamp makeover didn't cost me anything as I had the supplies on hand, but it's an inexpensive makeover.
Become a DIY insider!
You'll never miss a post, and you'll get all my FREE tutorials
and more...delivered straight to your inbox!
and more...delivered straight to your inbox!
Let's be Social! Follow along on Pinterest, FB, G+, Twitter, Instagram
Popular Posts You Might Have Missed
This blog's content is for entertainment purposes only and is not professional advice. By reading this blog and attempting to recreate any content shared on it, you assume all responsibility for any injuries or damages incurred. Read my full disclaimer here.


How cute is that! I for sure am going to look at my lamp shades different now.
ReplyDeleteThanks Bliss!
DeleteOh I love it!! That ribbon was the perfect touch! I have many projects that evolve over time and grt just a little better every time.
ReplyDeleteThanks Jessica, yes I hardly ever throw anything out if I think I can improve it!
DeleteSo cute! Love the ribbon and the texture that it adds to the lamp. It's a great way to jazz up a plain shade.
ReplyDeleteThanks Kristi!
DeleteOh my. The ribbon made all the difference. It fits ypur style perfectly. Love it!
ReplyDeleteThank you!
DeleteWe love lamp makeovers and yours is just adorable! Love the shade.
ReplyDeleteVicki and Jenn - 2 Bees in a Pod
Thanks ladies!
DeleteYour lamp update is super cute! Love how you used the ribbon to fancy up the shade a bit!
ReplyDeleteThank you Pam, I'm enjoying the update!
DeleteGreat transformation Cindy!!
ReplyDeleteThank you!
Delete