Marbled Metallic Ornaments - 2017 Ornament Exchange
An easy tutorial to make marbled metallic ornaments! These sparkly, shimmery ornaments are a stunning Christmas gift idea!
Well hey there friends! I'm sure you're aware that Christmas is just over 5 weeks away. My DIY blogger friends and I have been hard at work coming up with ideas to inspire you! Welcome to the 2017 Ornament Exchange and Blog Hop!
Last year I didn't make too much for Christmas as we were just barely in our new home. This year, we're all settled and I'm making ornaments galore and creating a Christmas wonderland in our home!
I joined a fabulous group of DIY bloggers for an ornament gift exchange. We swapped names, shared a little about our tree decor and ornament 'wish list' with our partner, and made an ornament for each other with a budget of $15. Today we're sharing our creations with you!
My exchange partner was Michelle James who blogs at Our Crafty Mom. Michelle shared that she loves metallics...primarily copper, and blues on her tree.
So of course I wanted to incorporate all of Michelle's wish list into her ornament, and I think I accomplished that with this marbled metallic ornament!
Links to all the completed ornaments are below so you'll be able to hop over and visit each blogger and see her ornament tutorial...lots of inspiration for you!
Affiliate links are included for your convenience; my full disclosure policy can be found here.
SUPPLIES FOR METALLIC ORNAMENTS
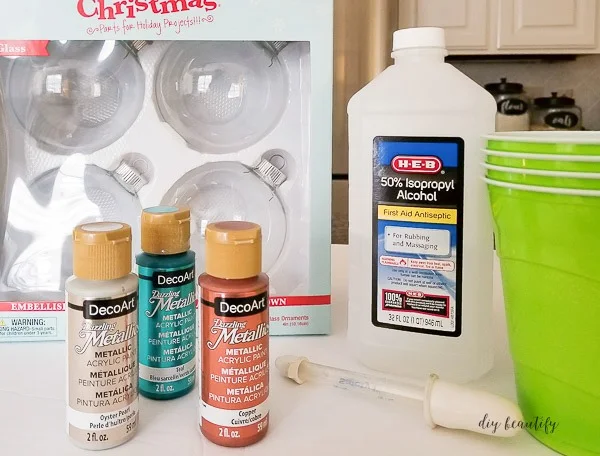
- clear glass ornaments (I chose the largest ones I could find for a big impact)
- metallic paints in choice of colors (I used Dazzling Metallics by DecoArt in copper, teal and oyster pearl for Michelle's ornament)
- rubbing alcohol
- dropper
- plastic cups
- wide ribbon
- craft vinyl to add a customized monogram (optional)
- Silhouette or Cricut die-cut machine to cut vinyl
Before we get into the tutorial, let me tell you why I chose to use rubbing alcohol. Initially I wanted to make these ornaments with alcohol inks, but when I priced them they were just too expensive for the $15 budget and didn't come in the exact colors that I wanted to use.
I have made painted ornaments in the past, but found it difficult to get the paint to cover the entire ornament. A ton of paint was needed, and it took forever to dry! That's where the rubbing alcohol comes in... it thins the paint just enough to make coating the inside of the entire ornament with paint a breeze, even these jumbo ornaments! The bonus is you don't need to use as much paint...therefore they dry much more quickly.
These specific paints, Dazzling Metallics by DecoArt, are ideal for creating shimmery ornaments! They're made with the brightest metallic flakes available, perfect for that Christmas dazzle!
HOW TO MAKE MARBLED METALLIC ORNAMENTS
Here are some pretty pictures, and I'll share the details below.STEP ONE
Decide on the paint colors you will use. I recommend 3 per ornament.Holding the ornament at an angle, drizzle a line of paint into the ornament so that it runs down the side. Stop squeezing the bottle once the paint reaches the bottom.
Repeat this step for each color, alternating colors around the inside of the ornament. I drizzled 2-3 lines per color into each glass ornament.
Note: you won't be covering the entire ornament with paint, there will be plenty of "white space" which is fine because that's where the marbling action happens!
STEP TWO
Fill dropper with about 1/2 tsp of rubbing alcohol and squeeze into ornament.STEP THREE
Cover open end of ornament with folded paper towel and shake ornament until surface is completely covered in paint.
STEP FOUR
Set ornament upside down (a plastic cup is perfect for this) so excess paint can drain out. Allow several hours.
STEP FIVE
After no more paint is dripping out of ornament, set it on its side.
Rotate the ornament every 30 minutes or so until it's completely dry. The colors will continue to blend and 'marble' as the ornament is drying. Rotating is important so that paint is not allowed to pool in any one spot and leave a dark blob!
Please note that drying time will vary depending on where you live! I'm in humid south Texas and it took about a week for the ornaments to completely dry out. Leave the cap off while it's drying!
Please note that drying time will vary depending on where you live! I'm in humid south Texas and it took about a week for the ornaments to completely dry out. Leave the cap off while it's drying!
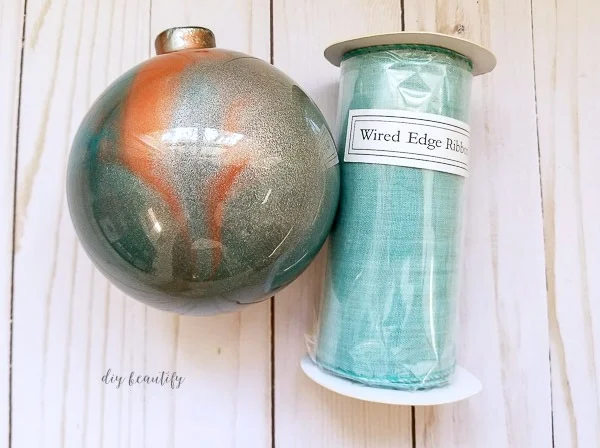
Once the ornament is dry, add a pretty ribbon. I chose this wide wired fabric ribbon because it's so elegant looking. I ended up removing the wire because I preferred the flowy effect without the wire!
I love how soft and elegant this metallic ornament turned out with the soft blues and copper!
I love to personalize the items that I make as gifts...it just adds that extra something that lets the recipient know you were thinking specifically of them! I cut out a large 'J' (Michelle's last name is James) from craft vinyl using my Silhouette machine. I also added 2017 on the back of the ornament.
These marbled metallic ornaments are easy to make...they only looks difficult! The magical part is that no two ornaments look exactly the same; each one will marble in its own way.
I made several metallic ornaments and plan to make a few more as gifts because they are just so pretty! I hope you try this tutorial!
And now I encourage you to visit the blog hop below! First, here are the 47 participating bloggers who created ornaments this year!
Meet the 2017 Ornament Exchange Hosts
Erlene ⋅ My Pinterventures Kim · Made In A Day Amanda · Domestically Creative
Shirley · Intelligent Domesticatons Michelle · Our Crafty Mom
Beverly · Across the Blvd. Christene · Key to Inspiration Pili ⋅ My Sweet Things
Nicki · Sweet Parrish Place Megan · C'mon Get Crafty
Hilary · Raising Fairies and Knights Emily · Two Purple Couches
Tina · One Crafty Mess Marie · The Inspiration Vault Debra · Shoppe No. 5
Trisha · Rosewood and Grace Jeanie · Create and Babble Katrin ⋅ Kreativ K
Terri · Christmas Tree Lane Maureen · Red Cottage Chronicles
Toni ⋅ Small Home Soul Ula ⋅ Lulu & Celeste Sue ⋅ A Purdy Little House
Pamela · Home On The Corner Lorelai ⋅ Life with Lorelai Cindy ⋅ DIY Beautify
Debbie ⋅ Tweak and Style Stephanie ⋅ Swoodson Says Chelc ⋅ Inside the Fox Den
Susan ⋅ Super Mom - No Cape! Molly ⋅ Just a Little Creativity
Roseann ⋅ This Autoimmune Life Angela ⋅ Simply Beautiful by Angela
Vicki and Jenn ⋅ 2 Bees in a Pod Joanne ⋅ Our Unschooling Journey
Tylynn ⋅ Bitterroot DIY Sam ⋅ Raggedity Bits Mary ⋅ The Boondocks Blog
Cyn ⋅ Creative Cynchronicity Dione ⋅ Clever Chameleon Quilting
Erica ⋅ Erica Ever After Chelsea ⋅ Love Paper Crafts Evija ⋅ From Evija with Love
Samantha ⋅ Little Bits of Home Hope ⋅ Hopes Crafty Niche Anne ⋅ Orange Bettie
Pam · P.S. I Love You Crafts
Find all 47 handmade ornament tutorials below and share yours too! Use Hashtag #2017OrnamentExchange so we can see your creations on social media.
bringing beauty to the ordinary,
Become a DIY insider!
You'll never miss a post, and you'll get all my FREE tutorials
and more...delivered straight to your inbox!
and more...delivered straight to your inbox!
Let's be Social! Follow along on Pinterest, FB, G+, Twitter, Instagram
Popular Posts You Might Have Missed
This blog's content is for entertainment purposes only and is not professional advice. By reading this blog and attempting to recreate any content shared on it, you assume all responsibility for any injuries or damages incurred. Read my full disclaimer here.
Sharing with: The Pin Junkie, Craftberry Bush,


These are gorgeous! I love the tip about the alcohol and will be trying it out. Thanks so much for joining the #2107ornamentexchange.
ReplyDeleteThanks so much Erlene 😄
DeleteHow gorgeous. I love all of your handy tips in making these. They will add so much elegance to anyone's Christmas tree.
ReplyDeleteThanks Debra!
DeleteBeautiful! I love the colors you selected for the ornament. Great tutorial. I'm putting this on my must try list. Pinning.
ReplyDeleteThanks Beverly!! Enjoy the process ☺
DeleteYou always have the best tips and projects. Love the metallics and the colors that you chose - the ornaments turned out beautifully!
ReplyDeleteAww, thanks so much! I'm glad you find my tips helpful 😊
DeleteOh... these are going to look lovely on her tree! Thanks for sharing the tip about the rubbing alcohol. I can't wait to try this!
ReplyDeleteThank you! Have fun!
DeleteSO pretty. I really like how they shimmer. Thanks for sharing.
ReplyDeleteThanks Marsha, the shimmer is really pretty with the tree lights!
DeleteWe made swirl painted ornaments last year and I wish I had thought of thinning the paint with some alcohol; that is genius! I love the shimmer of the paint and the personalization. Pinned.
ReplyDeleteThanks so much! The ornaments dry so much faster this way 😉
DeleteSo pretty! I love the colors you used!
ReplyDeleteThanks Roseann!
DeleteI love how pretty that worked out. The marble design is such a cool design, and way easier than melting wax for it.
ReplyDeleteI participated in the #2017ornamentexchange too, my DIY wishlist is getting so long seeing all these cool tutorials!
Thanks so much!
DeleteThis is absolutely gorgeous !!! I would be very happy to have this ornament on my tree ! Thank you for the handy tips too !
ReplyDeleteThank you Evija, I'm definitely going to make some as hostess gifts!
DeleteI love your ornament! Perfect color combination! I participated in the ornament exchange too and I always love seeing what everyone else comes up with!
ReplyDeleteThanks Pam, there's a lot of great ideas!
DeleteThis is so pretty! I love the colors together. I've made a few marbled ornaments and thought they took a ton of paint too. I will definitely try out the alcohol tip next time.
ReplyDeleteThanks Amanda.
DeleteSuch pretty and festive ornaments, love the marbled look!!
ReplyDeleteThanks Katrin!
DeleteI haven't tried marbling yet but now I NEED to! These turned out so beautiful! I love that you mixed in some copper - it pairs perfectly with the blue!
ReplyDeleteThanks so much Emily!
DeleteThese are gorgeous! I so needed that tip about the alcohol and paint for one of my upcoming projects! I tossed it out because it it just wouldn't dry right. I love the personalization of them too. I need to break out my Silhouette more often.
ReplyDeleteKim
Thanks Kim, I had several fails too in previous years. The rubbing alcohol was definitely a happy experiment!
DeleteCindy I too have used these paints in a different way from your technique but really love them for their shimmering shine. Michelle is going to be thrilled with her ornaments. They really reflect her home too.
ReplyDeleteThanks Mary!
DeleteThese turned out SO well! I love how each one is unique. It's interesting that you also had a hard time with that paint taking forever to dry. I used the link one of my exchange ornaments and had to paint three coats for full coverage and 12+ hours to dry for each one. Very frustrating.
ReplyDeleteYes, especially in humid climates!
DeleteWow. Very beautiful. This is a marvellous ornament idea and very nicely explained.
ReplyDeleteThanks Dionne!
DeleteOh, this turned out so very pretty! I actually just tried this technique for an ornament gift as well!
ReplyDeleteHi Cindy! Visiting from the ornament exchange. Great ornament project...I love how the colors combined and you can customize for your decor!! Pinned!
ReplyDelete