Chippy White Spindles in Minutes
This is quite possibly the easiest technique to create a worn and chippy look with paint! Whether your item is vintage or new, follow the steps below to achieve perfect authentic-looking chippiness!
Updated 7/2022
Affiliate links may be included for your convenience; my full disclosure policy can be found here. If you click through and make a purchase I'll receive a small
commission at no extra cost to you!
Serendipity. That's what this chippy spindle project is!
Let me start at the beginning, always the very best place to start
(channeling my inner Maria!) Last year we found a small round dining
table for our
kitchen nook. It came with 4 cane seat chairs, for the unbeatable price of $75! Two of
the chairs had busted seats, but I cut them up because they had gorgeous
spindles that I wanted to save for future projects...it was easy to chop them
off the chair using my
Dremel Saw Max!
I stuck all the spindle pieces into an olive bucket and sat it beside our
door...hoping to get to them someday. I knew all along that I wanted to create
a chippy painted look with them, but I held off because it just seemed like it
would be a ton of work but mainly because
I wasn't really sure how to get a nice, authentic chippy feel using
paint.
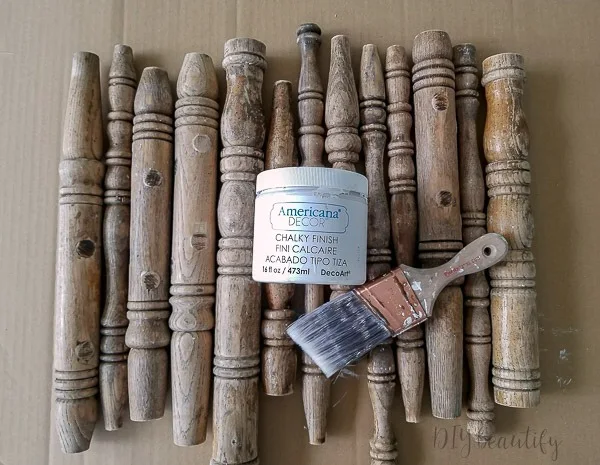
Old and moldy spindles
A couple weeks ago as we were cleaning off the porches, I pulled all the
spindles out of the olive bucket...and screamed in horror! I thought I saw a
snake, but it was a skink that slithered out of the grimy depths of the bucket
and took off for a safer spot! Unbeknownst to me, the spindles had been
sitting in a couple inches of rain water for several weeks, and the ends had
turned black and moldy. I fully intended to just toss them in the trash that
day. Don't the moldy leaves add a nice effect? Ew!
I'm not even sure what made me Google "chippy paint techniques", but it
brought me to
this
gem of a tutorial and the rest is history, as they say! My spindles were saved
to live another day, and it was so much easier than I thought it would be! I
followed most of the steps that Debbie used, with the exception of the
stain...I skipped that. But I'm going to share my own version here for you,
with pictures, so you can see how easy this chippy paint technique is!
And while I'm at it, I'll share some creative ways to use chippy spindles in
home decor, so make sure to read all the way to the end!
Supplies
- sandpaper or a palm sander (I love mine)
- white candle
- chalk paint in color(s) of choice (I used DecoArt Americana Decor Chalky Finish Paint in Everlasting)
- paint brush (I threw away all my chip brushes because I'm tired of picking up fallen bristles; this brush never disappoints!)
- razor blade or paint scraper
- rag or paper bag
- chop saw (optional)
- spray polycrylic (optional)
The easiest way to get a chippy painted look
Remember I said that the ends of the spindles had turned black? I really didn't want to paint over that mold or mildew or whatever nasty it was so I had Mr DIY set up the chop saw for me, and I cut all those gross ends right off (you can see them all below). Then I used my palm sander to smooth the cut ends of the spindles.
My spindles were already looking a little chippy because of the stain; I liked
the aged looking wood tones. This is where I veered from the original
tutorial; I didn't stain my pieces.
Designer tip: If you're starting with something that is raw wood or very
new looking, you'll probably want to give them a coat of stain because that
is what will show through the chippy paint that we're going to create.
Wax your spindles
Take a piece of candle wax and rub it all over the pieces. You may have heard
of using wax to resist paint. I've read of doing this for distressing, but I
had never heard of using it to create a chippy look. It's very easy, and works
really well! Rub the wax well all over your piece, and then rub the candle wax
into the wood with your hands. There will be little bits of candle wax left
behind and that is totally ok! By the way, this went must faster than I
thought it would; I had all my spindles waxed in about 10 minutes!
This one small votive was enough to wax all my spindles. You can see how
little I had left.
Paint the spindles
Painting them is the next step to that amazing chippiness. I lined all my
spindles up on a piece of cardboard to paint them. That way I was able to
paint all the tops at one time, and then rotated the spindles to paint the
rest.
I was hoping that one coat of paint would be enough, but in the end I decided
to paint two coats. And honestly, the more paint you have, the better this
technique will work! In fact, if you want to get a really multi-colored chippy
look (say aqua under white) then just add another layer of wax between each
coat of different colored paint.
Just a note with the painting: we're not after a perfect painted finish!
Fingerprints, rough spots, thin spots, they are all okay and will add to the
authentic age that we are going to create when we start chipping! So just
get em painted, don't worry about how it looks!
Everything looks better white, in my opinion! But wait, because the next step
is where the magic happens!
Shave the spindles
Let your paint dry, and then using a razor or paint scraper, just start
dragging it over the paint, wherever you want a chippy look. You can go heavy
hand, or a lighter hand...it's up to you depending on how chippy you want your
spindles to look!
The wax resists the paint, which means you could probably just use your
fingernail to scrape paint off (I didn't think to try that!)
Scrape the paint in multiple directions to get the most authentic
look!
Rub spindles
Once you've scraped your spindles and are satisfied with how chippy they look,
rub the spindles with a brown paper lunch bag just to smooth the edges and
clean all the loose wax from the spindles.
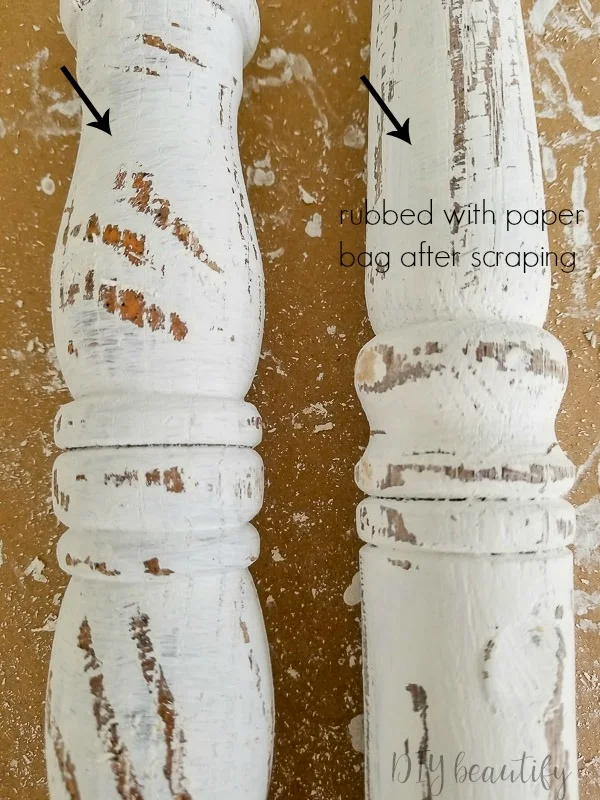
It does give the spindles a bit of a mellower look (see below) so it's a
totally optional step. See how there's less contrast with the stain underneath
the white paint after I rubbed the spindle with a brown paper bag.
That's it! Wasn't that quick and easy? If you want to protect your pieces from
further chipping, you can certainly give them a spray of polycrylic. I didn't
because I wouldn't mind if my spindles continued to chip.
In about an hour, I went from gross, headed-to-the-trash spindles to gorgeous,
chippy white spindles!
But now what? Keep reading to find out how to use those chippy spindles in
your home decor!
How to use chippy spindles in home decor
I am currently on the hunt for another old chair or crib to chop up because
I've used up all my chippy spindles!
Here is what I made:
Other ideas for using chippy spindles
- pile them in a farmhouse basket
- cut off the ends and use them as feet on a DIY chippy beaded tray
- cut them into chunks, drill a hole and insert a taper candle
- make chippy chunky wood beads by chopping the spindles into chunks and drilling a hole through the centers; string onto jute cord
- make farmhouse glam ornaments by attaching crystals from a vintage chandelier to the bottoms
- make a small plant stand by using chippy spindles as the table legs
You get the idea - there are SO many ways to use chippy spindles in your
home, the sky is the limit! I'd love to know how you've used chippy
spindles in your decor, leave me a comment below!
Pin it to remember
As always, I'm honored and delighted when you share my projects with your
friends!
See you back here soon!


I love the way these came out! The distressing is awesome! My only question is what are you going to do with all of those?
ReplyDeleteThank you so much! I turned some into farmhouse candleholders https://www.diybeautify.com/2019/07/how-to-make-spindle-candlesticks-from-old-chair.html
Deleteand hung some on my French farmhouse Christmas tree https://www.diybeautify.com/2018/11/how-to-decorate-a-blue-and-white-french-farmhouse-christmas-tree.html. The others I have in a bucket.
This is exactly the post I was hoping to find!! I need to revamp my spindles and your tutorial is just perfect!! Wish me luck!
ReplyDeleteSo glad it was helpful! Let me know how they turn out!
Delete