Deconstructed Books with Stamped Words
Stamping books with words you choose is a great way to use supplies you likely already have, and turn a stack of books into personalized decor for your home! Stamped books make great gifts and decor for any season!
Affiliate links may be included for your convenience;
my full disclosure policy can be found here. If you click through and make a purchase I'll receive a small commission at no extra cost to you!
I love a good quick and affordable DIY! I know sometimes here on the blog we tackle the big stuff, like rip out our carpet and install new wood floors...or shiplap an entire bathroom, but just between you and me...these smaller DIYs are my favorites!
I love to create a little thing of beauty for my home in just a few minutes! Plus, I'm really no good at measuring or lifting or hauling...so I'll leave those projects for Mr DIY 😉❤❤
Full disclosure...this is not my brainchild! I've seen these deconstructed books around the internet for a long time, and I'm sure you have too! And I know some are even making and selling them, and I don't want to take away from them at all!
Full disclosure...this is not my brainchild! I've seen these deconstructed books around the internet for a long time, and I'm sure you have too! And I know some are even making and selling them, and I don't want to take away from them at all!
However, if you have the supplies on this list, then carry on my friend, carry on.
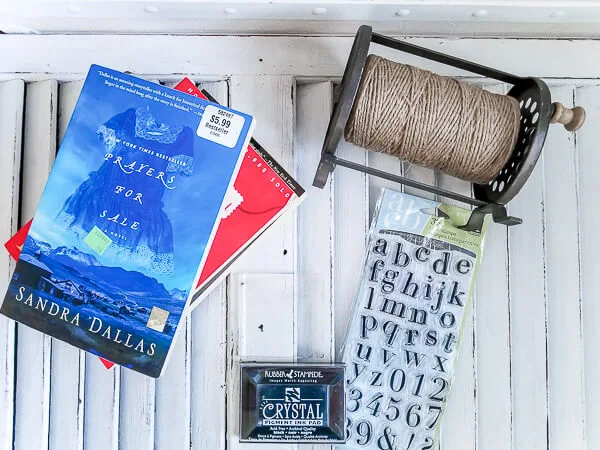
Supplies for a Deconstructed Book Stack
- old books from Goodwill, the Dollar store or yard sale
- alphabet stamps
- clear stamp block
- black ink pad
- jute twine
- baby wipes (not pictured)
How to Deconstruct a Book and Stamp Words
Before you go all gangsta on your books, take a look at the pages. Make sure they all match or at least look good together. Some books have really dark pages, others have thick, lighter pages.Gently peel the covers from the books you are using. I also removed a few of the front pages until just the title was showing. You may need to very gently peel a layer or two from the book spine so you don't see words (see below).
Prep stamp block
The nice thing about using clear stamps with a clear block is that you can see exactly how your word will look before you stamp!Keep in mind that you will be adding the letters backwards and from right to left! Be sure to check the front to make sure the stamps are placed the correct way before adding ink!
Stamping tips: I hadn't stamped in a few years, and I had forgotten all about this tip, but it's a good one! Rather than taking your stamping block to the ink pad and pushing your letters into the ink, lightly tap the ink pad onto your stamps while they're laying flat! This not only prevents you from getting a bunch of ink all over the block, it gives a nice, even layer of ink to each letter!
Practice on a piece of paper a couple times to make sure you like the spacing of the letters and get a feel for how much pressure is needed!
Stamp words onto book spine
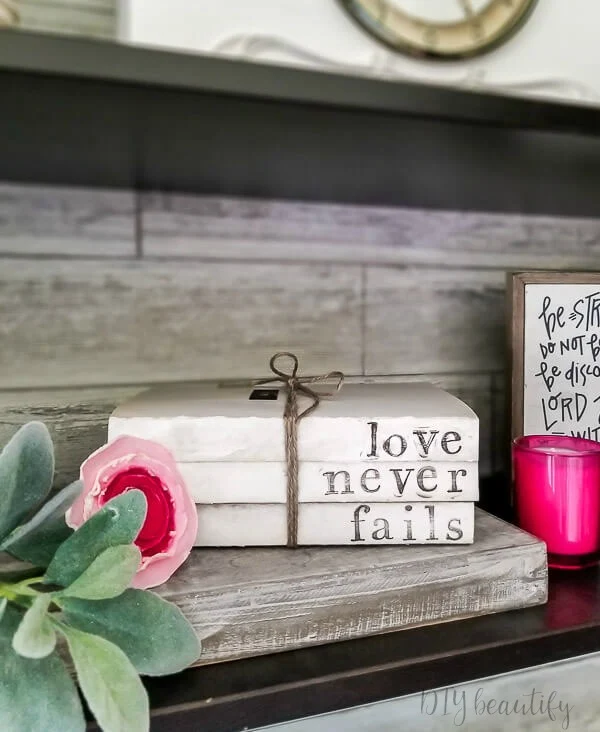
Before I show you how to stamp your book spine, let's talk words! I chose to stamp one word onto each of 3 books. 'Love Never Fails' are words from a verse that we used in our wedding. It's in the Bible. It's important, it's something I want and need to remember!!! Words are powerful!
Other ideas would be unique dates (like your kids birthdays, the date of your wedding, etc), your kiddos names, a family quote, places you've been on vacation or places you want to visit...you get the idea! This is a great way to create something meaningful for your home because you get to personalize it!
Okay, so to stamp the word onto the spine, I found it easiest to lay the book flat on my desk and then bend the spine up a little towards me. That way when I applied pressure with the stamp block, everything was sturdy and nothing went flying! 😏
I like to keep a package of
baby wipes in my office; they're great for so many things! And cleaning stamps is something they're perfect for!
Have a couple wipes nearby and when you're done stamping your book, press the stamp into the baby wipe a couple times to clean all the ink off! They're great for cleaning your hands and the stamp block too!
A personalized stamped bookstack makes a great little statement piece wherever you need one!
I'm displaying my stamped book stack on my office shelves for now, but I love that they're neutral, so they'll work in any room! They do look pretty near my painted mantle clock!
Perfection is highly over-rated, and you can see that my stamping wasn't perfect! However, I like it!
Who knew a deconstructed book could look so beautiful? Now I want to make more!!!
Pin for future reference
SUPPORT AN ETSY SELLER!
Later this week I'll be sharing some of my favorite finds for Valentine's day!
I'm off to take Millie to school...obedience school 🐶🐾💩😍...cause this little pooper needs to learn to COME when she's called!! Wish me luck!
bringing beauty to the ordinary,


Cindy I love this idea. I can just hear my son saying "what is the purpose of this?" in the back. Haha! Sometimes we do things because they are simply beautiful!
ReplyDeleteHaha, Mary my boys would probably say the same thing!!! They just don't get it 😁
DeleteThat is a super cute idea. I must be living in a black hole. I've not seen these deconstructed books anywhere!! Yours are so beautiful.
ReplyDeleteHaha, that's ok Rachel! Thank you so much :)
DeleteCindy, I have been trying to find stamps that are the size you used, but keep finding very small ones...could you tell me which you used, and perhaps where you found them?
ReplyDeleteI bought them at Michaels, the brand is Inkadinkado. I found similar on Amazon.
DeleteI haven’t seen them either. They’re so cute! Thank you for showing us how to make our own and for letting us know it may be less expensive to just buy them already completed. Also, I love your painted clock
ReplyDelete