How to Create a Functional and Organized Pantry
I'm sharing how we turned our unorganized and dysfunctional pantry into a usable and functional space by installing custom shelves.
Affiliate links may be included for your convenience; my full disclosure policy can be found here. If you click through and make a purchase I'll receive a small commission at no extra cost to you!
I'm going to tell you how we changed that! But before I do, I am so excited to let you know I'm participating in a new monthly blogger challenge group called At Home DIY!
We are a group of 39 bloggers who will come together once a month to share our different take on various home decor and DIY challenges! This month the challenge is 'Build to Organize' and I know you will find something to help with an organizational issue in your own home! All the links will be at the end of my tutorial!
Pantry Challenge
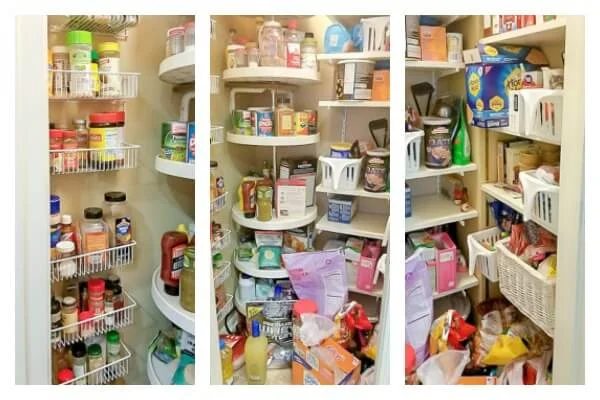
We thought we'd scored when we moved into this home! The pantry, right next to our fridge, had lots of shelves, a spice rack and even a floor-to-ceiling 5-tier lazy susan in the corner...brilliant!
Until we moved in and started using it. We quickly realized that it was not as functional as we'd imagined! The shelves were too narrow for many items, not secured well, and were sitting on top of flimsy brackets. And that lazy susan that I was initally so "ga-ga" over...it stunk! While it worked for small, light objects, anything larger would topple over when you turned another shelf.
My favorite method of organizing is to put like objects together, but these shelves were just too short to accommodate that! Plus, the brackets took up valuable space from the side of each shelf!
Gah, that is scary to look back on and remember how BAD IT WAS!! A lot of things ended up on the floor because it was just easier than trying to find a place on the shelves!
Mr DIY had finally had enough and spent a weekend recently making custom pantry shelves.
Here's how it went down...
Cleaning out and Disassembling
I cleared out the pantry of all our food stuffs, and then Mr DIY removed all the shelves and hardware. We patched all the holes and then decided to give it a fresh coat of paint with leftover paint from our kitchen. Goodbye pinky-beige...hello Repose Gray!Now that we had a clean, fresh slate, we were able to make our new plans for the space.
Building Custom Shelves to Fit Our Pantry
We decided to install wood shelves all the way around the 3 walls, end to end, to maximize our storage space and finally be able to utilize the corners!
The pantry isn't square inside, it has a little jog on the right as you can see in the picture below. We decided this would be a great place for our oils, vinegars and spices. After measuring our tallest jar, Mr DIY planned the shelves at this height.
Supplies We Used for Custom Pantry Shelves
- 1/2" thick laminated wood boards (we used both 12" wide and 8" wide)
- primed 1" x 2" trim boards for supports
- chop saw
- cordless drill
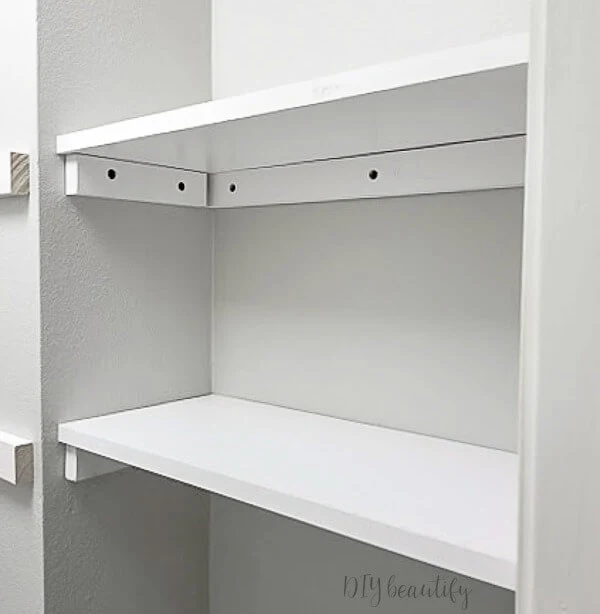
Both the shelves and the supports go wall to wall for extra sturdiness (see below). On the left, where 2 shelves meet, Mr DIY cut a piece of shelving down to a 4" x 5" rectangle and screwed those boards into the shelves above (I'll show you what I mean a little further down).
The 12" wide shelves were added to the left hand side and the longest wall at the back. It is SO nice to have wide shelves! The narrower, 8" boards were used in that little jog-out, where we'll put our spices, oils, vinegars, etc.
We installed all the shelves at the same height, so that it would look cohesive and be more aesthetically pleasing! But, we made sure to leave extra space at the top and bottom for taller items like cereal boxes.
No more flimsy shelves! These babies are sturdy! I am able to plonk something down without worrying about the shelf and contents falling onto my head!
I had to show you a pic of our pantry sign...so cute right?
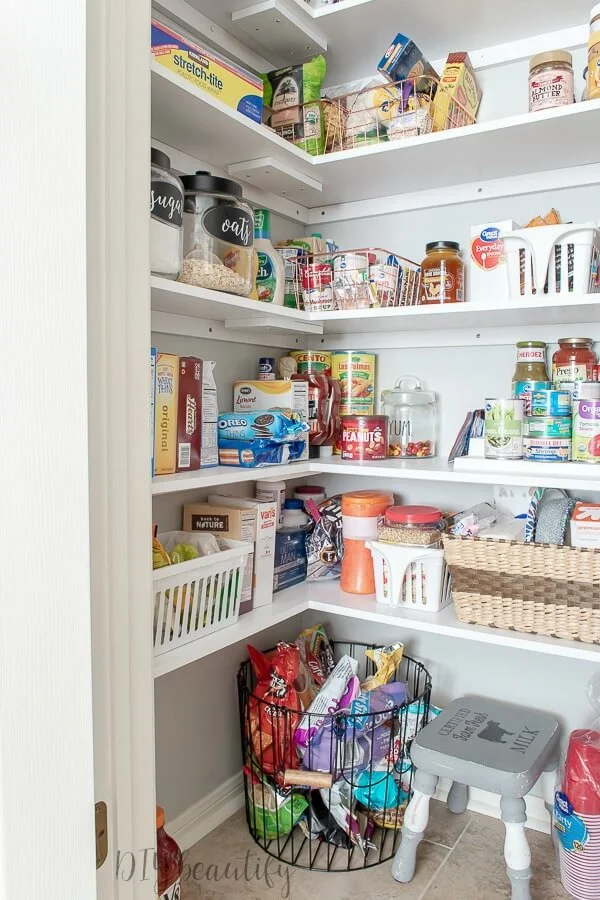
I used small baskets to store like items together (pasta, soups, baking, etc) and a large wire basket on the floor corrals all the chips (guess we like our chips!) Some of the smaller baskets have handles on the ends...I think they're originally intended to be fridge baskets, but it's so easy to grab a basket and pull it out by the handle!
The pantry feels so much bigger and there is so much more space because we can utilize it wall to wall!
I was delighted to find that I had room in the pantry for my glass canisters (what a relief to get those off the countertop!), and there was even room on the floor for the stool.
This picture below shows you a close up of where the shelves on the left meet...and the little piece of wood Mr DIY installed to insure the shelves are stable. Like I said, we only needed to do this in one spot, where two shelves butted up against one another...the other ends all butt up to a wall.
Remember that little jog to the right? It is perfect for organizing all our spices and vinegars and oils! I bought some small round stickers and added the name of the spice to the lid so they're easier to find. We added a spice step for extra useability! I even added one of these for our canned goods so everything is visible!
On the left hand side, there was enough space in the pantry to put all of our storage bags, cling wrap, foils, etc! They're just stacked on top of one another, easily visible and easy to grab!
This pantry makeover was a slam dunk! It looks better...but even more importantly, it FUNCTIONS like a dream! If you have any questions, please let me know in the comments! I wasn't able to get many "in-process" pics because it's such a small space!
Go ahead and Pin, Share, Save this image for future reference!
As I mentioned, this talented group of bloggers listed below will be bringing you our DIY projects once a month! Each month will have a different theme! You'll find all the links to February's Build to Organize Challenge below!

Become a DIY insider!
You'll never miss a post, and you'll get all my FREE tutorials
and more...delivered straight to your inbox!
and more...delivered straight to your inbox!
Let's be Social! Follow along on Pinterest, FB, G+, Twitter, Instagram
Popular Posts You Might Have Missed
This blog's content is for entertainment purposes only and is not professional advice. By reading this blog and attempting to recreate any content shared on it, you assume all responsibility for any injuries or damages incurred. Read my full disclaimer here.


LOVE IT! I miss our big pantry... we just moved and lost a lot of storage space in the kitchen. I'm hoping to build something to help improve things but it'll be a long term project.
ReplyDeleteThanks Danielle! Our last house had a very small closet! This house has very little counter space, so I'm glad I could move some items into the pantry!
Deleteoh man, this just looks awesome! We just finished doing our pantry too and so it's got a special place in my heart haha. happy to be blog hopping with you!
ReplyDeleteThanks Carmen, it's a great feeling isn't it?
DeleteYour pantry looks great now and this really wants me to make my pantry look this good. I know that you are enjoying how organized it is.
ReplyDeleteThanks Sherry, it's so nice not to cringe when I open that door anymore!! ;)
DeleteI need all the extra space and pantry organization I can get! Thanks for sharing your detailed ideas. It's always fun to visit your blog and see your creativity. Happy weekend, Cindy.
ReplyDeleteThanks so much Meegan!
DeleteIt looks so great!! So funny how when you move into a place you are oogling at all the space... and then you fill it up and need a new solution! We are going through that over here too:)
ReplyDeleteThanks so much Eileen!
DeleteWhat a transformation, you really made it much more usable space. Everything is very easy to see now and it will be so much easier to keep it all organized nicely.
ReplyDeleteThank you! That is definitely the plan 😊
DeleteYour pantry looks great, so organized. It looks bigger after your custom shelving too.
ReplyDeleteThanks Sarah, it definitely feels bigger too!
DeleteOh how I would love to have a pantry like yours! You did such a great job organizing it. Love it!
ReplyDeleteThank you so much Christine! There are other things in my kitchen I wish I could change!!
DeleteYour pantry turned out great. What a good use of space.
ReplyDeleteThanks so much!
DeleteLooks great, Cindy! My problem would be keeping it that way! I feel like as soon as I get my cabinets organized, it only lasts for a few days :(
ReplyDeleteI hear you Brittany, the baskets have really helped with that!
DeleteThis looks so much better! Lazy Susans always look like a good idea, but they never are!
ReplyDeleteThank you Vineta, we are able to fit so much more on the shelves!
DeleteWell- tickle me inspired! It looks fantastic and I love the idea to tier your spices. The shelves look so simple too- thank you!
ReplyDeleteThanks so much, it's made a world of difference!
Delete