Weathered Wood Makeover on Oak Dressers
How to update oak dressers with chalk paint, wax and new hardware for a weathered wood look.
Affiliate links may be included for your convenience; my full disclosure policy can be found here. If you click through and make a purchase I'll receive a small
commission at no extra cost to you!
One Room Challenge - Master Bedroom Refresh
Want to get caught up? You can see how we added a faux brick wall and the Master plan for our European farmhouse bedroom by clicking the links below!
Furniture Makeover Challenges
This week we focused on updating our bedroom furniture. Our dressers are almost 28 years old. We bought them shortly after saying "I DO" and while we still love the size, the style and the function...the finish had grown old. Orangey oak was so popular back in the 90's, but it just wasn't working for us anymore!Normally when I don't care for a finish, the easiest option is to paint it. I've painted a lot of furniture; if you're interested you can view my furniture makeovers here! For this European farmhouse inspired bedroom makeover, I was wanting more of a grown up look. I opted to leave our headboard as is because the dark finish is absolutely gorgeous against our faux brick wall!
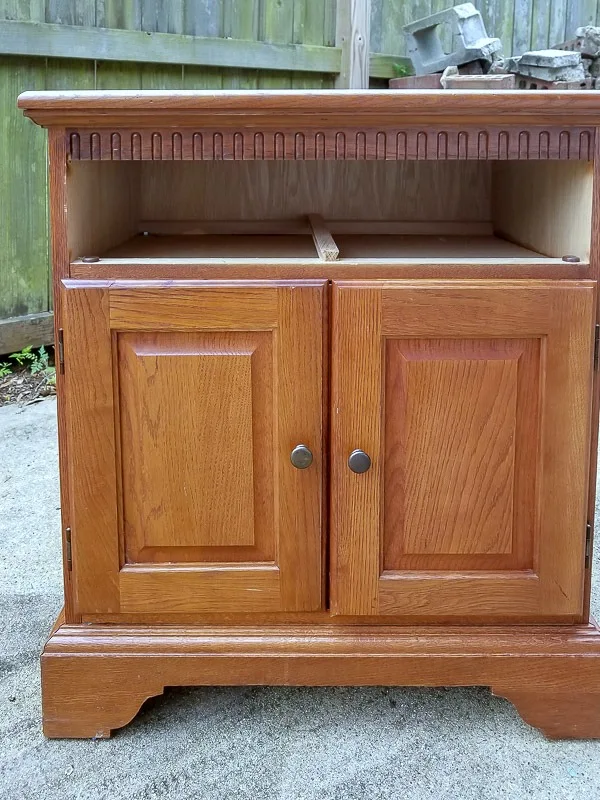
So the furniture that we focused on were our his and her dressers, as well as our nightstands. Let's start with the dressers. Here is the BEFORE.
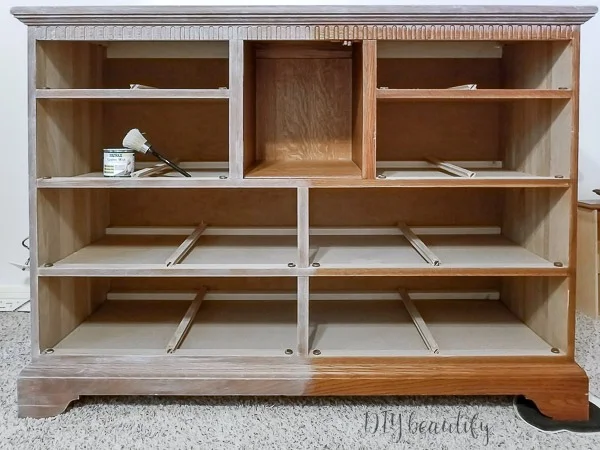
I thought this week would be a breeze, and of course that meant there were some major issues to deal with. But what room makeover doesn't come with challenges? My original plan for our orangey oak dressers was to update them using Briwax Liming Wax. Liming Wax is a great alternative to chalk paint (and so much faster!) when you want to highlight a strong wood grain, like oak, and tone down the color of the existing stain. It's quick and easy to apply with a round brush, and gives a really nice whitewashed look with very little effort.
Liming Wax

BUT...here's where it all went wrong. I didn't think ahead. The issue wasn't in applying the liming wax, it was in swapping out our hardware. The old pulls have a 3-1/2" spread center to center...unfortunately, that size is no longer industry standard and it's very hard to find replacements!
The new pulls that I chose were larger, and that meant filling the existing holes and trying to disguise them, which I found out with liming wax, is next to impossible to do!
I tried so many ways to blend the holes, including paint, marker, even
wax!
Nothing worked. After doing a lot of research online, I realized
that there really was no way to perfectly blend those filled holes! My
only option was to use pulls that were the exact same size....or to paint.
Weathered Wood Paint Treatment
I found some tutorials online that showed how to give your furniture a weathered wood look, and that is what I chose to do. In hindsight, I wish I would have chosen a lighter paint as my base (beige instead of gray), but in the end, the color is growing on me.- I started by painting over the liming wax with this light gray chalk paint.
- The next step was brushing on and wiping off wax. I used both white wax (the liming wax actually worked well for the purpose) and dark wax.
The picture below shows a gray painted drawer (top) and the final results with the wax treatment on the bottom drawer. The chalk paint completely covered the patched holes and they're not even visible anymore! The wax helps to add that weathered wood look.
Insider Tip: When painting furniture that has a mirror or details you want to protect from paint, use painters tape and even tin foil to create a protective barrier.
While Mr DIY worked on removing all the old hardware from the drawers, filling the holes, and adding the new hardware, I painted. It definitely was a team effort!
Watch this quick video to see exactly how I achieved a weathered wood finish on our oak furniture!
- Mr DIY's dresser pulls
- Mr DIY's dresser knobs
- my dresser pulls
- my dresser knobs
The knobs on my dresser resemble rosebuds, and the pulls have a little more flair. I do think the matte black matches the black iron scrolls around my mirror better than the previous hardware (not pictured)...but you'll see it all together soon, I promise!
Let's talk about the nightstands next.
Bringing a mutual finish to mismatched nightstands
I shared in
Week 1
that I disliked how our nightstands were so different. The size, height and
color was all different. My goal this week was to unify them with a lime wax
finish...
but we all know how that went down.
My white nightstand (a thrift store purchase years ago) was bought for its
beautiful lines. I still liked the white color, but the top had a lot of
water damage and wasn't looking too good. I decided to strip the white paint
off.
And guess what? MORE CHALLENGES!
And guess what? MORE CHALLENGES!
Stripping Paint Challenges
If I had realized that stripping the top of this small nightstand was going
to be so much work, I may have opted to paint it with the same weathered
wood treatment I did on our dressers.
However, I took the long, hard, messy road. I used
Citristrip, a paint and
varnish stripping gel. I had read reviews, and thought it would be much
easier than it turned out to be. While I loved the fact that there was no
toxic smell...the downside to removing paint this way is the sticky,
gooey mess!
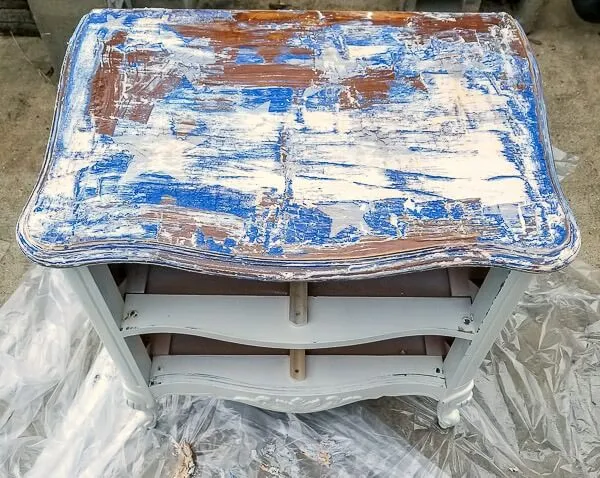
Bright blue paint with silver stars...making my job even tougher. I'll be
honest folks, I was about ready to give up on this one! I spent an entire day
just trying to get the top down to bare wood. When I finally succeeded, I
didn't even take a picture. Sorry. I was tired...and more than a little
frustrated!
But in the end, perseverance won out and I'm really happy with the results! Revealing a little wood on the top of the white nightstand helped unify it with the one on the other side.
Mr DIY's nightstand was a much quicker fix as it got the weathered wood paint treatment. Here's a little preview of the before.
The liming wax fills in the grain of the wood and softens the finish. The result is more of a gray-washed look than white.
A couple Insider tips when using Liming Wax:
- you do NOT need to remove the poly first
- liming wax can be applied to bare wood or stained wood
- will highlight any blemishes like scratches or dings
This is the top of my dresser and you can see how the liming wax draws attention to ANY imperfections, like scratches. So that could be a deal breaker, if your piece is covered in scratches!
Unlike the liming wax treatment, the weathered wood treatment with paint and then wax, will cover any blemishes in your furniture! So keep that in mind when you're considering your own furniture makeover!
WHEW, am I glad to have that behind me!!! I need a little breather, and I'm happy to pass the reins to Mr DIY who will be building barn doors this week! See you next Thursday 😉
bringing beauty to the ordinary,
But in the end, perseverance won out and I'm really happy with the results! Revealing a little wood on the top of the white nightstand helped unify it with the one on the other side.
Mr DIY's nightstand was a much quicker fix as it got the weathered wood paint treatment. Here's a little preview of the before.
In the end, I was just glad to have the dresser makeovers behind me!
I'm including this short video and information on how to lime wax furniture,
because I think it's still a great option for wood furniture, especially if
you aren't replacing any hardware!
How to Lime Wax
The liming wax fills in the grain of the wood and softens the finish. The result is more of a gray-washed look than white.
A couple Insider tips when using Liming Wax:
- you do NOT need to remove the poly first
- liming wax can be applied to bare wood or stained wood
- will highlight any blemishes like scratches or dings
This is the top of my dresser and you can see how the liming wax draws attention to ANY imperfections, like scratches. So that could be a deal breaker, if your piece is covered in scratches!
Unlike the liming wax treatment, the weathered wood treatment with paint and then wax, will cover any blemishes in your furniture! So keep that in mind when you're considering your own furniture makeover!
Please feel free to PIN and SHARE this image!
WHEW, am I glad to have that behind me!!! I need a little breather, and I'm happy to pass the reins to Mr DIY who will be building barn doors this week! See you next Thursday 😉
Disclosure: Thank you to Hickory Hardware for sponsoring this project and
providing the hardware used in this post! As always, all opinions included
are my own.


Comments
Post a Comment
Your comments are like sunshine and chocolate! Thanks for taking the time to leave a nice one ;) I read all comments and love to respond if you leave your name and email! Otherwise, please look for my response under the post where you left it!