DIY Thrifty Buffalo Check Christmas Tree Collar
A step by step tutorial for creating a budget-friendly buffalo check Christmas tree collar.
Affiliate links may be included for your convenience;
my full disclosure policy can be found here. If you click through and make a purchase I'll receive a small commission at no extra cost to you!
Good morning! Today I'm sharing a really fun and best of all THRIFTY way to make a cute tree collar for your Christmas tree! AND it's buffalo check which you know I love!!!! ❤❤
When tree collars were first a thing, I purchased one from Home Depot. It wasn't cheap, but I've noticed that as tree collars have grown in popularity, their price has grown too! I cannot imagine paying $50-$100 for a Christmas tree collar!
Buyer alert: I just checked and the
galvanized tree collar I purchased from Home Depot 3 years ago for $40 is on sale for $20!
I started Googling DIY tree collars to see if I could find something online that was affordable and easy to make.
I found a fantastic tutorial
here, and the best part was that this DIY tree collar cost less than $20 to make! Diane made her tree collar to keep her kitties out of her tree...mine is purely decorative!
I made a few changes to make it work for me, and that's what I'm sharing today. In hindsight, I think my large 7' tree needs a taller collar, so if I make another collar, I'll purchase a wider flashing (I used the 10" flashing I'm linking to below).
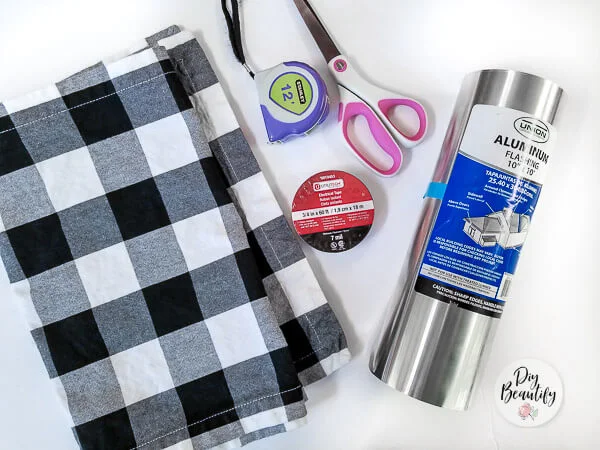
Supplies to Make a DIY Christmas Tree Collar
- roll of aluminum flashing - 10" wide or 14" wide
- gloves
- electrical tape
- scissors
- measuring tape
- spray adhesive
- fabric (I used this buffalo check table runner)
- heavy duty hole punch ( this is the hole punch I used)
- ribbon (I used this black striped ribbon)
How to Make an Afforable Buffalo Check Christmas Tree Collar
* Safety first! The aluminum flashing has sharp edges, so please wear gloves when handling!
First you need to measure around your Christmas tree stand and find out how wide you need your DIY tree collar to be. Mine measured 72".
Lay out the aluminum sheeting on a flat surface, measure and cut, allowing 3-4" overlap. You don't need special tin snips, this stuff cuts fine with scissors!
Next, cover the long edges with electrical tape and fold over to the other side. The electrical tape covers the sharp edges so once it's on, you don't need gloves anymore!
I purchased a buffalo check table runner that was the exact length I needed, and allowed for some overlap on the edges to wrap around the collar top and bottom. But you can use any fabric!
Use spray adhesive to attach the fabric to the flashing.
Use your hands to press the flashing securely to the fabric.
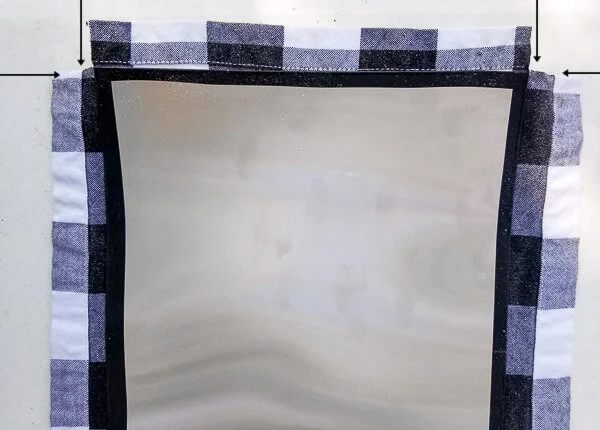
Snip the corners as shown by the arrows below, and then wrap the edges of the fabric over to secure in place (use a little more spray adhesive if needed).
You could stop here, you have a cute Christmas tree collar that just requires a couple of binder clips to secure the ends together as Diane did in her tutorial.
I decided to step it up a notch (don't I always??) and create decorative ties to secure the ends of the tree collar together.
Here's how I did it.
How to Create Ties for Christmas Tree Collar
You'll need the fabric-wrapped flashing, ribbon and a heavy duty hole punch (that is strong enough to cut through fabric and flashing). I also recommend a roll of painter's tape.
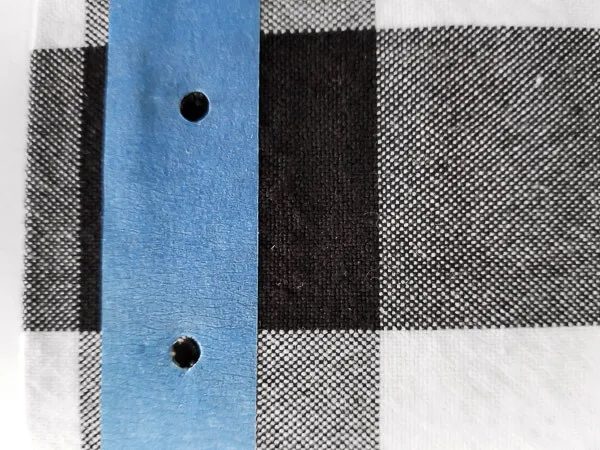
Decide where you want your holes to be. Lay a strip of painter's tape over both edges. Mark holes and cut with hole punch.
I absolutely love this
1" ticking stripe ribbon from
Burlapfabric.com and knew it would be the perfect complement to the black and white buffalo check. I did have to go back and make my holes a little bigger in order to thread the ribbon through the holes. If your ribbon is satin or really loose, you should be okay.
Wrap end of ribbon in painter's tape as tightly as possible. This will help to thread the ribbon through the holes.
Then simply thread it like you would shoelaces, and tie a bow at the end.
I love how this easy step elevates the tree collar and makes it look totally custom!
Millie decides that she likes the pretty buffalo check tree collar MUCH MORE than the Santa hat I bribed her to wear! 😉❤
One final thing to note - It is
much easier to put the DIY tree collar around your tree stand BEFORE you set up your tree! So just keep that in mind if you plan to make one. I did it the hard way (of course), so it IS possible, just involves lots of crawling around on the floor 😁😏😜
PIN FOR LATER
Later this week I'm sharing a super duper easy way to make peppermint candy pillow wraps for your porch!
bringing beauty to the ordinary,


Came out gorgggeoussss! Im new to tree collars and love this idea!!! Your tree is amazingly beautiful and I love the topper :} :} :}
ReplyDeleteAww thank you so much Sandra!! Hope your holidays are Merry and bright!
Delete