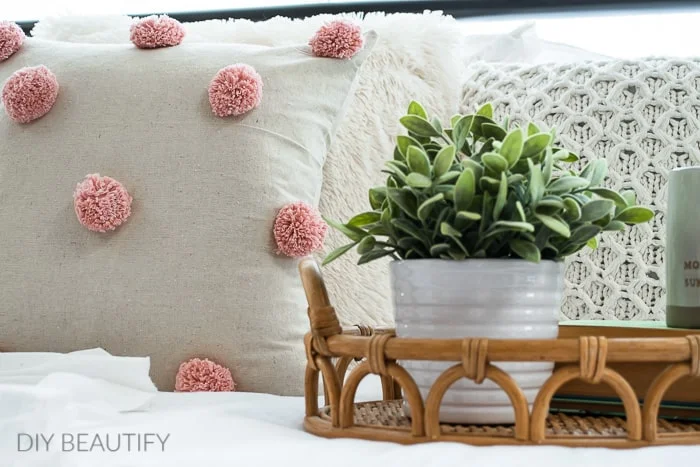
Make a Pink Pom Pom Pillow (video tutorial)
Let's make a pom pom pillow! Today I'm sharing a video tutorial for how I make the pom poms as well as how I created the pillow! This easy, no-sew pillow adds great style to your home decor!
This post may contain Amazon or other affiliate links. As an Amazon affiliate I earn from qualifying purchases. My full disclosure policy can be found here.
Who loves a cute pom pom? ✋✋
There's just something about pom poms that are so appealing right?
When I was a little girl, I remember my mom showing me how to make pom poms using cardboard circles. I was amazed!
But there are so many different ways to create these fluffy round balls of yarn. You can click here to see how I made a pom pom garland for Abby's room when she was little. I simply used my fingers to make the pom poms for this adorable garland.
Today I'm showing you how to make a pom pom using this pom pom maker. I've read about them, but had never used one and I was curious if it would actually make the process easier.
Click here to follow my YouTube account, and click here to watch me make this super sweet pink pom pom pillow.
How to make a pink pom pom pillow
Before we get started, obviously you're not limited to pink 😍
I chose to make a pink pom pom pillow because it matches the other
pink decor I have in my home currently, like my
Valentines Day mantel with vintage floral garland
and my new
Valentines Day DIY wreath, and the
blush pink I added to my dining table for winter.
I love pink, and it's a great color that can transition from winter
right through to spring, but you use a color that you love! I just changed up
my dining table decor and can't wait to share my simple Valentines Day
tablescape with you! Watch for that next week. Not getting my weekly
newsletter?
Sign up here!
The video tutorial walks you through the process of making the
pom poms, as well as how I attached them to the pillow.
CLICK HERE TO WATCH THE VIDEO.
Here are the supplies I used.
Supplies:
- pom pom maker
- pale pink cotton yarn (I used this one)
- fluffy yarn I used in the video
- natural 18" pillow cover (I used this one)
- hot glue
- piece of cardboard
- scissors
- down pillow insert (watch the video for my tip about buying down pillows on the cheap!)
Before you make your first pom pom, you need to decide how many pom poms you want on your pillow. I was going to do 4 rows of 4 pom poms, but decided to do 3, 2, 3, 2 and space them out differently. I kinda love how it turned out!
Aside from burning my finger on hot glue (I think I hid it pretty well in the
video, but I was in pain...and I still have a blister!), this pillow was so
easy to make!
I just found some finger tip protectors from the
dollar store that I'll have to use when I hot glue stuff...'cause it's hot and
it hurts when you get it on your fingers!
Just set aside an hour or so to make your pom poms. You'll need to keep track
of how many times you wrap the yarn around each side of the pom pom maker, so
all your pom poms turn out the same size!
And remember that super fluffy pom poms should be made with fluffy
yarn. If you like the casual, imperfect look like my pillow, then use cotton
yard. No matter what yarn you choose, you'll still need to give your handmade
pom poms a trim, so have a pair of sharp scissors handy!
This is a
great project to do while you're listening to music or watching TV. It's
rather mindless and relaxing!
I chose to put the pom pom pillow on our vintage inspired daybed because I
love how restful it looks! I've linked to all the products below in the SHOP
THE POST widget. Don't forget that you can
shop my house, room by room!
If you have any questions about anything in my home, don't
hesitate to ask!
bringing beauty to the ordinary,


Thanks Cindy! Love the adorable pink pom pom pillow. I am inspired now to make one!
ReplyDeleteGlad to inspire you Maggie!
Delete