DIY Copper Magnolia Wreath from Paper Bags
Brown paper lunch bags are crafted into a super thrifty and easy copper magnolia wreath that's perfect for Fall and into the holiday season!
This post may contain Amazon or other affiliate
links. As an Amazon affiliate I earn from qualifying purchases.
My full disclosure policy can be found here.
Hi friends are you ready for another Fall craft? This one is super cheap to
make, it literally cost me $0! You probably have most of the supplies
already at home but if not, you should still be able to make this wreath for
around $10.
Welcome to October's edition of
Thrifty Style Team. I love getting together with these talented
friends each month (if only virtually) to share our love of creating a
thrifty home! Be sure to visit all the links below my post.
Easy copper magnolia wreath from paper bags
This is the time of year when I literally lay in bed for hours, unable to sleep, because I have so many DIY ideas floating around in my head! Pumpkins...Christmas...decorating trees...Thanksgiving table settings...it.doesn't.end!
When I was working on adding a
Fall refresh to our bedroom, I needed something simple to hang above our majestic dark headboard. I
wanted something that added Fall vibes, but didn't want to spend any money, or
trek to the craft store in the pouring rain! I'll show you a picture of the
wreath hanging in our bedroom a little further down.
I came up with this simple fall wreath crafted entirely from paper lunch sacs!
I used leftover copper paint, as well as a few other colors, to add some
metallic drama to this simple wreath. Crafting this wreath did take a couple
of hours, but all the steps were easy and it was the perfect way to pass a
rainy afternoon! In fact, in addition to this wreath, I made a paper bag fall
garland using a different leaf shape and different paint technique. I'll be
sharing that tutorial in a few days!
Let me show you how easy it was to make this thrifty Fall wreath!
Before I share the steps to this paper bag copper wreath, make sure you're following me on Instagram, YouTube, Pinterest and Facebook. And if you're not already subscribed to my newsletter, you can sign up here so you are the first to be notified when I post a new project!
You'll need the following supplies:
You should be able to find all the supplies at your local craft store or
Walmart, or you can shop the Amazon links below.
- wreath form (I separated a store-bought grapevine wreath into several twiggy pieces and formed my 12" base from that)
- paper bags - I used lunch sacs
- metallic copper paint
- brown paint
- beige paint
- small foam roller - make sure the roller is foam or it will absorb too much paint
- paper plate
- something to roll out paint on (I used a piece of cardboard)
- hot glue
I forgot to count how many of the paper lunch sacs I used but I think it was
around 8 because I wound up with about 80 paper leaves.
Step 1: Cut paper bags into sheets
The first step is to cut your paper bags into sheets. These are just simple
lunch sacs but you could use grocery store bags as well. I wanted something
without any writing or logos on it.
Designer Tip:
The best way to avoid getting that seam on one side of the sheet (see below)
is to start cutting the bag straight down the middle of that seam. Cut all the
way to the bottom of the bag, then cut around the ends of the bag, removing
the base. In other words...don't do what I did here 😉
Step 2: Paint paper sheets
Squeeze a little bit of your paints next to each other on a disposable
surface. Roll your roller through the paint a few times to blend, then in
long, broad strokes paint the paper bag sheets. Don't stress about this step,
you really can't go wrong! Some of my sheets had more brown, others more
copper. A varied mix is best because it gives the "leaves" more dimension! You
will have to squeeze out more paint periodically but the paint does go far.
Designer tip:
Don't feel you have to completely saturate the paper bag sheets with paint.
Leaving a little of the natural brown bag color peeking through is fine!
Step 3: Cut out leaves
Once the paper sheets are dry, make a simple leaf template using a stiffer
piece of cardboard, then stack a couple sheets together and cut out multiple
leaves at one time. You don't have to do a magnolia leaf shape like I did! Cut
any leaf you'd like, a maple leaf, oak leaf, etc. You can even freehand your
leaves and make them all different!
Designer tip:
I was aiming to get as many leaves per sheet as possible (10), so some of them
are a little bit smaller to accommodate the paper I had to work with. Again,
you cannot mess this up! No two leaves in nature are exactly the same!
Step 4: Crease leaves and glue ends
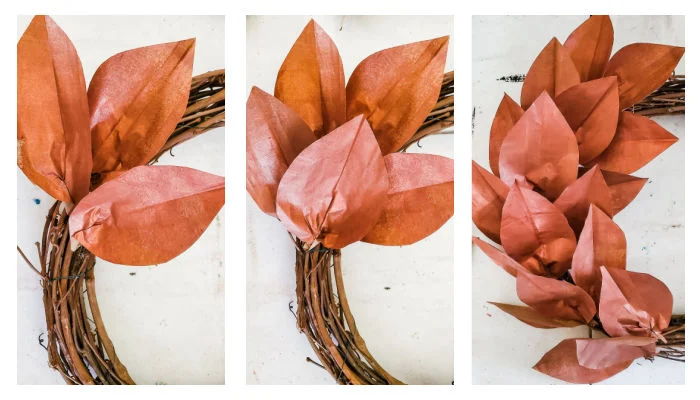
This step is optional if you're rushed for time, but it really does make the paper leaves look more realistic so don't skip it unless you absolutely need to. Fold each leaf in half and use your fingernail to add a crease down the center. Add a tiny drop of hot glue to the end of each leaf and pinch the sides together so it holds that shape.Step 5: Glue leaves to wreath form
Add a dab of hot glue to the back of a leaf and press it onto the grapevine
twig base, right in the middle. Next, glue a leaf to either side of the
first leaf. Continue adding leaves in this manner all the way around the
wreath.
It's so fun to see the DIY copper magnolia leaf wreath take shape before
your eyes!
Once I finished my wreath, I had a few leaves left so I hot glued them into
any spots that need a little more fullness.
So simple.
I hung this wreath above our headboard and love how it looks against our
German schmear brick wall!
You can see more details of our bedroom here.
I took a few additional pictures of the DIY copper magnolia fall wreath in
our
sunroom where the light is better and I could get some close ups.
Pin it to save!
Don't want to make it?
SHOP SIMILAR WREATHS
More Thrifty DIYs from the team
Redhead Can Decorate -
Affordable Fall Ornamental Cabbage Window Box
DIY Beautify - you are here
What Meegan Makes -
Decorate an Olive Bucket for Fall
Sweet Pea -
Upcycled Plastic Bag Halloween Wreath
The Tattered Pew -
5 Simple and Thrifty Fall DIYs
2 Bees in a Pod -
3 Free Halloween Printables
Lora Bloomquist Create and Ponder -
Creative Ways to Display Your Collections with Style
Cottage on Bunker Hill -
Pottery Barn Dupe Vase
I Should be Mopping the Floor -
Free Printable Pumpkin Garland
The How-To Home -
Depression Glass Autumn Display
Our Crafty Mom -
Thanksgiving Favors - DIY Candy Cups


Your wreath is absolutely stunning, Cindy! I may give it a try but I doubt mine will be anywhere near as gorgeous as this.
ReplyDeleteGosh, thanks friend! I think you'll find it easier than you might think!
DeleteAbsolutely stunning, Cindy! You made it look so easy. I am excited to give it a try for my cottage apartment front door. Thanks for the tutorial.
ReplyDeleteHey Meegan, it really was easy! I'm so happy you plan to make one for your front door :)
DeleteLove this beautiful wreath. Need to make one myself.
ReplyDeleteThanks Bev, yes you should make one! Or wait and make the paper leaf garland I'm sharing next week! Or make both, LOL!!
DeleteYour wreath is gorgeous and it looks like real Magnolia leaves were used. I am looking forward to your post on making the paper leaf garland.
ReplyDeleteThanks so much Paula!
DeleteCindy this is gorgeous! What a creative idea and I love that it cost nothing!!! I can’t wait to try this!
ReplyDeleteThanks Kelly, it's definitely budget friendly!
DeleteCindy,
ReplyDeleteThis looks so beautiful! Great idea and your instructions sound super easy.
Thanks Rachel, I love how thrifty it is!
DeleteI love this so much!! It's such a cute idea!!
ReplyDeleteThank you!
DeleteI LOVE this idea, when I can find these leaves they are SO expensive. I for sure will be making one of these beautiful leaves this year! Thanks for sharing this great idea!
ReplyDeleteThank you Laurie, I'm so glad you were inspired! Magnolia leaves are plentiful down here (real and faux), but I don't think they're as common (or plentiful) in Canada.
DeleteI am ALWAYS looking for a good, neutral wreath with a good amount of interest. This is the perfect version of that...and the lunch sacks are genius, Cindy. I love the addition of the paint to add interest and a but of sparkle, too. That takes a basic wreath to another level of beautiful!! xoxo, Kristi
ReplyDeleteThank you Kristi, it's pretty amazing how paint can transform even a lowly paper bag!
DeleteI LOVE this idea, Cindy! I've always liked the texture of brown craft bags, and giving the leaves a little extra color adds so much dimension. Pinned!
ReplyDeleteThanks Lora, it's pretty fun to craft with paper bags, I agree that they have so much texture!
DeleteThis paper wreath is absolutely incredible!!!!
ReplyDeleteThanks Julie!
DeleteGorgeous project Cindy, you would never know that it is a paper bag! I’d love for you to join us over at the Creative Crafts Linky Party every Wednesday through Sunday
ReplyDeletehttps://creativelybeth.com/creative-crafts-linky-party/
Followed and Pinned! 🙂
Creatively, Beth
A BAG?! What a stunning result! This magnolia wreath is gorgeous, and you sure nailed in in that decadent copper look!
ReplyDeleteThank you Donna, I sure appreciate your sweet remarks!
DeleteI love your wreath! In fact I love all your work but I’m also in love with that headboard you have pictured! Would you mind sharing where you can buy that?
ReplyDeleteI’m getting ready to start crafting my fall and winter wreaths and more and I hope I can get even close to what you have created! I am truly in love with this wreath!
Thank you so much! Sorry, but the headboard was a thrift store find many years ago! Search 'mansion bed' on resell sites and maybe you'll get lucky 🤞
Delete