Directions to make a pleated paper table runner with free printable
Thanksgiving greeting. Add to your runner, or print it out and pop into a
frame for easy and thrifty decor that expresses your thankfulness!
Hello friend and welcome. Today's DIY is pretty incredible, if I do say so
myself! As a long time crafter and DIYer, I'm always amazed that there are
always NEW things to create! This ruffled paper runner idea popped into my
head as I was thinking about how to style and decorate my table for
Thanksgiving. I wasn't sure it would work, but am very pleased that it did and
I get to share the process with you!
It's time for
Thrifty Style Team and this month we're celebrating Thanksgiving! We're
a group of bloggers who love to decorate and DIY on a budget. All the ideas
below are thrifty, which saves your wallet for other things! Thank you to
Julie of Redhead Can Decorate
for being our trusty pilot each month! Have fun reading my paper runner
tutorial and then please visit the other DIYs, decorations and recipes linked
below.
How to Make a Pleated Paper Table Runner
You can make a pleated paper table runner with simply a roll of butcher paper,
scissors and hot glue. I've had a
roll of butcher paper
from Target Dollar Spot in my craft stash for awhile now. I wanted to make a
paper table runner, but I thought why not step it up a notch? Why not see if I
could make paper pleats or ruffles to add a little extra something special to
the table runner.
It was actually quite easy and I can't wait to share how I did it below!
You'll need to first measure the length of your table, as well as the drop you
want on each ends. Cut your butcher paper to the length that you need for your
dining table. Mine was around 90" so yes, it's a lot of paper!
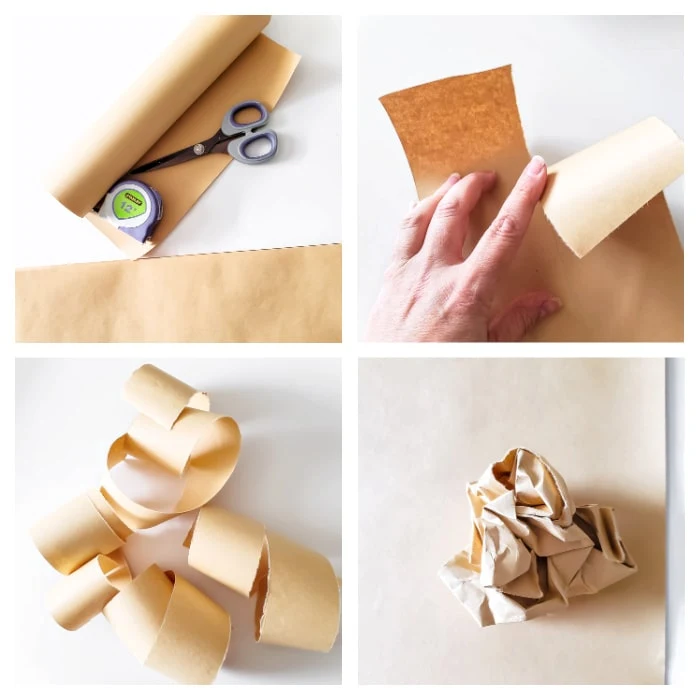
Step One - Prepare paper strips
Measure the width of your paper roll (mine was 12") and multiply by 3ish. It's
not an exact science but you do want it to be at least
twice the width (I cut mine around 30"). Cut a strip of paper to that
length.
Next you're going to cut 4 strips of paper from the length you cut. I found it
easiest to fold the paper along the middle (use a thumb nail to really press
that fold) and then carefully tear the strip along the fold. Of course, you
can cut it with scissors.
Repeat this to make two more strips of paper. Your 4 strips of butcher paper
should all be the same length and width.
The paper will want to curl up because it's been rolled. Rather than fight it,
go ahead and crumple the strips up. Just make a crumpled ball of paper, but be
gentle not to rip it!
Step Two - Glue paper pleats to runner
Gently uncrumple paper strips and press flat with hands. Hot glue the edge of
one strip to one of the runner ends. I taped my runner end to my table to keep
it in place while I added the ruffled pleats. Glue the paper strip about an
inch above the edge of the paper runner. Use your fingers to press the edge of
the paper into pleats and hot glue them in place. Continue making pleats in
this way across the width of the runner.
If you want to make a double ruffle, use another strip of paper and repeat the
process, gluing the second pleated ruffle above the first. Repeat these steps
with the last two paper strips on the other end of the runner.
Step Three - Glue a fabric pleat in place
I had some long strips of coffee stained drop cloth leftover from my
Primitive DIY Sunflowers
and decided to use it to cover the edges of the pleated paper ruffle. You can
find out how I stained the fabric by visiting the link.
I created the fabric pleats in the same way and hot glued them into place just
above the edge of the top paper ruffle.
Your paper table runner with pleated ruffles is now complete and ready to use on
your table! If you have a
Silhouette or Cricut machine and want to add the Thanksgiving sentiment, follow the steps
below.
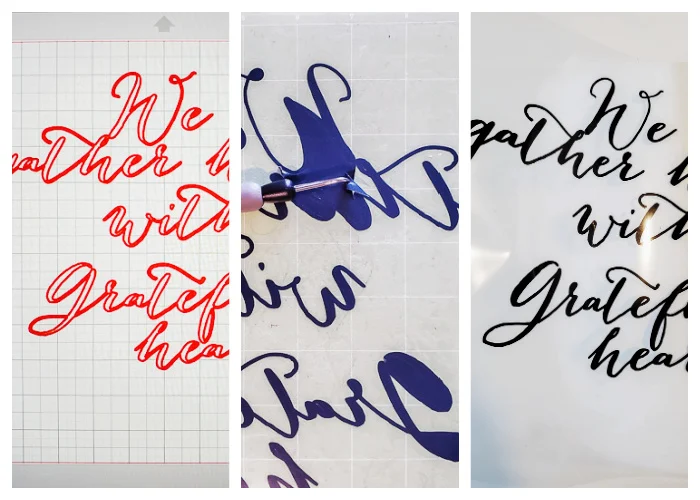
Step Four - Cut HTV vinyl Thanksgiving sentiment
I created this Thanksgiving sentiment on my computer and cut it onto
black Heat Transfer Vinyl. I'll provide this cut out/printable below if you'd like to use it.
Why not use regular vinyl?
You could try using regular craft vinyl; however, I wasn't sure how it would
stick to the butcher paper. The HTV is sealed with heat and I thought it would
be easier to do. Plus there's no worry of the backing paper sticking when you
peel it off.
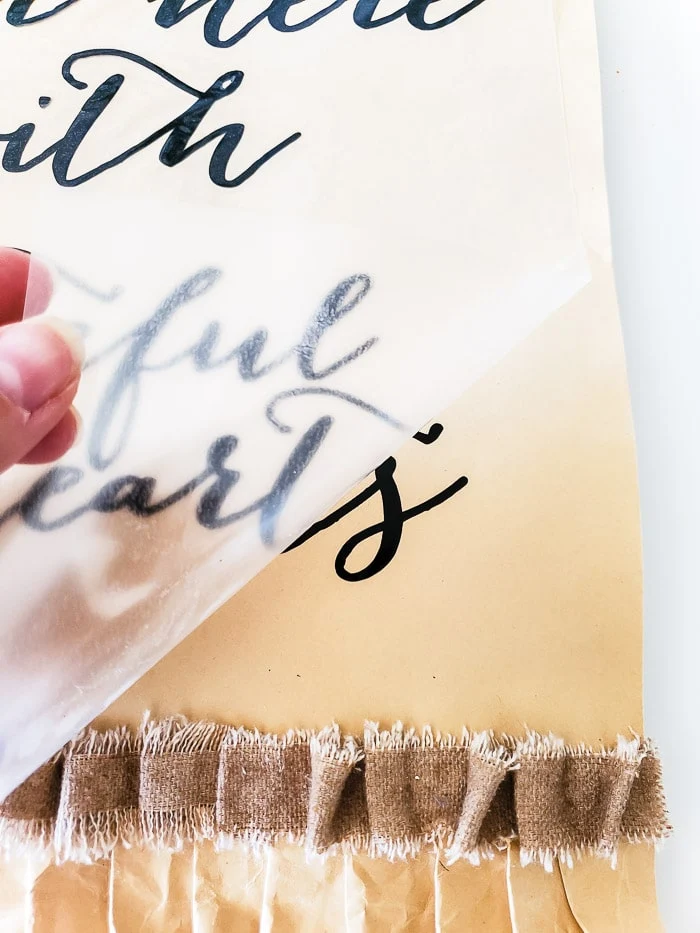
Step Five - Iron sentiment to paper runner
I used my
Cricut EasyPress*, heated to 275°, and ironed the Thanksgiving gratitude sentiment to one end
of my paper runner. You want to make sure to use a
pressing sheet in between the heat press and the paper runner! This will help to
prevent it from scorching.
*This is a great product to add to your Christmas list! It's currently more
than $40 cheaper than when I purchased mine 4 years ago! I use it for any
type of ironing I need to do, both for crafts and regular.
I let the plastic backing cool and then gently peeled up the backing paper. It
worked so well!
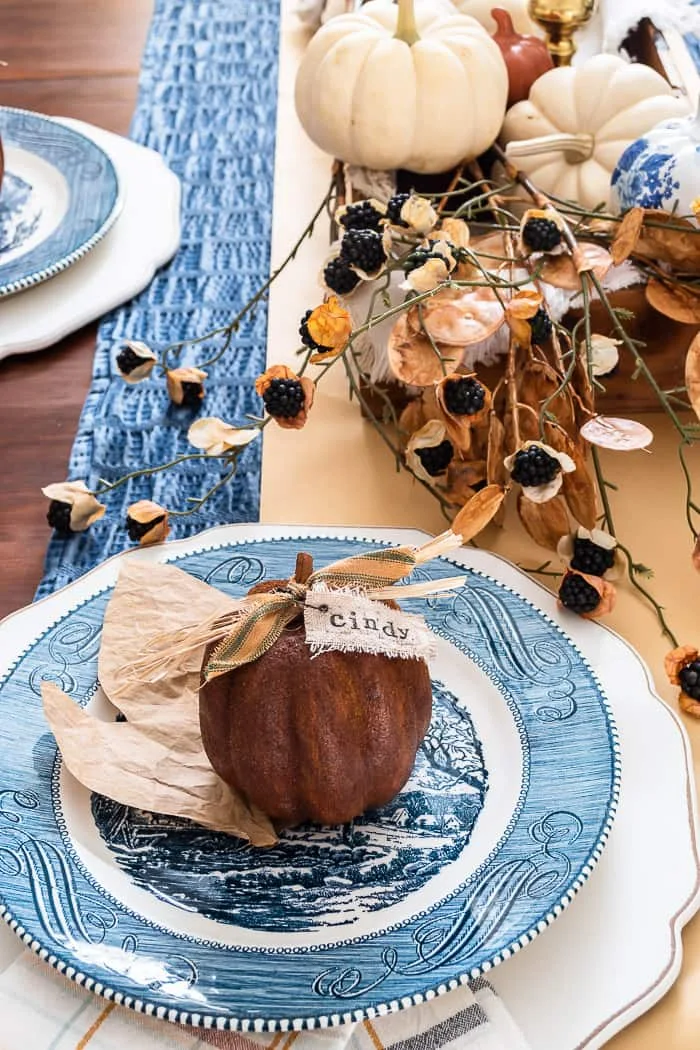
I used my pleated paper table runner down the center of my Thanksgiving table!
I laid down a blue fabric runner (see similar
here) first, it gives more weight to the center of the table and adds more blue!
Plus, I just love the look of layered items, it adds interest and texture!
Isn't it beautiful? I did have to move the end chair to the side so you could
fully appreciate the pleated paper runner. I love that everyone can see it as
we're gathering around the table to celebrate all our many blessings!
I am going to try carefully rolling the paper table runner to store after
Thanksgiving! It should be fine, as the
brown paper bag leaf garland
I made last year stored beautifully!
The centerpiece didn't change much from my
Fall dining table. I just added my
blue and white DIY porcelain pumpkins
that I made from dollar store pumpkins. I also tucked in some faux blackberry
stems from Hobby Lobby. When we lived in Oregon, blackberries grew wild in the
ditches and parks, and we have many, many family memories of picking
blackberries together (including lots of scratches!) so I was excited to find
these!
Free printable
If you'd like the free printable Thanksgiving sentiment "We gather here with
grateful hearts", you can access it
HERE. If you have a die cut machine, you can upload it and then resize as needed
(remember to mirror design before cutting!).
If you don't have a diecut machine but would like to use this design as a
printable, save it to your computer. Then simply print it full size onto
regular copy paper, pop it into a frame and display!
As always, my printables are free for your home use and not to be used for
profit.
Support my site - PIN this image
More Thanksgiving Ideas from the Thrifty Style Team
bringing beauty to the ordinary,










Cindy - this is the best idea! I love how creative you are...and this runner is proof. Happy Thanksgiving, friend!
ReplyDeleteThank you sweet friend! Happy Thanksgiving to you xx
DeleteOk Cindy, you are so darn creative! You had me at ruffle! Beautiful my friend!
ReplyDeleteThank you Kelly, I haven't met a ruffle I don't like either LOL xx
DeleteSeriously, this is so stinkin' cute!! Another great project Cindy!!
ReplyDeleteThanks Jennifer, I truly appreciate that xx
DeleteCindy...this idea is crazy cool. I seriously thought that was fabric. I can't sew, so this would be perfect for me. You are so talented!!!! HAPPY TG!!! Love, Julie
ReplyDeleteThank you Julie!
DeleteCindy I love this cute idea and how it looks with your blue and white, such a great and unique idea. So happy to be part of the Thrifty Style Team with you.
ReplyDeleteThank you Sonya so happy you're part of the team!
DeleteCindy, this turned out absolutely darling! I love fun runners and this one can't be beat. Happy Thanksgiving to you and yours! xoxo, kristi
ReplyDeleteThank you Kristi, have a wonderful Thanksgiving!
DeleteI'm featuring you when the next To Grandma's house we go Wednesday link party starts! Thank you for sharing with us!
ReplyDeleteCindy, what an absolutely amazing Thanksgiving craft! The pleats definitely take it up a notch. It looks so pretty on your tablescape. The beautiful blue layered runner looks great with it. Happy Thanksgiving!
ReplyDeleteThanks so much Michelle, so happy you like it!
DeleteGORGEOUS table runner, Cindy! I’d love for you to join us over at the Creative Crafts Linky Party every Wednesday through Sunday
ReplyDeletehttps://creativelybeth.com/creative-crafts-linky-party/
Followed and Pinned! 🙂
Creatively, Beth