DIY Oversized Boxwood Wreath
Learn how to use multiple types of faux boxwood greenery to make a stunning and very affordable oversized wreath to display inside (or outside) your home!
This post may contain Amazon or other affiliate links. As an Amazon
affiliate I earn from qualifying purchases.
My full disclosure policy can be found here.
Hey friend. Are you looking for budget-friendly ideas to decorate your home? This DIY faux boxwood wreath is beautiful, large, and inexpensive to make! Don't worry, I'll walk you through all the steps.
Boxwood is a popular greenery to use in home decorating, both real and faux.
If you don't have a boxwood bush in your yard that you can clip to make a real
boxwood wreath, this faux boxwood wreath is easy to craft! The best part of a
faux wreath is you can use it for years to come.
Welcome to Pinterest Challenge, a monthly series hosted by
Cindy of County Road 407. We are a group of home decor bloggers, and every month we take on a new
challenge.
The idea is to use what we have, and use the inspiration picture as just
that - inspiration!
It's always fun to see the variety we have each month. You'll find the links
below to see how the team is using wreaths. If you are visiting from
County Road 407, don't you love all the ideas Cindy shared for decorating with a boxwood
wreath?!
Inspiration boxwood wreath
Our PINspiration image this month comes from
Courtenay at The Creek Line House. Courtenay made a boxwood wreath using greenery she clipped from her yard.
It's a beautiful, full wreath and will last for about 3 months. This is such a
beautiful wreath to hang on your door right into Fall!
How to make a faux boxwood wreath
I wish I had a boxwood shrub in my yard but I did have the supplies already on
hand to create a faux boxwood wreath, and rather than just making a regular
sized wreath, I went BIG! This oversized wreath makes a fun statement, and it
wasn't any more difficult than a regular sized wreath. Our front door is 9
feet tall, so it needs a wreath that has some presence.
TIP: separate one grapevine wreath into multiple wreath bases
I always separate my store-bought grapevine wreaths so I can make a wreath the
exact size I want. Wreath forms can be expensive, and this is a cost-effective
way to get many forms for the price of a single one. To find out more about
making your own custom sized grapevines wreaths,
watch this short video.
Gather supplies
I went through the greenery drawer in my recently
painted and labeled dresser
(whose sole purpose is to store my faux florals and greenery), and
pulled out two varieties of boxwood that I already had. I also used a 20"
grapevine wreath base that I made. If you don't have your supplies already on
hand, I've included some shopping links below.
Supplies needed
- grapevine wreath base
- faux boxwood (see similar HERE and HERE)*
- paddle wire
- wire snips or heavy duty scissors
* faux boxwood looks quite similar to faux eucalyptus (the small leaves),
so feel free to interchange them
Why should I use two different colors of boxwood?
As you can see in my supplies picture, I have two different varieties of faux
boxwood. There's a lighter green and a darker green. I like to use different
colors and varieties for the following reasons:
- It keeps the wreath from looking too plastic-y because it adds dimension to the wreath.
- It adds interest and variety to the faux wreath.
- It can be more cost effective to use a less expensive greenery to act as filler.
- An oversized wreath can feel very one-dimensional unless you add a variety of greenery.
Steps to making a faux greenery wreath
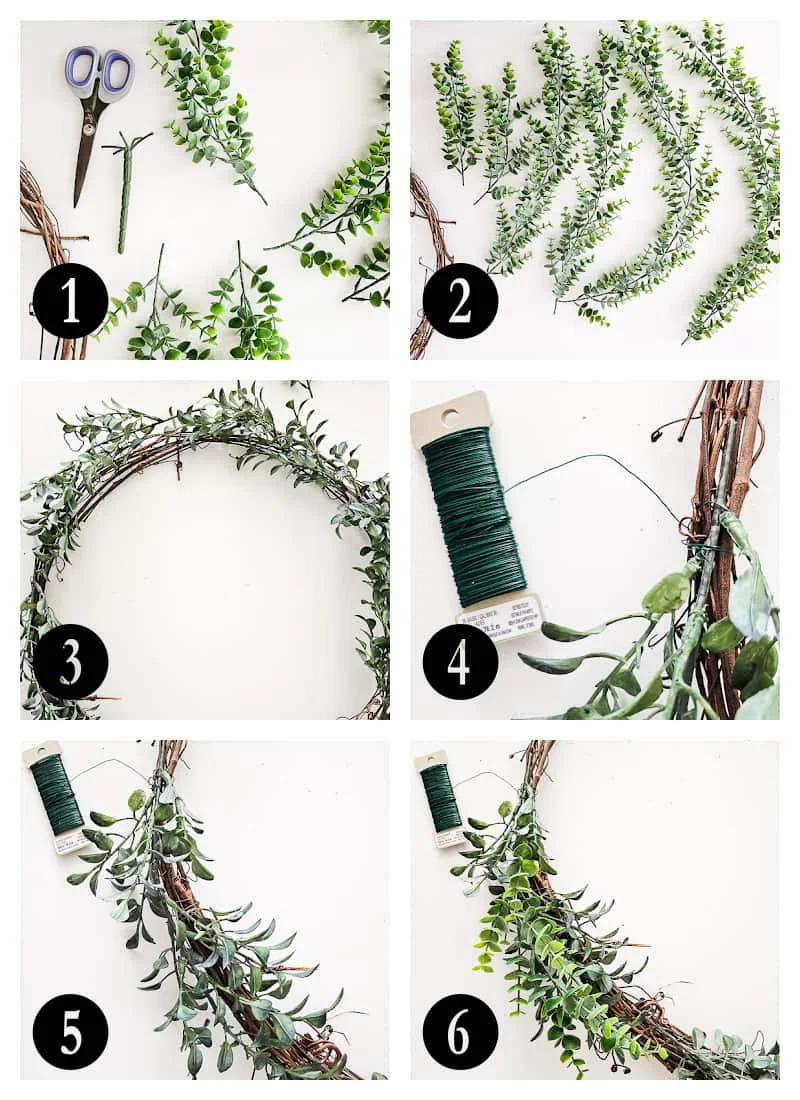
1. Prepare greenery
Some of my greenery is growing together as a hanging bush. You will want to
separate the faux boxwood into smaller pieces to make it easier to work with
and spread it out. I used heavy duty scissors to snip individual pieces off
the main stem. See the numbered pictures below for reference.
3, Do a dry fit
Make sure you have enough greenery before you begin attaching it to your
grapevine base. Simply lay pieces along the wreath, overlapping the stems
slightly with the leaves of the next piece to see if you have enough.
4, Wire greenery to base
Once you've established that you have enough greenery for your wreath, secure
your first stem to the grapevine by winding the wire a couple times around it.
Leave about a 2" tail at the back of the wreath, and pull the wire snuggly to
ensure the greenery is securely attached. Twist the tail of the wire around
the other wire to secure it.
Don't cut the wire!
I find it easiest to leave the wire attached to the paddle as you're attaching
greenery to the entire base. Moving on, tuck the clipped end of the next piece
underneath the previous piece so they're overlapping.
Tip: if possible, tuck the snipped end of the greenery into the grapevine
base to completely hide it!
5. Layer greenery
As far as mixing the two types and colors of boxwood, I found it easiest to
add the darker boxwood first. Think of it kind of as the filler. Then I wired
a piece of the lighter green boxwood on top of the first (see the last two
pictures in the above collage). The second piece of greenery adds fullness and
hides the imperfections of the bottom layer.
Tip: Rather than wrapping wire overtop of the greenery, use your fingers to
lift the top pieces out of the way, and wire the bottom stem to the
grapevine base. This keeps the wreath natural looking and loose on the top,
and you won't see any wire on the finished wreath.
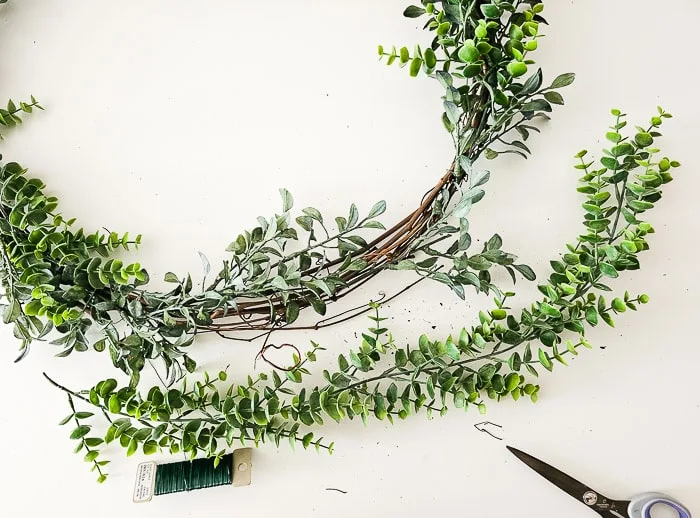
Continue around the wreath until you meet up at the beginning piece of
greenery. As you can see below, I needed to cut my last piece down because it
was too long. I then used those couple pieces of leftover boxwood to fill in
some thinner areas of the wreath. For those individual piece, I snipped a 4"
piece of wire and wired the greenery right where I wanted it.
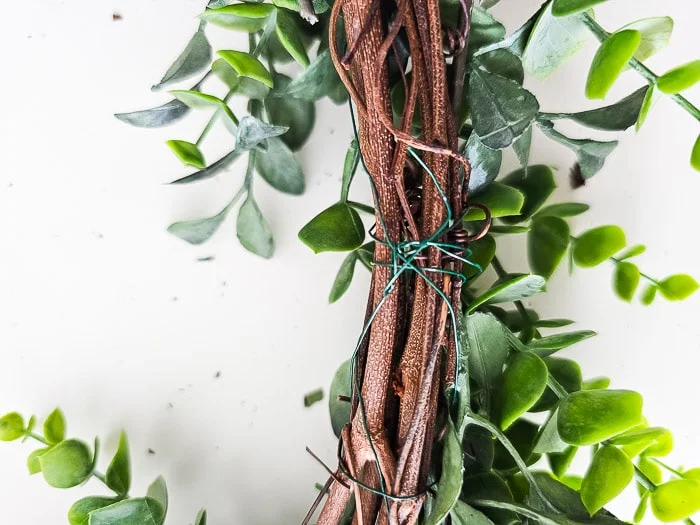
To finish off the wire, snip a couple of inches and twist it around the
previous wire at the back of the wreath so it's secure. I like using the green
wire because it's virtually invisible from the front!
Are you ready to see my finished oversized faux boxwood wreath? I'm really
pleased with it and I styled it in a couple of different places to give you
extra ideas!
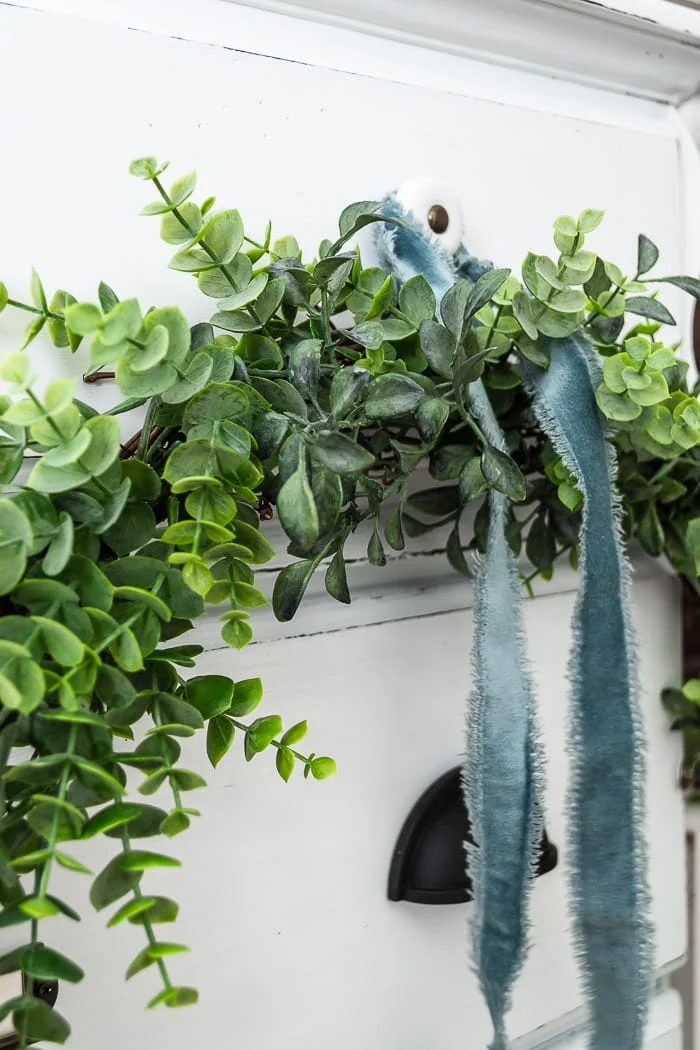
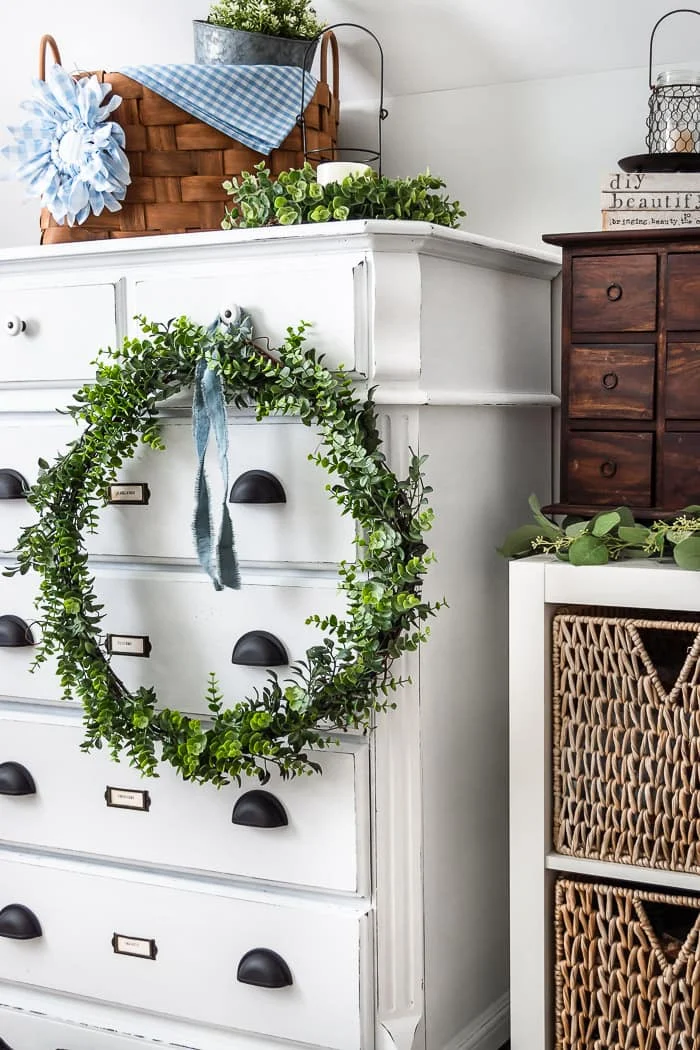
Hang a wreath from a dresser
I've done this before and I love the look of a wreath hanging from the front
of a vintage style upright dresser! If you use the dresser often, this may not
be practical for everyday use, but it sure is pretty ❤
The wreath is simply hanging from a dresser knob with a length of blue velvet
ribbon. See how the two different colors of greenery work together and add
dimension to the wreath?
Make a fuller wreath
This is not a full wreath because I didn't have enough greenery, but I'm still
perfectly happy with the skinny version 😉 If you want a fuller look to your
handmade wreath, you can simply wire additional strands of greenery to the
outside edge of the grapevine base.
I'm using a smaller boxwood wreath on top of the dresser. I laid it flat and
inserted a candle. This is another great way to repurpose a smaller wreath and
makes a candle look extra special.
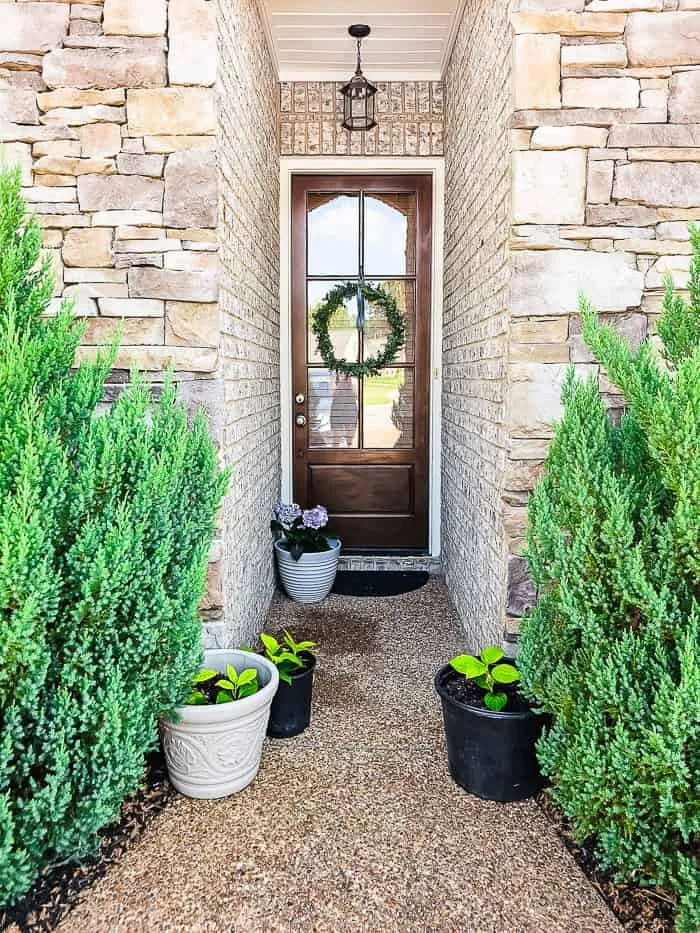
DIY boxwood wreath on front door
Here is the wreath hanging on our front door. I like that it's large enough
for the dimensions of the door. The door feels tall and skinny, and the wreath
is oversized and skinny, lol! I've mounted a
bronze outdoor Command hook
on the door and hung the wreath from it. This hook has stayed put for the year
we've lived in this house, even with our extreme humidity!
If you're wondering what's in all the pots, I am propagating hydrangeas from a
friend's yard! This area at the front door gets shade, which hydrangeas like.
They seem to be happy and growing! Let me know if you want more information on
how I've done this.
Love it? Pin to save!
More DIY greenery wreath ideas
- DIY boxwood topiary
-
How to make a fresh herb wreath
-
5 minute greenery wreath
-
Eucalyptus heart shaped wreath
-
Fresh magnolia DIY wreath
Let's see what the rest of the team has come up with this month! Marty of A
Stroll Thru Life is next and I can't wait for you to see her
Late Summer Early Fall Door Wreath. Click on the links below to visit each idea.
bringing beauty to the ordinary,

-min.jpg)







What a great wreath --- and post! Yes, your gorgeous door needs a large, thin wreath!!! And your tip about the two colors is spot on!
ReplyDeleteThanks so much Diane! And welcome to the team :)
DeleteSuch a pretty wreath. I adore the touch of blue in the ribbon!
ReplyDeleteThank you Laura, that blue velvet ribbon is my favorite!
DeleteExcellent tutorial Cindy! Wow your wreath is just perfect for your pretty door! Pinning!
ReplyDeleteThank you Michelle!
DeleteGreat tutorial for making my own wreath. I love that you used two colors of boxwood also, makes it look so interesting and natural.
ReplyDeleteI appreciate that Marty, thank you!
DeleteI knew this was going to look amazing! I absolutely love how it turned out. What I love the most is that its not overloaded. Just perfect. pinned
ReplyDeleteThank you!
DeleteYour wreath is so pretty, Cindy and it looks perfect on your front door!
ReplyDeleteThanks Kim, a new wreath is always so much fun to decorate with!
DeleteThis turned out beautifully, Cindy! I love it hanging on the dresser. Great tutorial, too!
ReplyDeleteThanks so much!
DeleteYour wreath is absolutely stunning. I love how delicate it is. I need to make one. Hugs to you.
ReplyDeleteThank you Renae, I appreciate it!
DeleteCindy, your wreath is gorgeous!! I love how you hung it on your dresser with the beautiful blue ribbon. You have inspired me to make one of my own!
ReplyDeleteOh that's great to hear Lynne! Always happy to inspire!!
DeleteCindy, I love the oversized wreath! Perfect!
ReplyDeleteThanks Tammy!
DeleteThe blue ribbon is the perfect touch, what a great tutorial Cindy, thank you! Tanya @twelveoeightblog.com
ReplyDeleteThank you Tanya!
Delete