How to Update the Padding on a Wood Stool
In this tutorial, learn how to remove and change the padding on a wood stool seat for an updated look.
This post may contain Amazon or other affiliate links. As an Amazon
affiliate I earn from qualifying purchases.
My full disclosure policy can be found here.
If you have a wooden stool that needs a new, comfy padded seat, it's much
easier than you might think, and can be completed for under $15!
The grungiest stool
I found the grungiest stool at Goodwill, and decided to buy it! It really
had nothing going for it, except that it was wood! The plan was just to
remove the yucky fabric and paint the stool, but I ran into some issues and
had to repad the entire seat!
Thankfully this project is an easy one, and even if you're an amateur DIYer, you can do this! I'll walk you through all the steps to a pretty new and updated stool cover.
How to Replace a Padded Stool Seat
So, I'm betting than if you had walked by this stool at Goodwill, 99.9% of you
would have walked right by! Not me, ha! Why did I buy it? Well,
I was looking for a stool to use at my craft table in my office, and it was
only $7.99. I thought I could just remove the cover, slap a new coat of paint
on it and I'd be done.
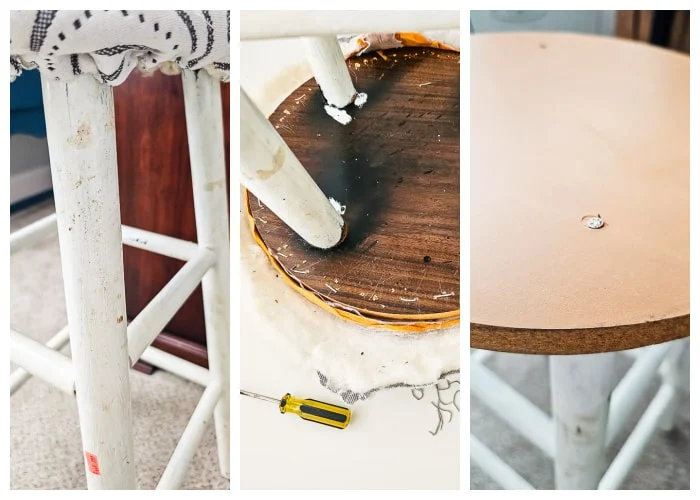
Screws in the seat!
This stool was dirty, grungy, had an old yucky cover and, like I discovered
when I removed the cover and padding, I wasn't going to be able to just paint
the seat. It had screws in the top and nobody wants to sit on that, so I had
to put new padding on it.
This 30 minute paint job turned into a 2 hour makeover. Now that it's done, I
love it! A fresh coat of paint and flirty new ticking stripe cover gave this
wooden stool all the charm it could handle!
Removing a stool cover
Before I could add the pretty, it had to get a little messy! This process is
the same whether you're working on a stool or
replacing the fabric on a dining chair.
Steps to remove a stool cover:
- Flip the stool over onto a sturdy tabletop.
- Use a staple remover and pliers to pull out all the staples that are holding the fabric and old padding in place.
- Clean the grime with a degreaser, like Totally Awesome.
- Paint stool with a new coat or two of paint (I like to use chalk paint because it will cover even glossy old paint with no sanding necessary - the color I used was Lace).
Tips: when you're working with a grungy piece, I always like to wear
disposable gloves, and even a face mask to protect myself.
Make a new padded stool seat
I'll admit I was dreading this process, but it was easier than I expected,
which is always a bonus!
Before you go to the craft store, you'll need to measure your stool seat and purchase padding. I bought both 1" foam, as well as natural cotton batting from Hobby Lobby. You will also need to purchase fabric to cover the seat. This will be the fabric that is seen, unless you opt to sew a ruffled stool cover, like I did.
Steps to add padding to a stool seat:
- Trace stool seat onto foam and cut out with scissors.
- Do a dry fit to make sure the foam adequately covers the stool. I doubled my foam but this isn't necessary.
- Cut a square of batting large enough to cover the seat, with excess that wraps under the stool.
- Cut fabric large enough to cover seat, with excess that wraps under stool.
- Center stool seat, with foam, then batting, then fabric (in that order) on top of the fabric 'sandwich'. See pictures below for details.
- Starting at one end, pull fabric tight and staple with a heavy duty staple gun. Do the opposite side, then the two sides before filling in between with heavy duty staples.
- Cut excess fabric with scissors.
Tip: be sure to pull fabric taut before stapling, and work your way
around stool in small sections.
At this point, your stool seat is finished, yay! Test out the new padding
for comfort and pat yourself on the back for a job well done!
Important note: If you aren't planning to make a stool slipcover, you'll
want to staple your fabric a little further away from the edge than I did.
If you zoom into the below pictures, you can see the edge of the fabric
peeking out from the bottom.
If this tutorial helped save your stool from the curb, please let me know!
As always, I love to hear about your success with my tutorials.
Please Pin to Save
Other tutorials featured in this post:
bringing beauty to the ordinary,


Comments
Post a Comment
Your comments are like sunshine and chocolate! Thanks for taking the time to leave a nice one ;) I read all comments and love to respond. If you don't have Gmail, please leave your name!