Chunky Cotton Knit Scrubbers for Beginners
Small cotton scrub cloths that knit up fast and easy, perfect for beginners! Add a stack near your sink. You'll love their small size and cleaning power!
This post may contain Amazon or other affiliate links. As an Amazon affiliate I earn from qualifying purchases. My full disclosure policy can be found here.
Here we are in 2024! My home is still a hot mess, with Christmas partially dismantled. I'm taking the decor down slowly because my back has been giving me issues for the last several weeks.
I needed a quick project that I could whip up, and with my desire to clean and organize after the chaos of the holiday season, these little knit dish scrubbers seemed like just the ticket. They satisfied my desire to create, and with my winter kitchen refresh (look for my tips in a few days), seemed like a great way to keep my kitchen clean!
No more smelly dish rags!
I hate having a smelly dish rag anywhere in my kitchen, so I tend to reach for paper towels instead. However, I love the look of a stack of pretty and neutral handmade cotton knit dishcloths near the sink, and we even enjoy using them as face cloths! These cotton cloths are more budget and eco-friendly than paper towels, and they wash up beautifully.
If you're like me, you learned to knit cotton dish cloths using Sugar 'n cream cotton yarn and the instructions on the label back for their knit dish cloth. My version is just as easy, and I'm sharing 3 simple patterns with you.
I should probably mention that I knit like maybe twice a year, if that! Definitely no expert over here! So if I can make these, you can too, and probably yours will look better than mine lol!
Despite a certain amount of wonkiness, I managed to crank out about six of these little hand-size scrubbers in no time, and I've got the full tutorial and supplies list below. You might be surprised at where I found my cotton yarn, I know I was!
Why you'll want to make these chunky kitchen scrubbers:
- they're inexpensive
- they're eco-friendly
- they're quick and easy
- they'll add homespun charm to your counters
- they're easy to wash and dry
How to knit chunky cotton dish scrubbers
Let's talk for a sec about the supplies. Now, I'm such a non-expert knitter, that I have no idea what size needles I used. I just used what I have (they're not marked), and I like using circular needles.Supplies:
- 3 skeins cotton yarn (see similar HERE and HERE)
- circular knitting needles (this set has several sizes, is under $10, and includes a couple of large-eye needles)
- scissors
- large-eye blunt needle
Like I mentioned above, I found cotton yarn at a surprising source - Dollar Tree! They didn't have many colors, but I grabbed a few balls of the cream color because I love my neutrals!
You will need 3 balls of whatever color yarn you're using to make your kitchen scrubbies. That's because we're going for chunky cloths, so we'll be knitting 3 yarns together. If you want to try making them with a single strand of yarn, they will still be cute, but more floppy, without that extra scrubbing power!
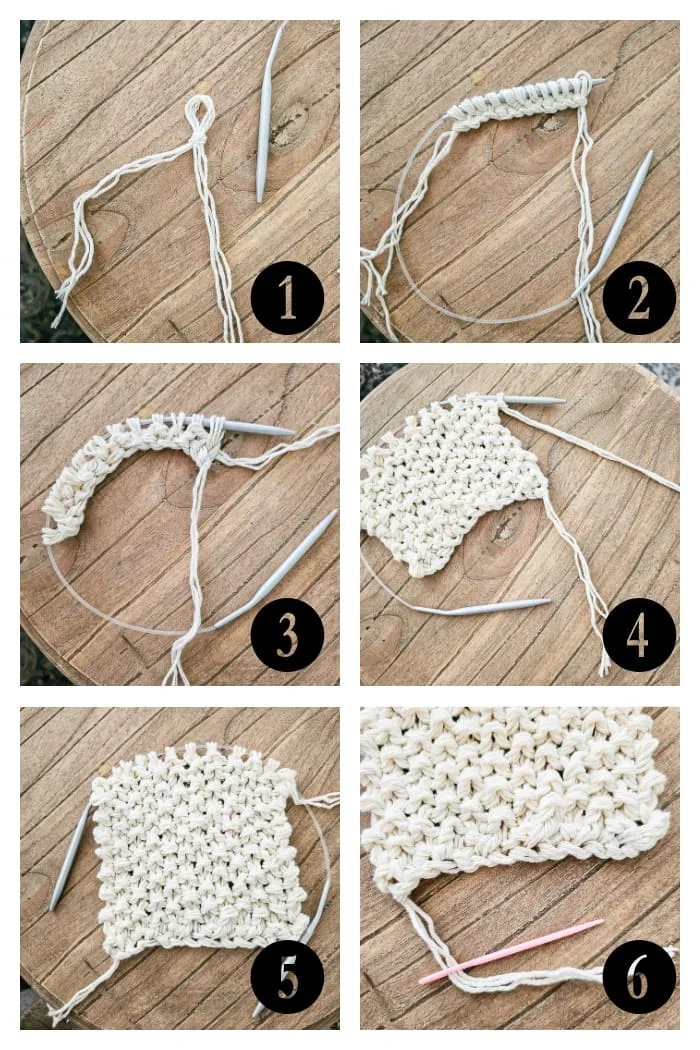
As I've already told you, I don't knit often, but I did take step by step images to show you how these come together. I'll explain the steps below, and then show you what the finished scrubber looks like with 3 different varieties to make.
I apologize if these instructions seem rudimentary to you. I'm a novice knitter, so I wrote these for someone who is just starting out as well, including tips that were helpful to me when knitting these.
A couple notes about knitting with 3 strands of yarn:
- you will grab the end from 3 balls of yarn and knit them as one strand
- it might take a few tries to get it right, my fingers were rusty and I kept missing a strand or grabbing an extra piece (and keep in mind that each single strand of yarn is made up of several pieces!)
- it's important to try to knit with a loose, even tension; I tend to knit with tight tension, which can make it harden on yourself!
- the finished size will depend on your tension, as well as the pattern you use; if you're aiming to have scrubbers that are the exact same size, I recommend making them all using the same pattern
Step 1 - slip knot
Start by grabbing the ends from three balls of yarn and tie a slip knot, leaving several inches.
Tip - to keep the yarns from tangling, I found it easiest to have the yarn balls on the ground at my feet.
Step 2 - cast on
Cast on 12 stitches. If you're new to knitting (or like me, it's been awhile), you might need a couple tries. Knitting with three strands can be a little tricky when you're doing it for the first time.
Step 3 - knit
Below, I'll share the three different patterns I used. But if you're just getting started, simply knit every stitch.
Tip - aim for a loose tension, which will make working with three strands much easier.
Step 4 - TIP for when you need to step away
One of the patterns I knitted involves starting every row with either a knit or a purl stitch. I found I was forgetting which one I had already done (especially if I had to put the piece down to go do something else), and messed up several times until I discovered this trick! You might need to refer to the picture above in step 4, but notice how the threads from tying the slip knot are on the right hand side? That means that the row I'm knitting next starts with a purl stitch. When the threads are on the left, it means I need to knit.
Step 5 - how to know when you're done
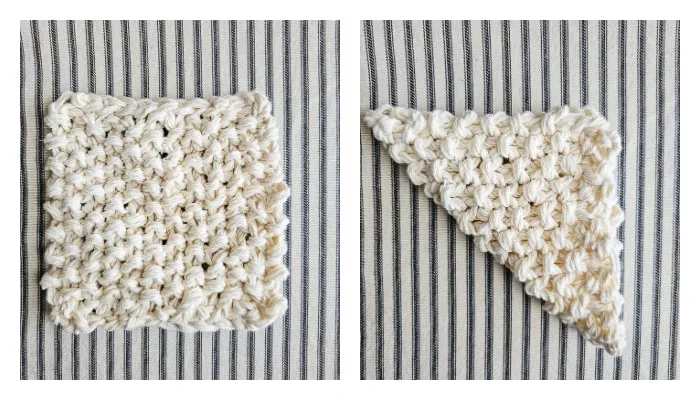
I haven't mastered counting rows of knitting yet, so here is my lazy girl's trick to knowing when to stop. When your knitted piece looks like a square, fold the bottom edge up on the diagonal until it meets the opposite corner. If the sides are even as well, it's finished. See below.
Step 6 - cast off and knit ends
Cast off and use the large-eye needle to hand stitch the ends into the cloth. You can tie a knot if you like, but try to pull it so it's invisible in the middle.
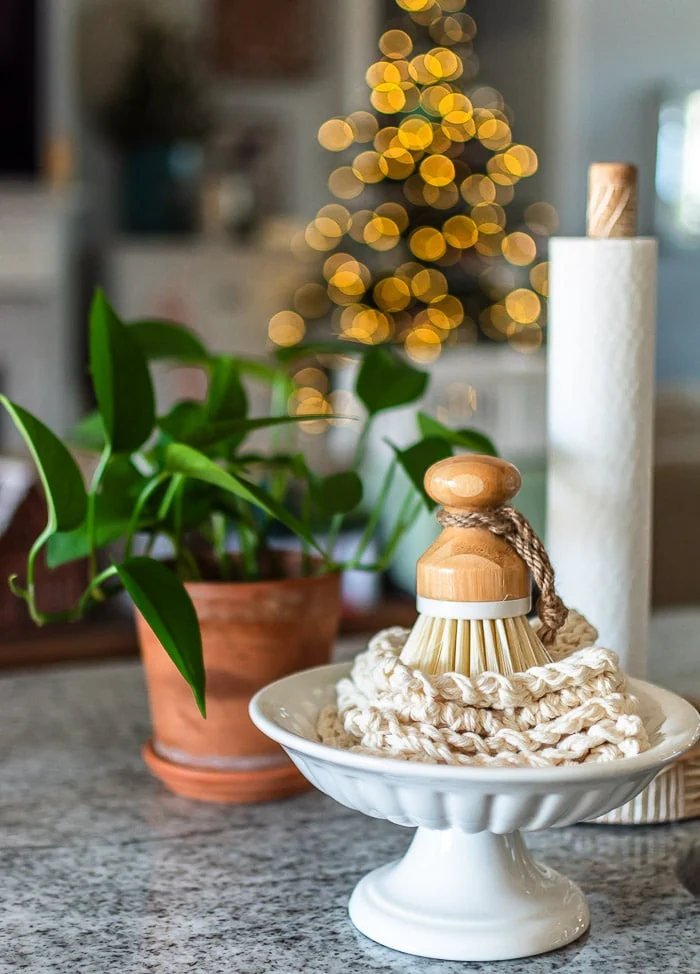
I really like a pile of these stacked in a bowl or pedestal near the sink, it makes it easy to grab a new one every day!
3 Different Patterns
I like variety, so I chose to knit three different patterns. Each one starts off by casting on 12 stitches, just to make it easy.1. Knit - Garter Stitch
Just so you know, I did have to look up the names for these stitches, haha! By far the easiest knit scrubber is made by simply knitting every row. These ended up being my smallest scrubbies and also the thickest. I'm going to make a few more, and try to keep the tension a little looser.
2. Seed Stitch
This pattern is made by alternating knit and purl stitches to create little bumps.
- Cast on 12 stitches
- knit 1, purl 1 (repeat to end of row)
- purl 1, knit 1 (repeat to end of row)
- repeat this pattern until scrubber is complete
- cast off
This is where the trick in step 4 really comes in helpful! Repeat until you have the size you want. I think this ended up being my favorite pattern, it was also the largest finished size scrubber.
3. Basketweave stitch
This pattern when knitted looks like a checkerboard. It's similar to the seed stitch because you will knit and purl.
- Cast on 12 stitches
- knit 3, purl 3 (repeat to end of row)
- purl 3, knit 3 (repeat to end of row)
- continue this pattern until scrubber is finished
- cast off
Cotton dishcloths and scrubbies wash up great, but they will shrink a little in the dryer. I usually don't dry them fully but pull them out while still a little damp. That allows me to stretch and reshape them if I want them to keep their square shape.
Pin to Save
bringing beauty to the ordinary,


-min.jpg)


Love this idea! This will be the perfect Christmas gift for four of my friends this year! I’m going to start early (just received all of the supplies) so that I am sure to finish them before 12/25/24! Just curious, where did you get the dish they are displayed in? Would love to add this, or something similar as part of the gifts. Thank you.
ReplyDeleteThank you so much, what a great idea! I found the pedestal dish at HomeGoods.
DeleteWhat size needle did you use for the dish scrubbies?
ReplyDeleteI'm not sure, it's an old set and the number has rubbed off. I would guess a 5 or 6, and I used circular needles.
DeleteForgot to ask in my earlier post: What is the finished scrubbie size using the Garter Stitch? Thank you!
ReplyDeleteThey are 4-1/4" square
DeleteThank you!
ReplyDelete